


In this two-part article series, we’re building an internet-connected garden bot using JavaScript. In part one, we set up a Particle Core board, created a Johnny-Five project, and ran a Node.js program to read raw values from a soil moisture sensor.
Adding a light sensor
Let’s connect another sensor. We’ll extend our circuit to add a photo resistor to measure the ambient light levels around our plants.
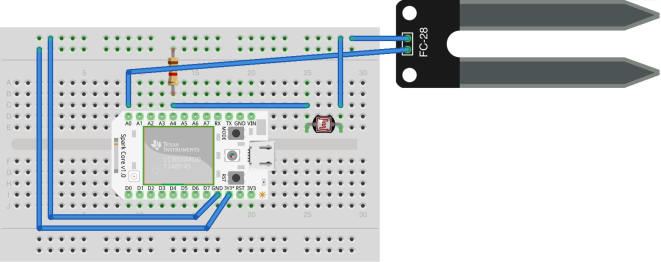
Connect one lead of the photo resistor to ground, and the other to analog pin 4, with a 1K pull-down resistor from A4 to the 3.3V pin.
The value of the pull-down resistor determines the raw readings from the sensor. We’re using a 1K resistor so that the sensor values don’t saturate under tropical sun conditions. For plants kept inside a dark room, or in a less sunny climate, a 10K resistor might be a better choice. Read more about how pull-down resistors work with photo resistors at AdaFruit.
Now, in our board’s ready callback function, we add another sensor instance, this time on pin A4:
var lightSensor = new five.Sensor({
   pin: "A4",
   freq: 1000
});

lightSensor.on("data", function() {
console.log("Light reading " + this.value);
});
For this sensor we are logging the sensor value every second, not just when it changes. We can control how often sensor events are emitted by specifying the number of milliseconds in the freq option when creating the sensor. We can use the threshold config option can be used to control when the change callback occurs.
Calibrating the soil sensor
The soil sensor uses the electrical resistance between two probes to provide a measure of the moisture content of the soil. We’re using a commercial sensor, but you could make your own simply using two pieces of wire spaced about an inch apart (using galvinized wire to avoid rust).
Water is a good conductor of electricity, so a low reading means that the soil is moist, while a high amount of resistance indicates that the soil is dry. Because these aren’t very sophisticated sensors, the readings will vary from sensor to sensor. In order to do anything meaningful with the readings within our application, we’ll need to calibrate our sensor.
Calibrate by making a note of the sensor values for very dry soil, wet soil, and in between to get a sense of what the optimal range of values should be. For an imprecise sensor like this, it also helps to map the raw readings onto ranges that can be used to display different messages (e.g. very dry, dry, damp, wet) or trigger different actions. The scale method on the Sensor class can come in handy for this. For example, we could convert the raw readings from 0 – 1023 to a 0 – 5 scale:
soilSensor.scale(0, 5).on("change", function() {
console.log(this.value);
});
However, the raw readings for this sensor range between about 50 (wet) to 500 (fairly dry soil). If we’re only interested in when the soil is dry, i.e. when readings are above 300, we could use a conditional statement within our callback function, or use the within method so that the function is only triggered when the values are inside a range of values we care about.
soilSensor.within([ 300, 500 ], function() {
console.log("Water me!");
});
Our raw soil sensor values will vary depending on the temperature of the soil, so this type of sensor is best for indoor plants that aren’t exposed to weather extremes. If you are installing a soil moisture sensor outdoors, consider adding a temperature sensor and then calibrate for values at different temperature ranges.
Connecting more sensors
We have seven analog and seven digital IO pins on the Particle Core, so we could attach more sensors, perhaps more of the same type to monitor additional planters, or different types of sensors to monitor additional conditions. There are many kinds of environmental sensors available through online marketplaces like AliExpress and ebay. These include sensors for temperature, humidity, dust, gas, water depth, particulate detection etc. Some of these sensors are straightforward analog or digital devices that can be used directly with the Johnny-Five Sensor class, as we have with our soil and light sensors. The Johnny-Five API also includes subclasses like Temperature, with controllers for some widely used sensor components.
However, some sensors use protocols like SPI, I2C or OneWire, which are not as well supported by Johnny-Five across all platforms. This is always improving, for example, I2C was added to the Particle-IO plugin in October 2015. Keep an eye on I2C component backpacks which are providing support for additional sensors via secondary microcontrollers.
Automation
If you are gardening at scale, or going away on extended vacation, you might want more than just monitoring. You might want to automate some basic garden maintenance tasks, like turning on grow lights on overcast days, or controlling a pump to water the plants when the soil moisture level gets low. This can be acheived with relays. For example, we can connect a relay with a daylight bulb to a digital pin, and use it to turn lights on in response to the light readings, but only between certain hours:
var five = require("johnny-five");
var Particle = require("particle-io");
var moment = require("moment");

var board = new five.Board({
io: new Particle({
   token: process.env.PARTICLE_TOKEN,
   deviceId: process.env.PARTICLE_DEVICE_ID
})
});

board.on("ready", function() {

var lightSensor = new five.Sensor("A4");
var lampRelay = new five.Relay(2);

lightSensor.scale(0, 5).on("change", function() {
   console.log("light reading is " + this.value)
   var now = moment();
   var nightCurfew = now.endOf('day').subtract(4,'h');
   var morningCurfew = now.startOf('day').add(6,'h');

   if (this.value > 4) {
       if (!lampRelay.isOn &&
         now.isAfter(morningCurfew) &&
           now.isBefore(nightCurfew)) {
         lampRelay.on();
       }
     } else {
       lampRelay.off();
     }
});
});
And beyond…
One of the great things about using Node.js with hardware is that we can extend our apps with modules from npm. We could publish an Atom feed of sensor readings over time, push the data to a web UI using socket-io, build an alert system or create a data visualization layer, or we might build an API to control lights or pumps attached via relays to our board. It’s never been easier to program your own internet-connected robot helpers and smart devices using JavaScript.
Build more exciting robotics projects with servos and motors – click here to find out how.
About the author
Anna Gerber is a full-stack developer with 15 years’ experience in the university sector, formerly a Technical Project Manager at The University of Queensland ITEE eResearchspecializing in Digital Humanities and Research Scientist at the Distributed System Technology Centre (DSTC). Anna is a JavaScript robotics enthusiast and maker who enjoys tinkering with soft circuits and 3D printers.


