


Who wouldn’t want an army of robots to help out around the home and garden? It’s not science fiction: Robots are devices that sense and respond to the world around us, so with some off-the-shelf hardware, and the power of the Johnny-Five JavaScript Robotics framework, we can build and program simple “robots” to automate every day tasks. In this two part article series, we’ll build an internet-connected device for monitoring plants.
Bill of materials
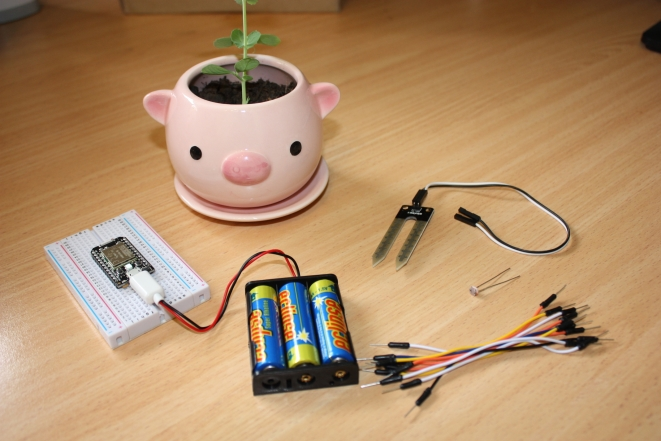
You’ll need these parts to build this project
|
Part |
Source |
|
Particle Core (or Photon) |
|
|
3xAA Battery holder |
e.g. with micro USB connector from DF Robot |
|
Jumper wires |
Any electronics supplier e.g. Sparkfun |
|
Solderless breadboard |
Any electronics supplier e.g. Sparkfun |
|
Photo resistor |
Any electronics supplier e.g. Sparkfun |
|
1K resistor |
Any electronics supplier e.g. Sparkfun |
|
Soil moisture sensor |
e.g. Sparkfun |
|
Plants |
|
Particle (formerly known as Spark) is a platform for developing devices for the Internet of Things. The Particle Core was their first generation Wifi development board, and has since been supeceded by the Photon. Johnny-Five supports both of these boards, as well as Arduino, BeagleBone Black, Raspberry Pi, Edison, Galileo, Electric Imp, Tessel and many other device platforms, so you can use the framework with your device of choice. The Platform Support page lists the features currently supported on each device. Any device with Analog Read support is suitable for this project.
Setting up the Particle board
Make sure you have a recent version of Node.js installed. We’re using npm (Node Package Manager) to install the tools and libraries required for this project. Install the Particle command line tools with npm (via the Terminal on Mac, or Command Prompt on Windows):
npm install -g particle-cliParticle boards need to be registered with the Particle Cloud service, and you must also configure your device to connect to your wireless network. So the first thing you’ll need to do is connect it to your computer via USB and run the setup program. See the Particle Setup docs. The LED on the Particle Core should be blinking blue when you plug it in for the first time (if not, press and hold the mode button). Sign up for a Particle Account and then follow the prompts to setup your device via the Particle website, or if you prefer you can run the setup program from the command line. You’ll be prompted to sign in and then to enter your Wifi SSID and password:
particle setupAfter setup is complete, the Particle Core can be disconnected from your computer and powered by batteries or a separate USB power supply – we will connect to the board wirelessly from now on.
Flashing the board
We also need to flash the board with the Voodoospark firmware. Use the CLI tool to sign in to the Particle Cloud and list your devices to find out the ID of your board:
particle cloud login
particle list
Download the firmware.cpp file and use the flash command to write the Voodoospark firmware to your device:
particle cloud flash <Your Device ID> voodoospark.cppSee the Voodoospark Getting Started page for more details. You should see the following message:
Flash device OK: Update started
The LED on the board will flash magenta. This will take about a minute, and will change back to green when the board is ready to use.
Creating a Johnny-Five project
We’ll be installing a few dependencies from npm, so to help manage these, we’ll set up our project as an npm package. Run the init command, filling in the project details at the prompts.
npm initAfter init has completed, you’ll have a package.json file with the metadata that you entered about your project. Dependencies for the project can also be saved to this file. We’ll use the –save command line argument to npm when installing packages to persist dependencies to our package.json file.
We’ll need the Johnny-Five npm module as well as the Particle-IO IO Plugin for Johnny-Five.
npm install johnny-five --save
npm install particle-io --save
Johnny-Five uses the Firmata protocol to communicate with Arduino-based devices. IO Plugins provide Firmata compatible interfaces to allow Johnny-Five to communicate with non-Arduino-based devices. The Particle-IO Plugin allows you to run Node.js applications on your computer that communicate with the Particle board over Wifi, so that you can read from sensors or control components that are connected to the board.
When you connect to your board, you’ll need to specify your Device ID and your Particle API Access Token. You can look up your access token under Settings in the Particle IDE. It’s a good idea to copy these to environment variables rather than hardcoding them into your programs. If you are on Mac or Linux, you can create a file called .particlerc then run source .particlerc:
export PARTICLE_TOKEN=<Your Token Here>
export PARTICLE_DEVICE_ID=<Your Device ID Here>
Reading from a sensor
Now we’re ready to get our hands dirty! Let’s confirm that we can communicate with our Particle board using Johnny-Five, by taking a reading from our soil moisture sensor.
Using jumper wires, connect one pin on the soil sensor to pin A0 (analog pin 0) and the other to GND (ground). The probes go into the soil in your plant pot.

Create a JavaScript file named sensor.js using your preferred text editor or IDE. We use require statements to include the Johnny-Five module and the Particle-IO plugin. We’re creating an instance of the Particle IO plugin (with our token and deviceId read from our environment variables) and providing this as the io config option when creating our Board object.
var five = require("johnny-five");
var Particle = require("particle-io");
var board = new five.Board({
io: new Particle({
   token: process.env.PARTICLE_TOKEN,
   deviceId: process.env.PARTICLE_DEVICE_ID
})
});

board.on("ready", function() {
console.log("CONNECTED");
var soilSensor = new five.Sensor("A0");

soilSensor.on("change", function() {
   console.log(this.value);
});

});
After the board is ready, we create a Sensor object to monitor changes on pin A0, and then print the value from the sensor to the Node.js console whenever it changes. Run the program using Node.js:
node sensor.jsTry pulling the sensor out of the soil or watering your plant to make the sensor reading change. See the Sensor API for more methods that you can use with Sensors. You can hit control-C to end the program.
In the next installment we’ll connect our light sensor and extend our Node.js application to monitor our plant’s environment. Continue reading now!
About the author
Anna Gerber is a full-stack developer with 15 years’ experience in the university sector, formerly a Technical Project Manager at The University of Queensland ITEE eResearchspecializing in Digital Humanities and Research Scientist at the Distributed System Technology Centre (DSTC). Anna is a JavaScript robotics enthusiast and maker who enjoys tinkering with soft circuits and 3D printers.


