Introduction
Let's face it, in today's business environment, there is only one email client that truly matters. I am not saying it is the best client, or that it offers more features, and I certainly am not saying it is the most secure. What I am saying is that you would be hard pressed to walk into an organization, of let's say more than 10 desktops, and not see users checking their email with Microsoft Outlook.
Zimbra Collaboration Suite offers uncanny support for Outlook including:
- Native Sync with MAPI
- Support for both Online and Offline Modes
- Cached mode operation
- Support for multiple calendars
Here, we will discuss these features and focus on configuring Outlook to work with the Zimbra server. As you will see with a Zimbra back end and an Outlook client, it is transparent to your users whether you are using Microsoft Exchange or Zimbra Collaboration Suite as your back end product. This transparency to users makes the migration from Exchange to Zimbra that much easier in the eyes of your users, especially when it comes to user training. The ability to seamlessly integrate Zimbra and Outlook is one of Zimbra's strongest assets and one of its strongest arguments for making the transition from Exchange to Zimbra.
However, if you want to use the full power of Zimbra (not only the fancy look but great features such as the searches), you should use the Web Client.
We will take a detailed look at Zimbra integration with Outlook, including:
- The Zimbra Connector for Outlook (ZCO)
- A look at Zimbra integration
- Sharing Outlook folders
Outlook uses the Messaging Application Programming Interface (MAPI) to allow programs to communicate with messaging systems and stores. MAPI is proprietary to Microsoft and is key to Zimbra being able to synchronize and work with Outlook. Zimbra uses a connector to facilitate this communication—called the Zimbra Connector—for Outlook.
The PST Import Wizard
One of the beauties of Outlook's integration in Zimbra is that you won't start from scratch: Zimbra gives you tools that are able to import your data (emails, calendars, contacts, etc) either from a concurrent solution's server (Exchange or Domino) or directly from a PST file (the file used by Outlook to store all its data).
We'll have a look at the PST Import Wizard. To download it:
- Log in to the Administration Console at https://zimbra.emailcs.com:7071/.
- Click on the Downloads tab on the left of the navigation pane.
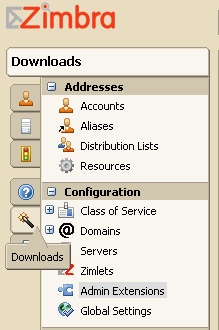
3. In the Content Pane, click on the PST Import Wizard to download the executable file.

4. Save the file to the local computer, or a network accessible shared folder.
5. Double click the .exe file to launch the wizard (there's no installation process).
6. Click on Next on the presentation page.
7. In the Hostname field enter: zimbra.emailcs.com.
8. In the Port field you can leave the default (80) and let the Use Secure Connection box unchecked.
9. In the Username field, enter your Zimbra's user (worker@emailcs.com) and in the Password field your Zimbra's password.
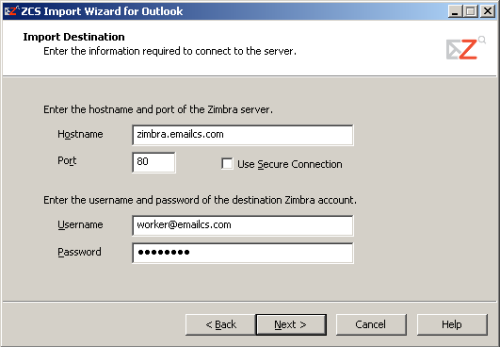
- Click on the Next button.
- You will now have to select the PST file that you want to import into the Zimbra server. The Zimbra Import Wizard helps you as it opens the default Outlook PST's directory when you click on the Browse button.
- Once you have selected the PST you want to import and clicked on the Open button, you can now click on the Next button of the initial window.
- Now, you can choose how your data will be imported:
- Import Junk-Mail Folder: If you leave this box checked, all your spam will be imported to the server and marked as spam on the server.
- Import Deleted Items Folder: With this, the deleted mails will be imported on the server.
- Ignore previously imported items: This option is used when you're importing your data in several attempts. If you leave it checked, the already imported mails won't be imported again.
- Import items received after: Checking this box and choosing a date in the calendar next to it, allows us to do a partial import based on date.
- Import messages with some headers but no message body: You should leave this one checked as it imports some badly formatted mails.
- Convert meeting, organized by me, from my old address to my new address: You need to check this box (and enter your previous email address) if you're getting a new email address on the Zimbra server. If you don't, the meetings will be imported but you won't be the owner.
- Migrate private appointments: This one is your own choice as Zimbra does not handle (yet) the private items; all the imported appointments will be viewable by anyone you share your calendar with.

Once your choices are made, you can click on the Next button.
14. Click OK in the confirmation window.
15. Next window will show you the import evolution (number of items and percentage). You can stop the import at anytime and start again later. Once the import is finished, a window pops up with a summary of the import session.
16. You can click on the OK button of the summary window then Finish in the last window.
The Zimbra Connector for Outlook
The Zimbra Connector for Outlook (ZCO) is a downloadable .msi installable file that must be installed on the desktop in order for Outlook and Zimbra to communicate. To download the ZCO to the client:
- Log in to the Administration Console at https://zimbra.emailcs.com:7071.
- Click on the Downloads tab on the left of the navigation pane.
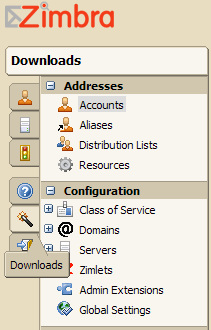
3. In the Content Pane, click on the Zimbra Connector for Outlook to download the .msi installable file.
- Save the file to the local computer, or a network accessible shared folder.
- Double click the .msi file to start the installation process.
- The installation wizard will begin and go ahead and accept the License Agreement and accept all of the defaults.
- Once complete click FINISH.
The ZCO creates a brand new profile within Outlook, called Zimbra. If you had previous profile(s) created on your computer, be sure to choose the "Zimbra" one.
The ZCO is now installed, and the first time we run Outlook on this client, the connector will prompt us for configuration information. Zimbra currently supports Outlook 2003 only.
- In the Server Name field, enter: zimbra.emailcs.com.
- For port leave the default of 80.
- Email address will be the email address for this user. In our case, we will use the Worker Bee with an email address of worker@emailcs.com.
- For the password, enter the same password Worker would use to log in to the AJAX web client.
- Once completed, click OK and Outlook will open Worker's email box.
The ZCO will now sync the Global Access List and will get all the emails from the server locally. It means that if you imported lots of item previously, you might need some time to get them back into Outlook from the server. Luckily, then the sync process happens in the background.
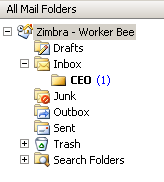
As you can see in the following screenshot, the folders we created in the Web Client are now configured in Outlook.
The first time Outlook is opened, it automatically performs a send/receive with the Zimbra server. After this initial synchronization, there is nothing a user needs to do from then on to initiate synchronization with the server. There is also nothing the user needs to set-up to let Outlook know whether or not the user is Online—connected to the server, or Offline—disconnected from the server. Outlook automatically checks the status and acts accordingly. Therefore, a user need not be connected to the server to work with email that has already been received, check the address book, or work with the Calendar. All changes that the user makes in Offline mode, will synchronize with the server the next time the server is connected and Outlook is online.
At this time, we should take a quick look around Outlook and see how integrated Zimbra really is with Outlook.
Unlock access to the largest independent learning library in Tech for FREE!
Get unlimited access to 7500+ expert-authored eBooks and video courses covering every tech area you can think of.
Renews at $19.99/month. Cancel anytime
A Look at Zimbra Integration
The integration of Zimbra is more than just the ability to send and receive email. Outlook is now acting as the front end to create contacts, appointments, and tasks that will be stored on the server. Let's take a moment to look at each one individually.
Contacts
The easiest way to see the integration of contacts between Outlook and Zimbra is to compose a new mail message, and instead of typing in an email address, click on the TO: button and select Global Address List from the Address Book drop-down menu.
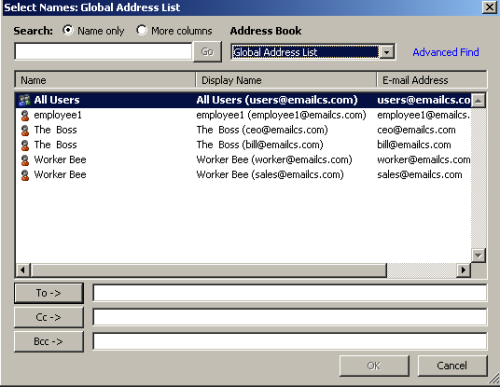
As you can see, this feature looks exactly the same whether you are using Exchange or Zimbra as your back end collaboration server. Users are familiar with this look and feel, and the ability to select users that are within the organization's Global Address List. This list comes directly from the Zimbra server and is maintained there as well.
The user also has the option to select the own personal contact list. This list could be created and maintained either via the web client, through Outlook directly, or both as they will synchronize together.
Appointments
In most work organizations, the ability to create appointments, invite people to attend, and check invitees schedule is a key function of Exchange and Outlook. Luckily for us, the same functionality could be used with Zimbra and Outlook. As seen in the following figure, the process for creating an appointment is exactly the same.
- In the Calendar application, click New --> Appointment.
- Click on the Invite Attendees button.
- Click the To button and select the Global Address List from the drop-down menu.
- Select the CEO from the address list and click OK.
- Click on the Scheduling tab.
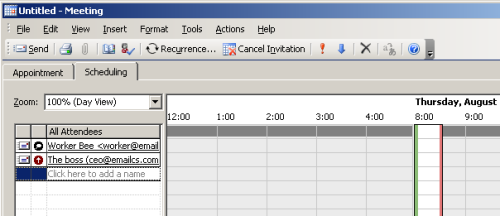
The Calendar is synced with the Zimbra server and is able to check the availability of the users within the organization, a key feature of any collaboration suite.
Once you have found a schedule when all the attendees are free, go back to the Appointment tab, type in a Subject for your appointment then click on the Send button.
The last feature we will look at is Sharing Outlook folders.
Sharing Outlook Folders
Users have the option to share any Outlook folder with users in the Global Address List. Essentially, this is the same ability we covered in an earlier chapter with the Web Client for the Contacts or Calendar. However, here the process is different.
Users could be delegated different levels of access to Outlook folders. These levels include:
| Read |
View items in folder only |
| Edit |
Edit any contents in the folder |
| Create |
Create/add items to the folder |
| Delete |
Delete/modify items in the folder |
| Act on workflow |
Respond to meeting and task requests |
| Administer Folder |
Modify the permissions on the folder |
There are also predefined roles that users could assign to other users in the Global Address List including:
| Administrator |
Has all rights to the folder listed above |
| Delegate |
Has access to all rights except for Administer folder |
| Editor |
Access to Read, Edit, Create and Delete |
| Author |
Access to Read and Create |
| Reviewer |
Read only |
To assign roles and rights to the folder:
1. Right click the folder and click Properties.
2. Click on the Sharing tab.
3. Click Add and select CEO from the Global Address List.
4. With CEO highlighted, select Administrator from the Permission Level drop-down-box.
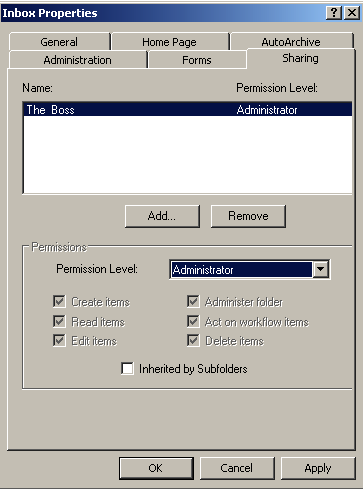
5. With Administrator selected, you should be able to see all of the Permissions selected.
6. Change the Permission Level to Reviewer and you will see that only Read items, is selected.
7. Go ahead and play with the various levels so you can get a feel for the different permissions associated with the various levels.
8. Once complete, click OK.
An email will be sent to the CEO informing him that he now has Administrator access to the Inbox of the Worker Bee.
In order for the CEO to work with the new Shared Folder (the Worker's Inbox in this case), the CEO would simply:
1. Click on File --> Open --> Other User's Mailbox in the Outlook Menu bar.
2. Select Worker from the Global Address List.
3. Once the folder is added to Outlook, click on the Send/Receive button to synchronize the folder.
Summary
The goal of this article was to take a brief look at using the Microsoft Outlook client as a front end to the Zimbra Collaboration Suite. In my experience, users do not like change and they tend to be comfortable with applications they are familiar with. One of the most common objections to changing email systems is that users rely so heavily on their email and contacts that they do not want to have to learn a whole new system to access them.
Hopefully, if I have done my job, you could now see how users need not be afraid of moving to a Zimbra system, because in the end, their everyday life and functionality is not going to change much. They could still use the tool that they are most familiar with, but still have the added benefit of using the AJAX Web Client when they are on the road or away from their desks.
 United States
 Great Britain
 India
India
 Germany
 France
 Canada
 Russia
 Spain
Spain
 Brazil
 Australia
 Singapore
 Canary Islands
 Hungary
 Ukraine
 Luxembourg
 Estonia
 Lithuania
 South Korea
 Turkey
 Switzerland
 Colombia
 Taiwan
 Chile
Chile
 Norway
 Ecuador
 Indonesia
 New Zealand
 Cyprus
 Denmark
 Finland
 Poland
 Malta
Malta
 Czechia
 Austria
 Sweden
 Italy
Italy
 Egypt
Egypt
 Belgium
 Portugal
 Slovenia
 Ireland
 Romania
 Greece
 Argentina
 Netherlands
 Bulgaria
 Latvia
 South Africa
 Malaysia
 Japan
Japan
 Slovakia
 Philippines
 Mexico
 Thailand


