In order to work with Pentaho 3.2 Data Integration(PDI) you need to install the software. It's a simple task; let's do it.
Time for action – installing PDI
These are the instructions to install Kettle, whatever your operating system. The only prerequisite to install PDI is to have JRE 5.0 or higher installed. If you don't have it, please download it from http://www.javasoft.com/ and install it before proceeding. Once you have checked the prerequisite, follow these steps:
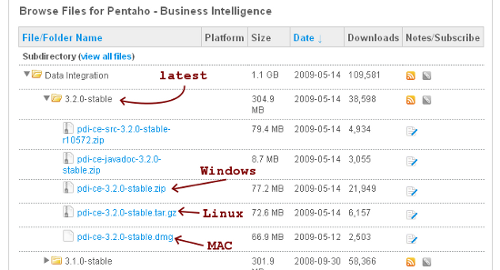
Choose the newest stable release. At this time, it is 3.2.0.
Download the file that matches your platform. The preceding screenshot should help you.
Unzip the downloaded file in a folder of your choice —C:/Kettle or /home/your_dir/kettle.
If your system is Windows, you're done. Under UNIX-like environments, it's recommended that you make the scripts executable. Assuming that you chose Kettle as the installation folder, execute the following command:
cd Kettle chmod +x *.sh
What just happened?
You have installed the tool in just a few minutes. Now you have all you need to start working
Launching the PDI graphical designer: Spoon
Now that you've installed PDI, you must be eager to do some stuff with data. That will be possible only inside a graphical environment. PDI has a desktop designer tool named Spoon. Let's see how it feels to work with it.
Time for action – starting and customizing Spoon
In this tutorial you're going to launch the PDI graphical designer and get familiarized with its main features.
Start Spoon.
If your system is Windows, type the following command:
Spoon.bat
In other platforms such as Unix, Linux, and so on, type:
Spoon.sh
If you didn't make spoon.sh executable, you may type:
sh Spoon.sh
As soon as Spoon starts, a dialog window appears asking for the repository connection data. Click the No Repository button. The main window appears. You will see a small window with the tip of the day. After reading it, close that window.
A welcome! window appears with some useful links for you to see.
Close the welcome window. You can open that window later from the main menu.
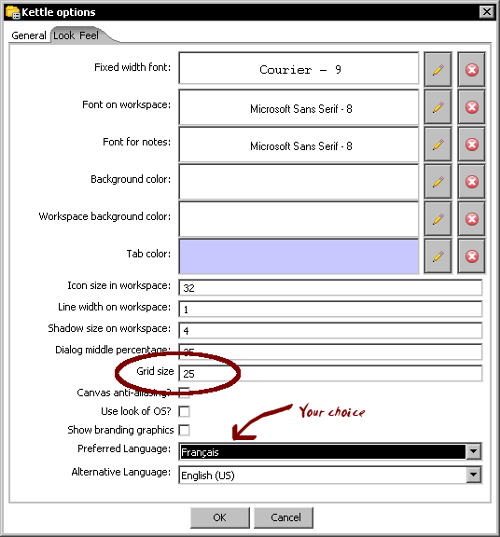
Click Options... from the Edit menu. A window appears where you can change various general and visual characteristics. Uncheck the circled checkboxes:
Select the tab window Look Feel.
Change the Grid size and Preferred Language settings as follows:
Click the OK button.
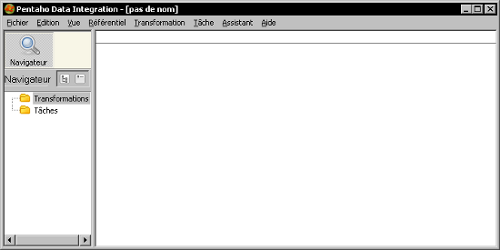
Restart Spoon in order to apply the changes. You should neither see the repository dialog, nor the welcome window. You should see the following screen instead:
What just happened?
You ran for the first time the graphical designer of PDI Spoon, and applied some custom configuration.
From the Look Feel configuration window, you changed the size of the dotted grid that appears in the canvas area while you are working. You also changed the preferred language. In the Option tab window, you chose not to show either the repository dialog or the welcome window at startup. These changes were applied as you restarted the tool, not before.
The second time you launched the tool, the repository dialog didn't show up. When the main window appeared, all the visible texts were shown in French, which was the selected language, and instead of the welcome window, there was a blank screen.
Spoon
This tool that you're exploring in this section is the PDI's desktop design tool. With Spoon you design, preview, and test all your work, that is, transformations and jobs. When you see PDI screenshots, what you are really seeing are Spoon screenshots. The other PDI components that you will meet in the following chapters are executed from terminal windows.
Setting preferences in the Options window
In the tutorial you changed some preferences in the Options window. There are several look and feel characteristics you can change beyond those you changed. Feel free to experiment with this setting.
Remember to restart Spoon in order to see the changes applied.
If you choose any language as preferred language other than English, you should select a diff erent language as alternati ve. If you do so, every name or descripti on not translated to your preferred language will be shown in the alternative language.
Just for the curious people: Italian and French are the overall winners of the list of languages to which the tool has been translated from English. Below them follow Korean, Argenti neanSpanish, Japanese, and Chinese.
Unlock access to the largest independent learning library in Tech for FREE!
Get unlimited access to 7500+ expert-authored eBooks and video courses covering every tech area you can think of.
Renews at $19.99/month. Cancel anytime
One of the setti ngs you changed was the appearance of the welcome window at start up. The welcome window has many useful links, all related with the tool: wiki pages, news, forum access, and more. It's worth exploring them.
You don't have to change the settings again to see the welcome window. You can open it from the menu Help | Show the Welcome Screen.
Storing transformations and jobs in a repository
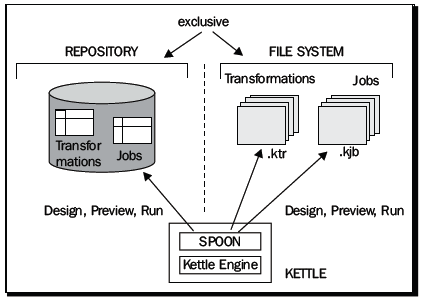
The first time you launched Spoon, you chose No Repository. After that, you confi gured Spoon to stop asking you for the Repository option. You must be curious about what the repository is and why not to use it. Let's explain it. As said, the results of working with PDI are Transformati ons and Jobs. In order to save the Transformations and Jobs, PDI offers two methods:
Repository: When you use the repository method you save jobs and transformations in a repository. A repository is a relational database specially designed for this purpose.
Files: The files method consists of saving jobs and transformations as regular XML files in the filesystem, with extension kjb and ktr respectively.
The following diagram summarizes this:
You cannot mix the two methods (files and repository) in the same project. Therefore, you must choose the method when you start the tool. Why did we choose not to work with repository, or in other words, to work with fi les? This is mainly for the following two reasons:
Working with files is more natural and practical for most users.
Working with repository requires minimum database knowledge and that you also have access to a database engine from your computer. Having both preconditions would allow you to learn working with both methods. However, it's probable that you haven't.
Creating your first transformation
Until now, you've seen the very basic elements of Spoon. For sure, you must be waiti ng to do some interesting task beyond looking around. It's time to create your first transformation.
Time for action – creating a hello world transformation
How about starting by saying Hello to the World? Not original but enough for a very first practical exercise. Here is how you do it:
Create a folder named pdi_labs under the folder of your choice.
Open Spoon.
From the main menu select File | New Transformation.
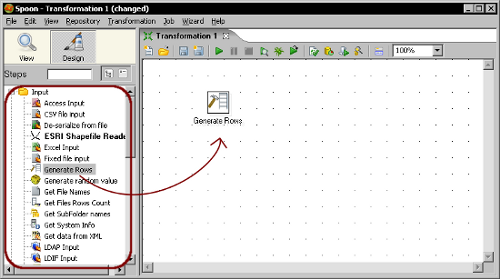
At the left-hand side of the screen, you'll see a tree of Steps. Expand the Input branch by double-clicking it.
Left -click the Generate Rows icon.
Without releasing the button, drag-and-drop the selected icon to the main canvas. The screen will look like this:
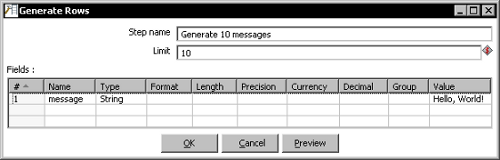
Double-click the Generate Rows step that you just put in the canvas and fill the text boxes and grid as follows:
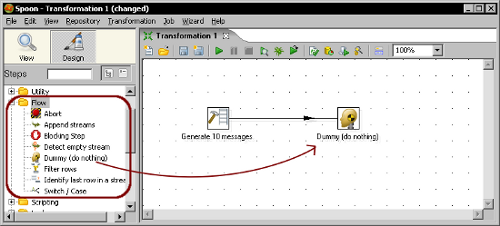
From the Steps tree, double-click the Flow step.
Click the Dummy icon and drag-and-drop it to the main canvas.
Click the Generate Rows step and holding the Shift key down, drag the cursor towards the Dummy step. Release the button. The screen should look like this:
Right-click somewhere on the canvas to bring up a contextual menu.
Select New note. A note editor appears.
Type some description such as Hello World! and click OK.
From the main menu, select Transformation | Configuration. A window appears to specify transformation properties. Fill the Transformation name with a simple name as hello_world. Fill the Description field with a short description such as My first transformation. Finally provide a more clear explanation in the Extended description text box and click OK.
From the main menu, select File | Save.
Save the transformation in the folder pdi_labs with the name hello_world.
Select the Dummy step by left -clicking it.
Click on the Preview button in the menu above the main canvas.
A debug window appears. Click the Quick Launch button.
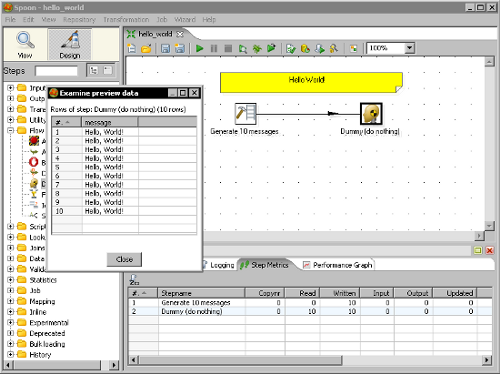
The following window appears to preview the data generated by the transformation:
Close the preview window and click the Run button.
A window appears. Click Launch.
The execution results are shown in the bottom of the screen. The Logging tab should look as follows:

 United States
 Great Britain
 India
India
 Germany
 France
 Canada
 Russia
 Spain
Spain
 Brazil
 Australia
 Singapore
 Canary Islands
 Hungary
 Ukraine
 Luxembourg
 Estonia
 Lithuania
 South Korea
 Turkey
 Switzerland
 Colombia
 Taiwan
 Chile
Chile
 Norway
 Ecuador
 Indonesia
 New Zealand
 Cyprus
 Denmark
 Finland
 Poland
 Malta
Malta
 Czechia
 Austria
 Sweden
 Italy
Italy
 Egypt
Egypt
 Belgium
 Portugal
 Slovenia
 Ireland
 Romania
 Greece
 Argentina
 Netherlands
 Bulgaria
 Latvia
 South Africa
 Malaysia
 Japan
Japan
 Slovakia
 Philippines
 Mexico
 Thailand