Like every other endeavor in life, there are two ways of installing Joomla!—the easy way and the difficult way. In order to do it the difficult way, you will need to set up your server by yourself before you proceed with the installation. You have the choice of environment to use for your new installation: you may install directly to a live server or you can set up a test environment on your local computer.
Minimum system requirements
A fully-operational web server (preferably Apache) is required to successfully install and use Joomla!. You also need a database (preferably MySQL) and the server-side scripting language PHP, together with specific modules for MySQL, XML, and Zlib functionality, which are activated within PHP amongst others. Following are the minimum versions of these server components that are required:
|
Software
|
Minimum requirement
|
Recommended
|
Latest options
|
Website
|
|
PHP
|
4.3.10
|
4.4.7
|
5.x.series
|
http://php.net
|
|
MySQL
|
3.23.x or above
|
|
5.x series
|
http://dev.mysql.com/downloads/mysql/5.0.html
|
|
Apache
|
1.3 or above
|
|
2.2 series
|
http://httpd.apache.org
|
Installation on a local computer
There are a number of ways to set up a test environment on your own local computer. Most time-pressed developers will install and configure directly onto a live server, but there are good reasons for running your application first on a local development server:
- Developing your application locally allows you to work on it even if you are not connected to the Internet.
- The experience that you gain from getting your local server running on a simple installation like WampServer for a machine running Windows, or MAMP for a Mac, will make it easier for you to understand server processes and databases. This knowledge will certainly pay off as you get deeper into Joomla!.
- The Web is constantly scanned and archived by various search engines, and so will everything that you put on the Web. This information will be around for quite a bit of time and you certainly don't want Google to display your inevitable learning mistakes for the world to see.
Installation on WampServer
WampServer2 enables you to run Apache, MySQL, and PHP on Windows, and is available for free. You can download it from http://www.wampserver.com. The WampServer2 package comes with the following components already configured to work together:
Unlock access to the largest independent learning library in Tech for FREE!
Get unlimited access to 7500+ expert-authored eBooks and video courses covering every tech area you can think of.
Renews at $19.99/month. Cancel anytime
- Apache 2.2.11
- MySQL 5.1.30
- PHP 5.2.8
There are similar packages that already include Joomla! (such as DeveloperSide and WDE). However, note that these may not always have the latest secure version of Joomla!. Therefore, it is better to use WampServer2 and load it with the Joomla! version of your choice.
WampServer2 is self-installing. Just double-click on the icon after you've unpacked your zipped download and follow the installation instructions. This gets your development environment ready in just a few minutes. Now let the fun begin!
Installing Joomla! 1.5 on localhost
Installing Joomla! on localhost can be remarkably straightforward:
- Download the latest stable release of Joomla!, and unzip the discernible Joomla! 1.5 folder. You will need to use a tool such as WinZip for Windows (http://www.winzip.com) to perform this task. Another free alternative to WinZip is IZArc (http://www.izarc.org/).
- Locate the directory in which WampServer2 is installed on your computer. This will usually be the root of your computer's main directory (usually C:) and in a folder named wamp. Open it, locate the www folder, and copy your Joomla! 1.5 folder into it. Name the Joomla! folder as per your preference. In the unlikely scenario that you will be installing only one Joomla! test site on your local machine, you may—just for the sake of living to a ripe old age—name it Joomla.
- Navigate to your computer desktop taskbar tray, click on the WampServer icon, and select the Start All Services option (if this has not yet been selected).
- Then open your browser and navigate to http://localhost. This will display the main WampServer2 interface and you will see your project, Joomla, listed under Your Projects.
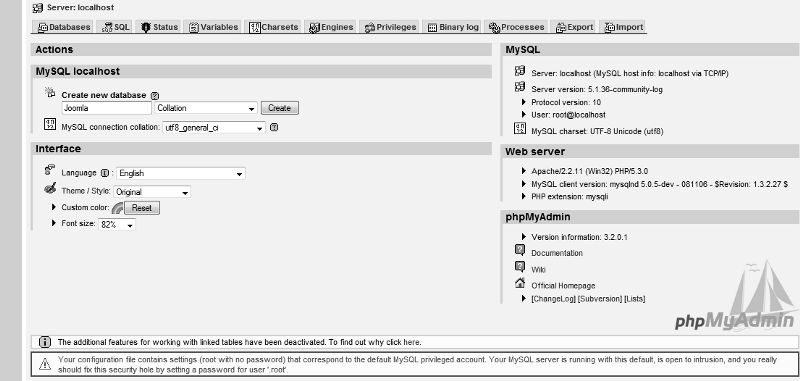
- However, because Joomla! needs a database to run, you must create the database for our project. Click on the phpMyAdmin link. This will display another interface, this time for phpMyAdmin. Enter the name of your new database in the Create new database field. For the simple reason that we shouldn't live a complicated life, we have given this database the same name (Joomla) as our project and our installation folder. We are now ready to install Joomla!.
- Joomla! has an automated installation script that automatically populates database tables. The installation script will set the base URL, connect Joomla! to the database, and create tables in the database. Navigate to http://localhost/Joomla and start your installation.
- You will be presented with a step-by-step guide to the installation in the later pages.
Page 1: Choose Language
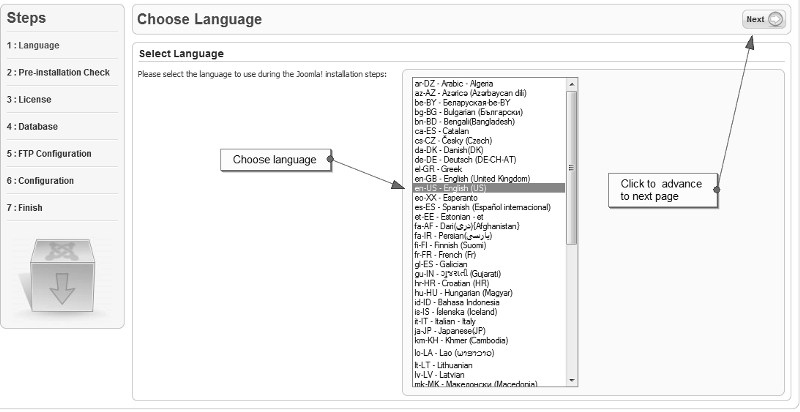
This page asks what language you want to use for the installation.
We select English as the language of choice. Click on the Next button to continue with your installation.
Page 2: Pre-installation Check
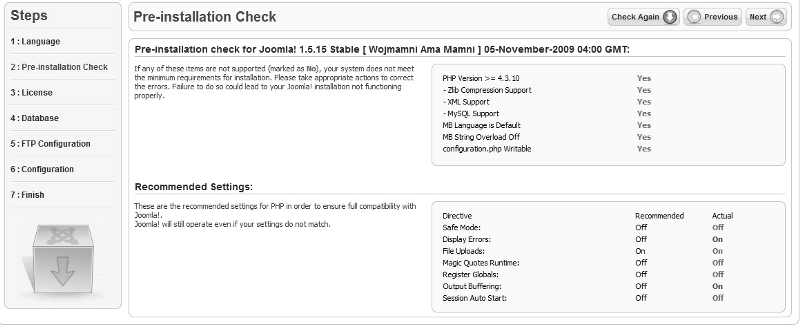
Checks are made by the installation script on server configuration. If any of these items are not supported (marked as No), then your system does not meet the minimum requirements for the installation of Joomla!, and you should take the appropriate actions in order to correct the errors.
Failing to do so could lead to your Joomla! installation not functioning properly. You are not likely to face this problem on your local installation, and if you do, it can be quickly fixed.
Page 3: License
The License page is just a page of legalese that the developers of Joomla! really think you must read. It tells you the conditions for use of the free software and also spells out liabilities. Primarily, if the Joomla! installation makes your computer to explode or you start acting funny after you are done with the installation, the suppliers of Joomla! will accept no liability. After correcting any host-specific errors and reading the license, you will be directed to the Database Configuration page.
Page 4: Database Configuration
On the Database Configuration page, you specify the database where Joomla! will store and retrieve data.
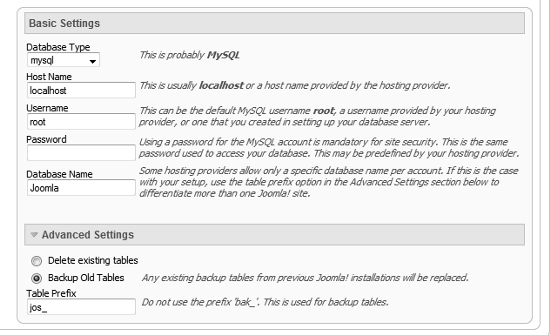
Select the type of database from the drop-down list. This will generally be mysql. Also, enter the hostname of the database server that Joomla! will be installed on. This may not necessarily be the same as your web server, so check with your hosting provider if you are not sure. In the present case, it will be localhost. Now enter the MySQL username, password, and database name that you wish to use with Joomla!. These must already exist for the database that you are going to use. We have already determined this when we created the data base. Here are the values for our present project:
- Host Name: localhost
- Username: root (unless you have changed it)
- Password: Leave blank (unless you added a password when you set up your database)
- Database Name: Joomla (or whatever you have called yours)
- Table Prefix: If you are installing more than one instance of Joomla! in a single database, then give one of them a prefix (such as jos2_), or else the second instance will not install. Otherwise, you may safely ignore this.
Click on the Next button to continue.
Page 5: FTP Configuration
You can safely omit this step and go on to the next page. But if you do decide to carry out this step, do take notice of the following requirements:
- As explained on this Joomla! installation page, due to file system permission restrictions on Linux and other Unix systems (and PHP Safe Mode restrictions), an FTP layer is used to handle fi le system manipulation and to enable Joomla! installers.
- You may enter an FTP username and password with access to the Joomla! root directory. This will be the FTP account that handles all of the file system operations when Joomla! requires FTP access to complete a task.
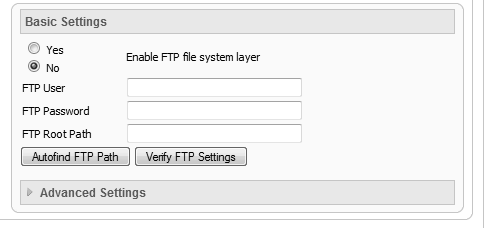
However, for security reasons, if the option is available, you are advised to create a separate FTP user account with access to the Joomla! installation only and not to the entire web server.
Page 6: Main Configuration
This is where you define your site's public identity.
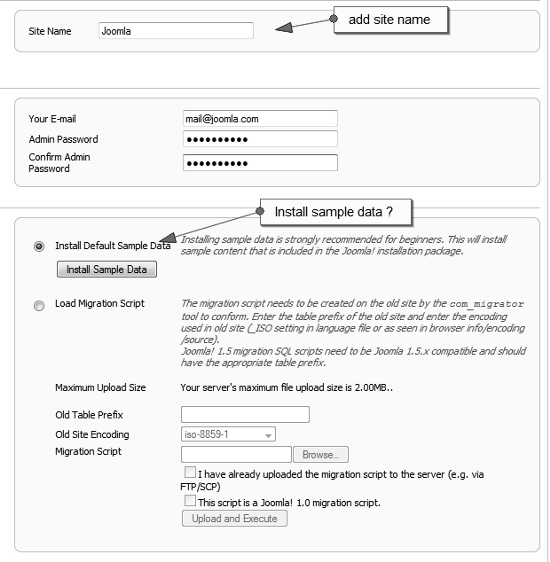
The descriptions of the fields are as follows:
- Site Name: Enter the name of your Joomla! site.
- Your E-mail: This will be the e-mail address of the website Super Administrator.
- Admin Password: Enter a new password and then confirm it, in the appropriate fields. Along with the username admin, this will be the password that you will use to login to the Administrator Control Panel at the end of the installation.
- Install Sample Data: It is strongly recommended that new Joomla! users install the default sample data. To do this, select this option and click on the button, before proceeding to the next stage.
Page 7: Finish
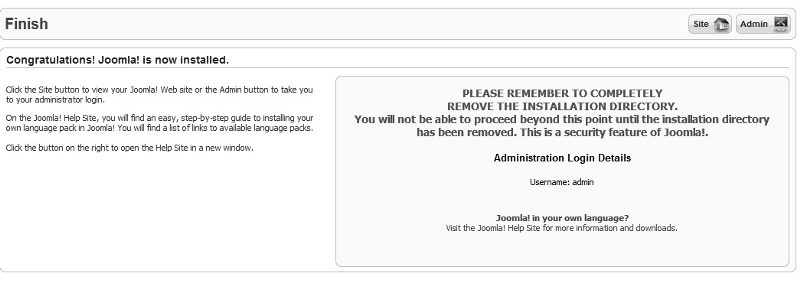
That's all! Your installation success screen will be displayed. Congratulations, you are now on your way to becoming a Joomla! Guru.
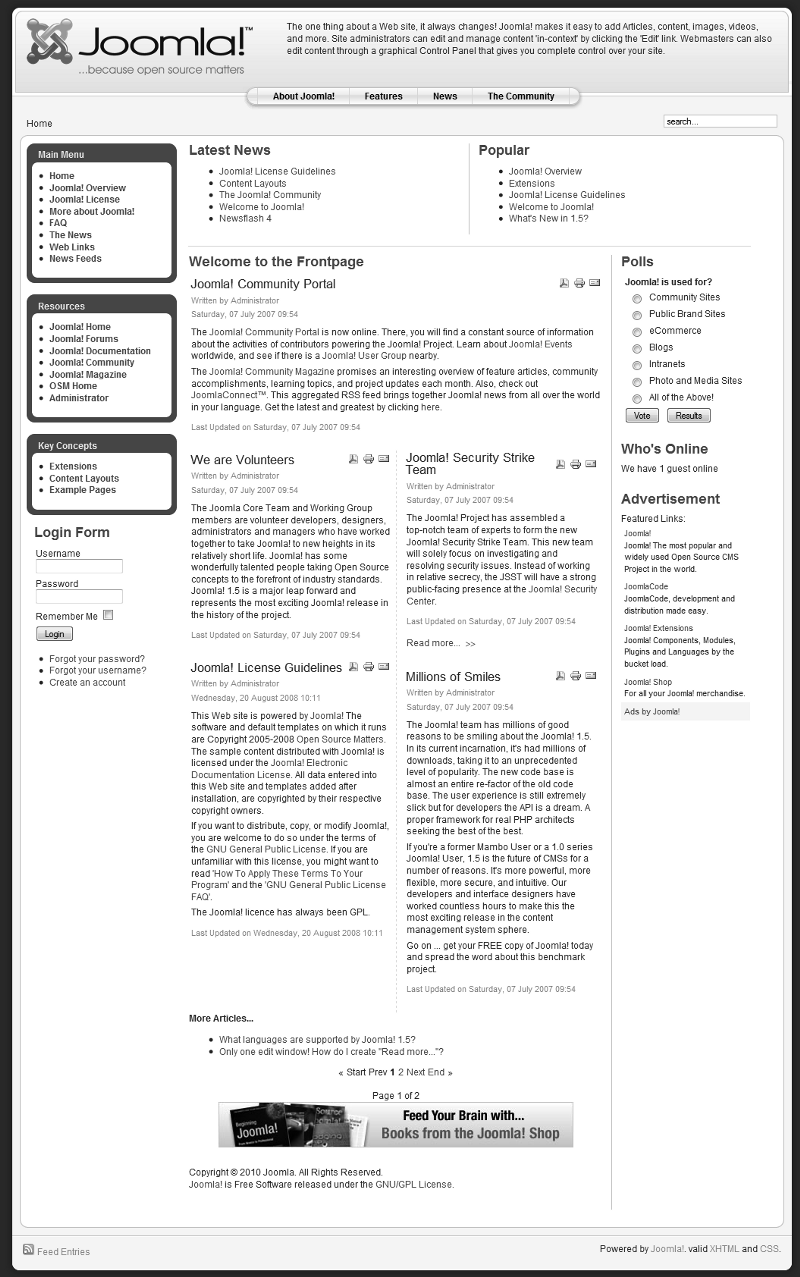
Once the installation script has successfully been completed and you have removed the installation folder, you will be directed to the Joomla! Administration login page—if you want to immediately perform administrative functions on your new site. Otherwise, clicking on the Site icon will direct you to the front page of your site showing all of the sample data—if you have loaded it.
That is the most of what you need to know about installing Joomla!.
 United States
 Great Britain
 India
India
 Germany
 France
 Canada
 Russia
 Spain
Spain
 Brazil
 Australia
 Singapore
 Canary Islands
 Hungary
 Ukraine
 Luxembourg
 Estonia
 Lithuania
 South Korea
 Turkey
 Switzerland
 Colombia
 Taiwan
 Chile
Chile
 Norway
 Ecuador
 Indonesia
 New Zealand
 Cyprus
 Denmark
 Finland
 Poland
 Malta
Malta
 Czechia
 Austria
 Sweden
 Italy
Italy
 Egypt
Egypt
 Belgium
 Portugal
 Slovenia
 Ireland
 Romania
 Greece
 Argentina
 Netherlands
 Bulgaria
 Latvia
 South Africa
 Malaysia
 Japan
Japan
 Slovakia
 Philippines
 Mexico
 Thailand

