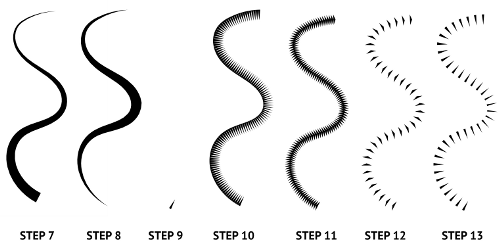
The process of creating the building blocks can be fully automated using features known as Live Path Effects (LPEs). They are very useful, easy to use, and ubiquitous.
In a nutshell, LPEs twist, replicate, transform, and apply many other modifications to shapes in a sequential and repeatable way. There are many different types of LPEs available for Inkscape 0.48, and even more are being developed. In this article we will cover some of the most interesting ones available for this release.
Bending paths
In this recipe we will go through the basic Live Path Effect options using the Bend path effect. We will create a simple rectangle and morph it into a waving flag. We will also bend some letter shapes directly and through linking to objects to use as bending paths.
How to do it...
The following steps show how to use bending paths:
- Create a rectangle using the Rectangle tool (F4 or R), set its fill to #D5D5FF, stroke to 60% Gray, and stroke width to 1.
- Open the Path Effect Editor by using Shift + Ctrl + 7 or by going to Path | Path Effect Editor....
- Under the Apply new effect, choose Bend and press Add, this will apply the Bend LPE to the rectangle but the rectangle won't change as a result of it.
- We now have several options available under Current effect. Select the Edit on-canvas option
 , and notice the bending line on the rectangle that appeared.
- Click on the green line (the Bezier segment) and drag slightly to bend the rectangle. Adjust more precisely using handles on the end nodes, and click on a node to show the handles. Here is what we have so far:
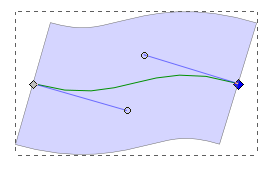
- Duplicate the rectangle (Ctrl + D) and move it away. Notice that the duplicated object will keep the LPE applied.
- Switch to the Node tool (F2 or N) and notice the four corner nodes of the original rectangle appear. The rectangle was automatically converted to a path when applying the LPE.
- Turn on the Show path outline (without path effects)
 and Show Bezier handles of selected nodes
  to see the original shape and its node handles. Move the nodes with the Node tool and notice how the bent shape updates accordingly:
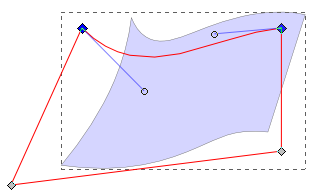
- Press the 7 key to switch to the edit LPE bending path mode; if more adjustments are necessary, switch back to the Node tool using F2 or N.
- Select the other rectangle (the one we got in Step 6), click on the Copy path button in the Path Effect Editor and paste somewhere on canvas (Ctrl + V or right-click and choose Paste from the pop-up menu). Remove the fill and add a stroke to the pasted path for more clarity. This is a copy of the rectangle bending path but it is in no way connected to the rectangle or its LPE.
- Create an "S" using the normal mode of the Pencil tool (F6 or P) with Smoothing: set to 50.
- Switch to the Selector tool (Space or F1 or S) and copy the "S" (Ctrl + C).
- Select the rectangle with Bend applied to it and press the Paste path
 button in the Path Effect Editor to bend our rectangle in the form of the "S".
- The shape might look a bit weird if our rectangle length and width are similar; this can be corrected in the Bend LPE by changing the Width value. In this case, reducing the width from 1 to 0.2 produces the desired results:
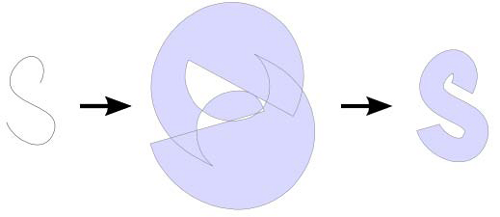
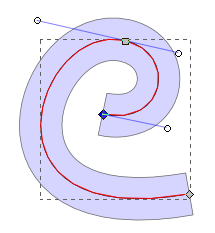
- Create a "C" using the normal mode of the Pencil tool (F6 or P) with Smoothing: set to 50 and copy it (Ctrl + C).
- Select one of the objects with Bend applied to it and press the Link to path button in the Path Effect Editor in order to bend our rectangle in the form of the "C". The LPE object will be positioned over the "C" and the "C" shape will still be available for editing.
- Change the Width value if necessary. In our case, a value of 0.2 proved adequate.
- Select the "C" shape and edit it using the Path tool (F2 or N). Notice how editing the "C" shape automatically updates the LPE linked to it:
Unlock access to the largest independent learning library in Tech for FREE!
Get unlimited access to 7500+ expert-authored eBooks and video courses covering every tech area you can think of.
Renews at $19.99/month. Cancel anytime
There's more...
Unexpected results can happen if the shape we're trying to bend is vertical (taller than wide); the Inkscape developers, in their wisdom, have provided a special Original path is vertical option that will adapt the bending effect accordingly.
Bending groups
We bent only one object in this recipe but bending groups is also possible. Just make sure the objects within the group are converted to paths before the bending is applied.
Stacking LPEs
It's possible to apply more than one LPE to a single object. You can preview what the shape looks like with or without a particular LPE applied by toggling the "eye"  icon in the Effect list.
Removing Path Effects
Live Path Effects change the shape of an object while keeping the original shape information intact (these changes are made "Live", as in real time). This means that LPEs can be undone, and the Remove Path Effect option under the Path menu does exactly that. You have to remove the object from the selection and then select it again to update the Path Effect Editor display.
Using Pattern Along Path
We have already used the Pattern Along Path effect without even knowing it by choosing a shape in the Shape: option of the Pen and Pencil tools (we told you LPEs are ubiqitous!). This LPE takes a path and applies it along another one, like a reverse Bend LPE. In this recipe we will learn another method to widen the outline of a tree trunk created using Spiro Spline and explore some other options of this LPE.
How to do it...
The following steps will show how to widen an outline using Pattern Along Path:
- Create a tree trunk using the Spiro spline mode with the Pencil (F6 or P) tool. Set the Smoothing: to 34 and the Shape: to Triangle in.
- Open the Path Effect Editor by using Shift + Ctrl + 7 or by going to Path | Path Effect Editor.... You will see two LPEs listed: Spiro spline and Pattern Along Path.
- Select the Pattern Along Path by clicking on it to get to its options.
- Use the arrow handles to widen the shape. Notice how this affects only the skeleton path and the "tree trunk" remains the same width because it's governed by the LPE shape.
- To make the "tree trunk" appear wider change the original triangle using the Edit on-canvas option of the Pattern source. It will appear as a green path near the top-left corner of the page.
- Move the top triangle corner upwards and the bottom one downwards. Notice how the "tree trunk" appears wider.
- There is also another way to achieve the same result—using the Width option. Change it to 5 and see how the "tree trunk" gets even wider. This time the original triangle shape isn't modified.
- Tick the Pattern is vertical option. Notice how the shape changes depending on what base triangle orientation is taken as the pattern.
- Change the Pattern copies from Single, stretched to Single. Notice we only see a small triangle at the beginning of the skeleton path because the original triangle shape is much smaller than the skeleton path, and we're only using a single one without stretching it.
- Change the Pattern copies to Repeated, stretched. The triangles are "copied" along the skeleton and positioned one next to the other. If there is a small part of the skeleton path not covered using the original triangle size they are stretched a bit to compensate for it. Since they are so small compared to the skeleton path there isn't much difference between using the Repeated, stretched and Repeated option. Notice the Pattern is vertical is still enabled.
- Untick the Pattern is vertical option. Notice the change in triangles.
- Change the Spacing option to 25. Notice how the triangles are now spaced out.
- Tick the Pattern is vertical option. The triangles change shape again based on the orientation but now the spacing between them is noticeable.

How it works...
The Pattern Along Path LPE uses one path as a pattern that is to be stretched and/or repeated along a skeleton path. Other than using the Shape: option of the Pen and Pencil tools we can create separate patterns and skeletons to be combined through the Path Effect Editor just like with any other LPE. The usual options to edit, copy, paste, and link are available, and both the pattern and the skeleton can be edited live.
Pattern Along Path also has some specific options to determine how the pattern is applied along the skeleton. We can choose to stretch it or repeat it, therefore increasing the separation between the repeated items.
There's more...
Normal and Tangential offsets are also specific options that influence the positions of the patterns in relation to the skeleton path. Normal offset moves the patterns away from the skeleton, and the tangential offset moves them along its tangent.
The difference between Pattern along Path and the other LPEs is that we can't use groups as patterns or skeletons.
Pattern along Path extension
Another (and older) way to achieve the same effect is by using the Pattern along Path extension found under the Extensions | Generate from Path menu. The extension also offers to choose between Snake and Ribbon as the Deformation type. Groups can be used as patterns, but the changes made to the pattern cannot be undone. The z-order determines which object is used as the pattern—the top-most one.
The extension doesn't always give the same results as the LPE; the straight segments stay straight when the extension is used, but the LPE bends them.
 United States
 Great Britain
 India
India
 Germany
 France
 Canada
 Russia
 Spain
Spain
 Brazil
 Australia
 Singapore
 Canary Islands
 Hungary
 Ukraine
 Luxembourg
 Estonia
 Lithuania
 South Korea
 Turkey
 Switzerland
 Colombia
 Taiwan
 Chile
Chile
 Norway
 Ecuador
 Indonesia
 New Zealand
 Cyprus
 Denmark
 Finland
 Poland
 Malta
Malta
 Czechia
 Austria
 Sweden
 Italy
Italy
 Egypt
Egypt
 Belgium
 Portugal
 Slovenia
 Ireland
 Romania
 Greece
 Argentina
 Netherlands
 Bulgaria
 Latvia
 South Africa
 Malaysia
 Japan
Japan
 Slovakia
 Philippines
 Mexico
 Thailand

 , and notice the bending line on the rectangle that appeared.
 and Show Bezier handles of selected nodes
  to see the original shape and its node handles. Move the nodes with the Node tool and notice how the bent shape updates accordingly:

 button in the Path Effect Editor to bend our rectangle in the form of the "S".

 icon in the Effect list.
