


ML-agents uses a reinforcement learning technique called PPO or Proximal Policy Optimization. This is the preferred training method that Unity has developed which uses a neural network. This PPO algorithm is implemented in TensorFlow and runs in a separate Python process (communicating with the running Unity application over a socket).
In this tutorial, we look at how to implement PPO, a reinforcement learning algorithm used for training the ML agents in Unity. This tutorial also explores training statistics with TensorBoard.
This tutorial is an excerpt taken from the book ‘Learn Unity ML-Agents – Fundamentals of Unity Machine Learning’ by Micheal Lanham.
Before implementing PPO, let’s have a look at how to set a special unity environment needed for controlling the Unity training environment. Go through the following steps to learn how to configure the 3D ball environment for external.
How to set up a 3D environment in Unity for external training
- Open the Unity editor and load the ML-Agents demo unityenvironment project. If you still have it open from the last chapter, then that will work as well.
- Open the 3DBall.scene in the ML-Agents/Examples/3DBall folder.
- Locate the Brain3DBrain object in the Hierarchy window and select it. In the Inspector window set the Brain Type to External.
- From the menu, select Edit | Project Settings | Player. From the Inspector window, set the properties as shown in the following screenshot:

-
Setting the Player resolution properties
- From the menu, select File | Build Settings. Click on the Add Open Scene button and make sure that only the 3DBall scene is active, as shown in the following dialog:
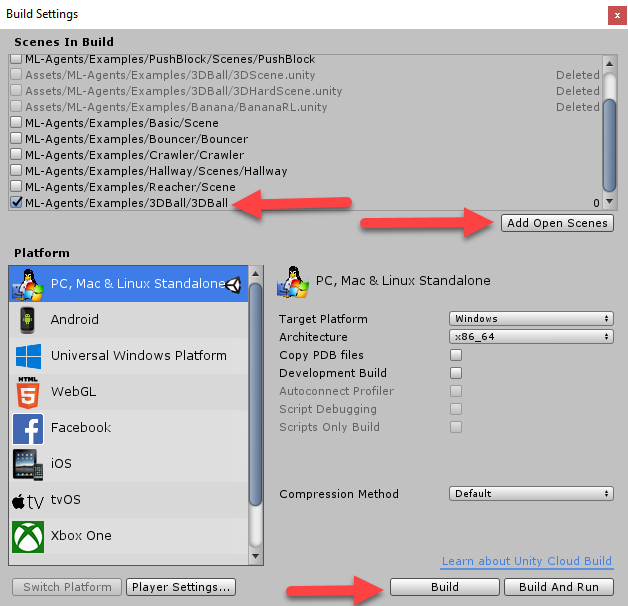
- Set the Target Platform to your chosen desktop OS (Windows, in this example) and click the Build button at the bottom of the dialog.
- You will be prompted to choose a folder to build into. Select the python folder in the base of the ml-agents folder.
- If you are prompted to enter a name for the file, enter 3DBall. On newer versions of Unity, from 2018 onward, the name of the folder will be set by the name of the Unity environment build folder, which will be python.Be sure that you know where Unity is placing the build, and be sure that the file is in the python folder. At the time of writing, on Windows, Unity will name the executable python.exe and not 3DBall.exe. This is important to remember when we get to set up the Python notebook.
With the environment built, we can move on to running the Basics notebook against the app. Let’s see how to run the Jupyter notebook to control the environment.
Running the environment
Open up the Basics Jupyter notebook again; remember that we wanted to leave it open after testing the Python install. Go through the following steps to run the environment.
- Ensure that you update the first code block with your environment name, like so:
      env_name = "python" # Name of the Unity environment binary to launch
      train_mode = True # Whether to run the environment in training or
      inference mode
- We have the environment name set to 'python' here because that is the name of the executable that gets built into the python folder. You can include the file extension, but you don’t have to. If you are not sure what the filename is, check the folder; it really will save you some frustration.
- Go inside the first code block and then click the Run button on the toolbar. Clicking Run will run the block of code you currently have your cursor in. This is a really powerful feature of a notebook; being able to move back and forth between code blocks and execute what you need is very useful when building complex algorithms.
- Click inside the second code block and click Run. The second code block is responsible for loading code dependencies. Note the following line in the second code block:
from unityagents import UnityEnvironment
- This line is where we import the unityagents UnityEnvironment class. This class is our controller for running the environment.
- Run the third code block. Note how a Unity window will launch, showing the environment. You should also notice an output showing a successful startup and the brain stats. If you encounter an error at this point, go back and ensure you have the env_name variable set with the correct filename.
- Run the fourth code block. You should again see some more output, but unfortunately, with this control method, you don’t see interactive activity. We will try to resolve this issue in a later chapter.
- Run the fifth code block. This will run through some random actions in order to generate some random output.
- Finally, run the sixth code block. This will close the Unity environment.
Feel free to review the Basics notebook and play with the code. Take advantage of the ability to modify the code or make minor changes and quickly rerun code blocks.
Now that we know how to set up a 3D environment in Unity, we can move on to implementation of PPO.
How to implement PPO in Unity
The implementation of PPO provided by Unity for training has been set up in a single script that we can put together quite quickly. Open up Unity to the unityenvironment sample projects and go through the following steps:
- Locate the GridWorld scene in the Assets/ML-Agents/Examples/GridWorld folder. Double-click it to open it.
- Locate the GridWorldBrain and set it to External.
- Set up the project up using the steps mentioned in the previous section.
- From the menu, select File | Build Settings….
- Uncheck any earlier scenes and be sure to click Add Open Scenes to add the GridWorld scene to the build.
- Click Build to build the project, and again make sure that you put the output in the python folder. Again, if you are lost, refer to the ML-Agents external brains section.
- Open a Python shell or Anaconda prompt window. Be sure to navigate to the root source folder, ml-agents.
- Activate the ml-agents environment with the following:
activate ml-agents
- From the ml-agents folder, run the following command:
python python/learn.py python/python.exe --run-id=grid1 --train
- You may have to use Python 3 instead, depending on your Python engine. This will execute the learn.py script against the python/python.exe environment; be sure to put your executable name if you are not on Windows. Then we set a useful run-id we can use to identify runs later. Finally, we set the --train switch in order for the agent/brain to also be trained.
- As the script runs, you should see the Unity environment get launched, and the shell window or prompt will start to show training statistics, as shown in the following screenshot of the console window:

Let the training run for as long as it needs. Depending on your machine and the number of iterations, you could be looking at a few hours of training—yes, you read that right. As the environment is trained, you will see the agent moving around and getting reset over and over again. In the next section, we will take a closer look at what the statistics are telling us.
Understanding training statistics with TensorBoard
Inherently, ML has its roots in statistics, statistical analysis, and probability theory. While we won’t strictly use statistical methods to train our models like some ML algorithms do, we will use statistics to evaluate training performance. Hopefully, you have some memory of high school statistics, but if not, a quick refresher will certainly be helpful.
The Unity PPO and other RL algorithms use a tool called TensorBoard, which allows us to evaluate statistics as an agent/environment is running. Go through the following steps as we run another Grid environment while watching the training with TensorBoard:
- Open the trainer_config.yaml file in Visual Studio Code or another text editor. This file contains the various training parameters we use to train our models.
- Locate the configuration for the GridWorldBrain, as shown in the following code:
      GridWorldBrain:
        batch_size: 32
        normalize: false
        num_layers: 3
        hidden_units: 256
        beta: 5.0e-3
        gamma: 0.9
        buffer_size: 256
        max_steps: 5.0e5
        summary_freq: 2000
        time_horizon: 5
- Change the num_layers parameter from 1 to 3, as shown in the highlighted code. This parameter sets the number of layers the neural network will have. Adding more layers allows our model to better generalize, which is a good thing. However, this will decrease our training performance, or the time it takes our agent to learn. Sometimes, this isn’t a bad thing if you have the CPU/GPU to throw at training, but not all of us do, so evaluating training performance will be essential.
- Open a command prompt or shell in the ml-agents folder and run the following command:
python python/learn.py python/python.exe --run-id=grid2 --train
- Note how we updated the --run-id parameter to grid2 from grid1. This will allow us to add another run of data and compare it to the last run in real time. This will run a new training session. If you have problems starting a session, make sure you are only running one environment at a time.
- Open a new command prompt or shell window to the same ml-agents folder. Keep your other training window running.
- Run the following command:
tensorboard --logdir=summaries
- This will start the TensorBoard web server, which will serve up a web UI to view our training results.
- Copy the hosting endpoint—typically http://localhost:6006, or perhaps the machine name—and paste it into a web browser. After a while, you should see the TensorBoard UI, as shown in the following screenshot:

You will need to wait a while to see progress from the second training session. When you do, though, as shown in the preceding image, you will notice that the new model (grid2) is lagging behind in training. Note how the blue line on each of the plots takes several thousand iterations to catch up. This is a result of the more general multilayer network. This isn’t a big deal in this example, but on more complex problems, that lag could make a huge difference. While some of the plots show the potential for improvement—such as the entropy plot—overall, we don’t see a significant improvement. Using a single-layer network for this example is probably sufficient.
We learned about PPO and its implementation in Unity. To learn more PPO concepts in Unity, be sure to check out the book Learn Unity ML-Agents – Fundamentals of Unity Machine Learning.
Read Next
Implementing Unity game engine and assets for 2D game development [Tutorial]
Creating interactive Unity character animations and avatars [Tutorial]
Unity 2D & 3D game kits simplify Unity game development for beginners


