


In this tutorial, we are going to learn about data recovery techniques that enable us to view data that has been deleted from a device. Deleted data could contain highly sensitive information and thus data recovery is a crucial aspect of mobile forensics.
This article will cover the following topics:
- Data recovery overview
- Recovering data deleted from an SD card
- Recovering data deleted from a phone’s internal storage
This article is taken from the book Learning Android Forensics by Oleg Skulkin, Donnie Tindall, and Rohit Tamma. This book is a comprehensive guide to Android forensics, from setting up the workstation to analyzing key artifacts.
Data recovery overview
Data recovery is a powerful concept within digital forensics. It is the process of retrieving deleted data from a or SD card when it cannot be accessed normally. Being able to recover data that has been deleted by a user could help solve civil or criminal cases. This is because many accused just delete data from their device hoping that the evidence will be destroyed.
Thus, in most criminal cases, deleted data could be crucial because it may contain information the user wanted to erase from their Android device. For example, consider the scenario where a mobile phone has been seized from a terrorist. Wouldn’t it be of the greatest importance to know which items were deleted by them? Access to any deleted SMS messages, pictures, dialed numbers, and so on could be of critical importance as they may reveal a lot of sensitive information.
From a normal user’s point of view, recovering data that has been deleted would usually mean referring to the operating system’s built-in solutions, such as the Recycle Bin in Windows. While it’s true that data can be recovered from these locations, due to an increase in user awareness, these options often don’t work. For instance, on a desktop computer, people now use Shift + Del whenever they want to delete a file completely from their desktop. Similarly, in mobile environments, users are aware of the restore operations provided by apps and so on. In spite of these situations, data recovery techniques allow a forensic investigator to access the data that has been deleted from the device.
With respect to Android, it is possible to recover most of the deleted data, including SMS, pictures, application data, and so on. But it is important to seize the device in a proper manner and follow certain procedures, otherwise, data might be deleted permanently. To ensure that the deleted data is not lost forever, it is recommended to keep the following points in mind:
- Do not use the phone for any activity after seizing it. The deleted text message exists on the device until space is needed by some other incoming data, so the phone must not be used for any sort of activity to prevent the data from being overwritten.
- Even when the phone is not used, without any intervention from our end, data can be overwritten. For instance, an incoming SMS would automatically occupy the space, which overwrites the deleted data. Also, remote wipe commands can wipe the content present on the device. To prevent such events, you can consider the option of placing the device in a Faraday bag. Thus, care should be taken to prevent delivery of any new messages or data through any means of communication.
How can deleted files be recovered?
When a user deletes any data from a device, the data is not actually erased from the device and continues to exist on it. What gets deleted is the pointer to that data. All filesystems contain metadata, which maintains information about the hierarchy of files, filenames, and so on. Deletion will not really erase the data but instead removes the file system metadata.
Thus, when text messages or any other files are deleted from a device, they are just made invisible to the user, but the files are still present on the device as long as they are not overwritten by some other data. Hence, there is the possibility of recovering them before new data is added and occupies the space. Deleting the pointer and marking the space as available is an extremely fast operation compared to actually erasing all the data from the device. Hence, to increase performance, operating systems just delete the metadata.
Recovering deleted data on an Android device involves three scenarios:
- Recovering data that is deleted from the SD card such as pictures, videos, and so on
- Recovering data that is deleted from SQLite databases such as SMS, chats, web history, and so on
- Recovering data that is deleted from the device’s internal storage
The following sections cover the techniques that can be used to recover deleted data from SD cards, and the internal storage of the Android device.
Recovering deleted data from SD cards
Data present on an SD card can reveal lots of information that is useful during a forensic investigation. The fact that pictures, videos, voice recordings, and application data are stored on the SD card adds weight to this. As mentioned in the previous chapters, Android devices often use FAT32 or exFAT file systems on their SD card.
The main reason for this is that these file systems are widely supported by most operating systems, including Windows, Linux, and macOS X. The maximum file size on a FAT32 formatted drive is around 4 GB. With increasingly high-resolution formats now available, this limit is commonly reached, that’s why newer devices support exFAT: this file system doesn’t have such limitations. Recovering the data deleted from an external SD is pretty easy if it can be mounted as a drive.
If the SD card is removable, it can be mounted as a drive by connecting it to a computer using a card reader. Any files can be transferred to the SD card while it’s mounted. Some of the older devices that use USB mass storage also mount the device to a drive when connected through a USB cable. In order to make sure that the original evidence is not modified, a physical image of the disk is taken and all further experimentation is done on the image itself. Similarly, in the case of SD card analysis, an image of the SD card needs to be taken. Once the imaging is done, we have a raw image file.
In our example, we will use FTK Imager by AccessData, which is an imaging utility. In addition to creating disk images, it can also be used to explore the contents of a disk image.
The following are the steps that can be followed to recover the contents of an SD card using this tool:
- Start FTK Imager and click on File and then Add Evidence Item… in the menu, as shown in the following screenshot:

Adding evidence source to FTK Imager
- Select Image File in the Select Source dialog and click on Next.
- In the Select File dialog, browse to the location where you downloaded the sdcard.dd file, select it, and click on Finish, as shown in the following screenshot:

Selecting the image file for analysis in FTK Imager
- FTK Imager’s default display will appear with the contents of the SD card visible in the View pane at the lower right. You can also click on the Properties tab below the lower left pane to view the properties for the disk image.
- Now, on the left pane, the drive has opened. You can open folders by clicking on the + sign. When highlighting the folder, contents are shown on the right pane. When a file is selected, its contents can be seen on the bottom pane.
- As shown in the following screenshot, the deleted files will have a red X over the icon derived from their file extension:
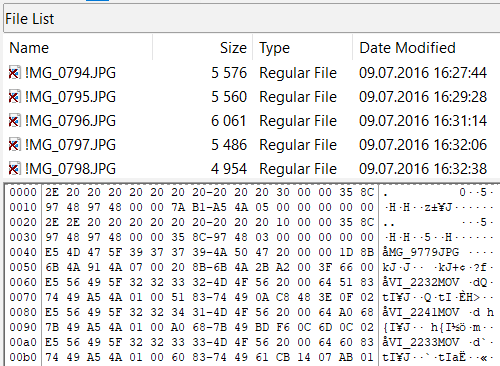
Deleted files shown with red X over the icons
- As shown in the following screenshot, to export the file, right-click on the file that contains the picture and select Export Files…:

Sometimes, only a fragment of the file is recoverable, which cannot be read or viewed directly. In that case, we need to look through free or unallocated space for more data. Carving can be used to recover files from free and unallocated space. PhotoRec is one of the tools that can help you to do that. You will learn more about file carving with PhotoRec in the following sections.
Recovering deleted data from internal memory
Recovering files deleted from Android’s internal memory, such as app data and so on, is not as easy as recovering such data from SD cards and SQLite databases, but, of course, it’s not impossible. Many commercial forensic tools are capable of recovering deleted data from Android devices, of course, if a physical acquisition is possible and the user data partition isn’t encrypted. But this is not very common for modern devices, especially those running most recent versions of the operating system, such as Oreo and Pie.
Most Android devices, especially modern smartphones, and tablets, use the EXT4 file system to organize data in their internal storage. This file system is very common for Linux-based devices. So, if we want to recover deleted data from the device’s internal storage, we need a tool capable of recovering deleted files from the EXT4 file system. One such tool is extundelete. The tool is available for downloading here: http://extundelete.sourceforge.net/.
To recover the contents of an inode, extundelete searches a file system’s journal for an old copy of that inode. Information contained in the inode helps the tool to locate the file within the file system. To recover not only the file’s contents, but also its name, extundelete is able to search the deleted entries in a directory to match the inode number of a file to a file name.
To use this tool, you will need a Linux workstation. Most forensic Linux distributions have it already on board. For example, the following is a screenshot from SIFT Workstation—a popular digital forensics and incident response Linux distribution created by Rob Lee and his team from the SANS Institute (https://digital-forensics.sans.org/community/downloads):

extundelete command-line options
Before you can start the recovery process, you will need to mount a previously imaged userdata partition. In this example, we are going to use an Android device imaged via the chip-off technique.
First of all, we need to determine the location of the userdata partition within the image. To do this, we can use mmls from the Sleuth Kit, as shown in the following screenshot:
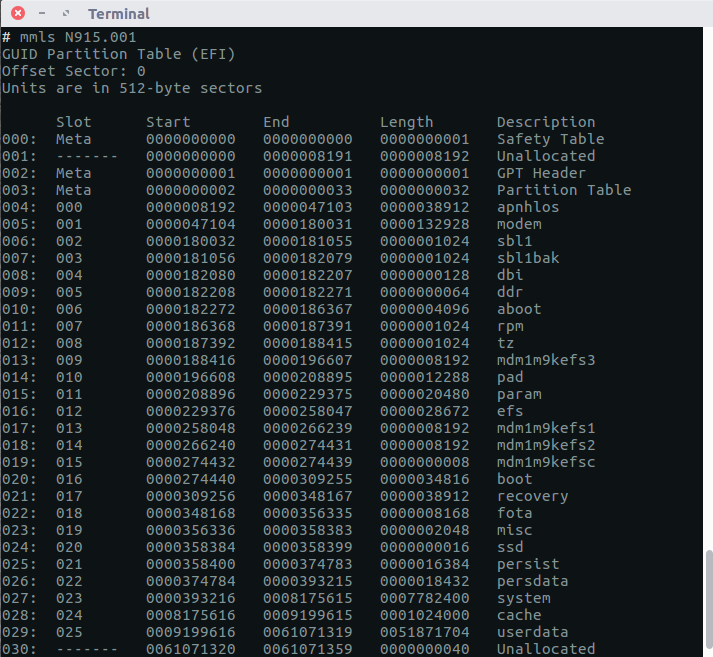
Android device partitions
As you can see in the screenshot, the userdata partition is the last one and starts in sector 9199616. To make sure the userdata partition is EXT4 formatted, let’s use fsstat, as shown in the following example:
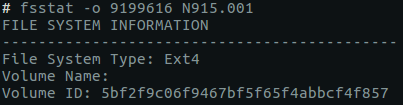
A part of fsstat output
All you need now is to mount the userdata partition and run extundelete against it, as shown in the following example:
extundelete /userdata/partition/mount/point --restore-all
All recovered files will be saved to a subdirectory of the current directory named RECOVERED_FILES. If you are interested in recovering files before or after the specified date, you can use the --before date and --after-date options. It’s important to note that these dates must be in UNIX Epoch format. There are quite a lot of both online and offline tools capable of converting timestamps, for example, you can use https://www.epochconverter.com/.
As you can see, this method isn’t very easy and fast, but there is a better way: using Autopsy, an open source digital forensic tool
In the following example, we used a built-in file extension filter to find all the images on the Android device, and found a lot of deleted artifacts:

Recovering deleted files from an EXT4 partition with Autopsy
Summary
Data recovery is the process of retrieving deleted data from the device and thus is a very important concept in forensics. In this chapter, we have seen various techniques to recover deleted data from both the SD card and the internal memory. While recovering the data from a removable SD card is easy, recovering data from internal memory involves a few complications. SQLite file parsing and file carving techniques aid a forensic analyst in recovering the deleted items present in the internal memory of an Android device.
In order to understand the forensic perspective and the analysis of Android apps, read our book Learning Android Forensics.
Read Next
What role does Linux play in securing Android devices?


