In today’s tutorial, we will show a step-by-step approach to publishing a prebuilt microservice onto a docker so you can scale and control it further.
Once the swarm is ready, we can use it to create services that we can use for scaling, but first, we will create a shared registry in our swarm. Then, we will build a microservice and publish it into a Docker.
Creating a registry
When we create a swarm’s service, we specify an image that will be used, but when we ask Docker to create the instances of the service, it will use the swarm master node to do it. If we have built our Docker images in our machine, they are not available on the master node of the swarm, so it will create a registry service that we can use to publish our images and reference when we create our own services.
First, let’s create the registry service:
docker service create --name registry --publish 5000:5000 registryNow, if we list our services, we should see our registry created:
docker service ls

ID NAME MODE REPLICAS IMAGE PORTS

os5j0iw1p4q1 registry replicated 1/1 registry:latest

*:5000->5000/tcp

And if we visit http://localhost:5000/v2/_catalog, we should just get:

{"repositories":[]}
This Docker registry is ephemeral, meaning that if we stop the service or start it again, our images will disappear. For that reason, we recommend to use it only for development. For a real registry, you may want to use an external service. We discussed some of them in Chapter 7, Creating Dockers.
Creating a microservice
In order to create a microservice, we will use Spring Initializr, as we have been doing in previous chapters.
We can start by visiting the URL: https://start.spring.io/:
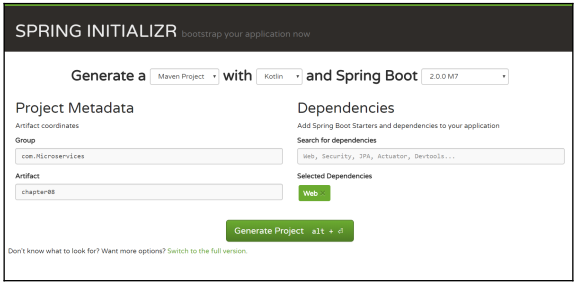
Creating a project in Spring Initializr
We have chosen to create a Maven Project using Kotlin and Spring Boot 2.0.0 M7. We chose the Group to be com.Microservices and the Artifact to be chapter08. For Dependencies, we have set Web.
Now, we can click Generate Project to download it as a zip file. After we unzip it, we can open it with IntelliJ IDEA to start working on our project.
After a few minutes, our project will be ready and we can open the Maven window to see the different lifecycle phases and Maven plugins and their goals.
We covered how to use Spring Initializr, Maven, and IntelliJ IDEA in Chapter 2, Getting Started with Spring Boot 2.0. You can check out this chapter to learn about topics not covered in this section. Now, we will add RestController to our project, in IntelliJ IDEA, in the Project window. Right-click our com.Microservices.chapter08 package and then choose New | Kotlin File/Class. In the pop-up window, we will set its name as HelloController and in the Kind drop-down, choose Class.
Let’s modify our newly created controller:
package com.microservices.chapter08

import org.springframework.web.bind.annotation.GetMapping

import org.springframework.web.bind.annotation.RestController

import java.util.*

import java.util.concurrent.atomic.AtomicInteger

@RestController

class HelloController {

private val id: String = UUID.randomUUID().toString()

companion object {

val total: AtomicInteger = AtomicInteger()

}

@GetMapping("/hello")

fun hello() = "Hello I'm $id and I have been called

${total.incrementAndGet()} time(s)"

}
This small controller will display a message with a GET request to the /hello URL. The message will display a unique id that we establish when the object is created and it will show how many times it has been called. We have used AtomicInteger to guarantee that no other requests are modified on our number concurrently.
Finally, we will rename application.properties in the resources folder, using Shift + F6 to get application.yml, and edit it:
logging.level.org.springframework.web: DEBUGWe will establish that we have the log in the debug level for the Sprint Web Framework, so for the latter, we could view the information that will be needed in our logs. Now, we can run our microservice, either using IntelliJ IDEA Maven Project window with the springboot:run target, or by executing it on the command line:
mvnw spring-boot:runEither way, when we visit the http://localhost:8080/hello URL, we should see something like:
Hello I'm a0193477-b9dd-4a50-85cc-9d9405e02299 and I have been called 1 time(s)Doing consecutive calls will increase the number. Finally, we can see at the end of our log that we have several requests. The following should appear:
Hello I'm a0193477-b9dd-4a50-85cc-9d9405e02299 and I have been called 1 time(s)Now, we will stop the microservice to create our Docker.
Creating our Docker
Now that our microservice is running, we need to create a Docker. To simplify the process, we will just use Dockerfile. To create this file on the top of the Project window, rightclick chapter08 and then select New | File and type Dockerfile in the drop-down menu.
In the next window, click OK and the file will be created.
Now, we can add this to our Dockerfile:
FROM openjdk:8-jdk-alpine

ADD target/*.jar app.jar

ENTRYPOINT ["java","-Djava.security.egd=file:/dev/./urandom","-jar",

"App.jar"]
In this case, we tell the JVM to use dev/urandom instead of dev/random to generate random numbers required by our ID generation and this will make the operation much faster. You may think that urandom is less secure than random, but read this article for more information: https://www.2uo.de/myths-about-urandom/.
From our microservice directory, we will use the command line to create our package:
mvnw packageThen, we will create a Docker for it:
docker build . -t helloNow, we need to tag our image in our shared registry service, using the following command:
docker tag hello localhost:5000/helloThen, we will push our image to the shared registry service:
docker push localhost:5000/helloCreating the service
Finally, we will add the microservice as a service to our swarm, exposing the 8080 port:
docker service create --name hello-service --publish 8080:8080

localhost:5000/hello
Now, we can navigate to http://localhost:8888/application/default to get the same results as before, but now we run our microservice in a Docker swarm.
If you found this tutorial useful, do check out the book Hands-On Microservices with Kotlin to work with Kotlin, Spring and Spring Boot for building reactive and cloud-native microservices.
Also check out other posts:
How to publish Docker and integrate with Maven
How to build Microservices using REST framework