There are many reasons why you might want to dockerize an ASP.NET Core application. But ultimately, it's simply going to make life much easier for you. It's great for isolating components, especially if you're building a microservices or planning to deploy your application on the cloud.
So, if you want an easier life (possibly) follow this tutorial to learn how to dockerize an ASP.NET Core application.
Get started: Dockerize an ASP.NET Core application
Create a new ASP.NET Core Web Application in Visual Studio 2017 and click OK:
On the next screen, select Web Application (Model-View-Controller) or any type you like, while ensuring that ASP.NET Core 2.0 is selected from the drop-down list. Then check the Enable Docker Support checkbox. This will enable the OS drop-down list. Select Windows here and then click on the OK button:
If you see the following message, you need to switch to Windows containers. This is because you have probably kept the default container setting for Docker as Linux:
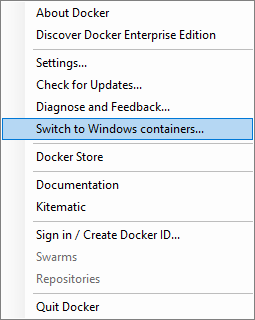
If you right-click on the Docker icon in the taskbar, you will see that you have an option to enable Windows containers there too. You can switch to Windows containers from the Docker icon in the taskbar by clicking on the Switch to Windows containers option:
Switching to Windows containers may take several minutes to complete, depending on your line speed and the hardware configuration of your PC.If, however, you don't click on this option, Visual Studio will ask you to change to Windows containers when selecting the OS platform as Windows.There is a good reason that I am choosing Windows containers as the target OS. This reason will become clear later on in the chapter when working with Docker Hub and automated builds.
After your ASP.NET Core application is created, you will see the following project setup in Solution Explorer:
The Docker support that is added to Visual Studio comes not only in the form of the Dockerfile, but also in the form of the Docker configuration information. This information is contained in the global docker-compose.yml file at the solution level:
3. Clicking on the Dockerfile in Solution Explorer, you will see that it doesn't look complicated at all. Remember, the Dockerfile is the file that creates your image. The image is a read-only template that outlines how to create a Docker container. The Dockerfile, therefore, contains the steps needed to generate the image and run it. The instructions in the Dockerfile create layers in the image. This means that if anything changes in the Dockerfile, only the layers that have changed will be rebuilt when the image is rebuilt. The Dockerfile looks as follows:
FROM microsoft/aspnetcore:2.0-nanoserver-1709 AS base
WORKDIR /app
EXPOSE 80
FROM microsoft/aspnetcore-build:2.0-nanoserver-1709 AS build
WORKDIR /src
COPY *.sln ./
COPY DockerApp/DockerApp.csproj DockerApp/
RUN dotnet restore
COPY . .
WORKDIR /src/DockerApp
RUN dotnet build -c Release -o /app
FROM build AS publish
RUN dotnet publish -c Release -o /app
FROM base AS final
WORKDIR /app
COPY --from=publish /app .
ENTRYPOINT ["dotnet", "DockerApp.dll"]
When you have a look at the menu in Visual Studio 2017, you will notice that the Run button has been changed to Docker:
Clicking on the Docker button to debug your ASP.NET Core application, you will notice that there are a few things popping up in the Output window. Of particular interest is the IP address at the end. In my case, it reads Launchinghttp://172.24.12.112 (yours will differ):
Unlock access to the largest independent learning library in Tech for FREE!
Get unlimited access to 7500+ expert-authored eBooks and video courses covering every tech area you can think of.
Renews at $19.99/month. Cancel anytime
When the browser is launched, you will see that the ASP.NET Core application is running at the IP address listed previously in the Output window. Your ASP.NET Core application is now running inside of a Windows Docker container:
This is great and really easy to get started with. But what do you need to do to Dockerize an ASP.NET Core application that already exists? As it turns out, this isn't as difficult as you may think.
How to add Docker support to an existing .NET Core application
Imagine that you have an ASP.NET Core application without Docker support. To add Docker support to this existing application, simply add it from the context menu:
To add Docker support to an existing ASP.NET Core application, you need to do the following:
Right-click on your project in Solution Explorer
Click on the Add menu item
Click on Docker Support in the fly-out menu:
Visual Studio 2017 now asks you what the target OS is going to be. In our case, we are going to target Windows:
After clicking on the OK button, Visual Studio 2017 will begin to add the Docker support to your project:
It's actually extremely easy to create ASP.NET Core applications that have Docker support baked in, and even easier to add Docker support to existing ASP.NET Core applications.
Lastly, if you experience any issues, such as file access issues, ensure that your antivirus software has excluded your Dockerfile from scanning. Also, make sure that you run Visual Studio as Administrator.

 United States
 Great Britain
 India
India
 Germany
 France
 Canada
 Russia
 Spain
Spain
 Brazil
 Australia
 Singapore
 Canary Islands
 Hungary
 Ukraine
 Luxembourg
 Estonia
 Lithuania
 South Korea
 Turkey
 Switzerland
 Colombia
 Taiwan
 Chile
Chile
 Norway
 Ecuador
 Indonesia
 New Zealand
 Cyprus
 Denmark
 Finland
 Poland
 Malta
Malta
 Czechia
 Austria
 Sweden
 Italy
Italy
 Egypt
Egypt
 Belgium
 Portugal
 Slovenia
 Ireland
 Romania
 Greece
 Argentina
 Netherlands
 Bulgaria
 Latvia
 South Africa
 Malaysia
 Japan
Japan
 Slovakia
 Philippines
 Mexico
 Thailand


 If you see the following message, you need to switch to Windows containers. This is because you have probably kept the default container setting for Docker as Linux:
 Switching to Windows containers may take several minutes to complete, depending on your line speed and the hardware configuration of your PC.If, however, you don't click on this option, Visual Studio will ask you to change to Windows containers when selecting the OS platform as Windows.There is a good reason that I am choosing Windows containers as the target OS. This reason will become clear later on in the chapter when working with Docker Hub and automated builds.

 When the browser is launched, you will see that the ASP.NET Core application is running at the IP address listed previously in the


