


In today’s tutorial, we will learn how to use QThread and its affiliate classes to create multithreaded applications. We will go through this by creating an example project, which processes and displays the input and output frames from a video source using a separate thread. This helps leave the GUI thread (main thread) free and responsive while more intensive processes are handled with the second thread. As it was mentioned earlier, we will focus mostly on the use cases common to computer vision and GUI development; however, the same (or a very similar) approach can be applied to any multithreading problem.
[box type=”note” align=”” class=”” width=””]This article is an excerpt from the book, Computer Vision with OpenCV 3 and Qt5 written by Amin Ahmadi Tazehkandi. This book will help you blend the power of Qt with OpenCV to build cross-platform computer vision applications.[/box]
We will use this example project to implement multithreading using two different approaches available in Qt for working with QThread classes. First, subclassing and overriding the run method, and second, using the moveToThread function available in all Qt objects, or, in other words, QObject subclasses.
Subclassing QThread
Let’s start by creating an example Qt Widgets application in the Qt Creator named MultithreadedCV. To start with, add an OpenCV framework to this project:
win32: {

include("c:/dev/opencv/opencv.pri")

}

unix: !macx{

CONFIG += link_pkgconfig

PKGCONFIG += opencv

}

unix: macx{

INCLUDEPATH += /usr/local/include

LIBS += -L"/usr/local/lib"

-lopencv_world

}
Then, add two label widgets to your mainwindow.ui file, shown as follows. We will use these labels to display the original and processed video from the default webcam on the computer:

Make sure to set the objectName property of the label on the left to inVideo and the one on the right to outVideo. Also, set their alignment/Horizontal property to AlignHCenter. Now, create a new class called VideoProcessorThread by right-clicking on the project PRO file and selecting Add New from the menu. Then, choose C++ Class and make sure the combo boxes and checkboxes in the new class wizard look like the following screenshot:
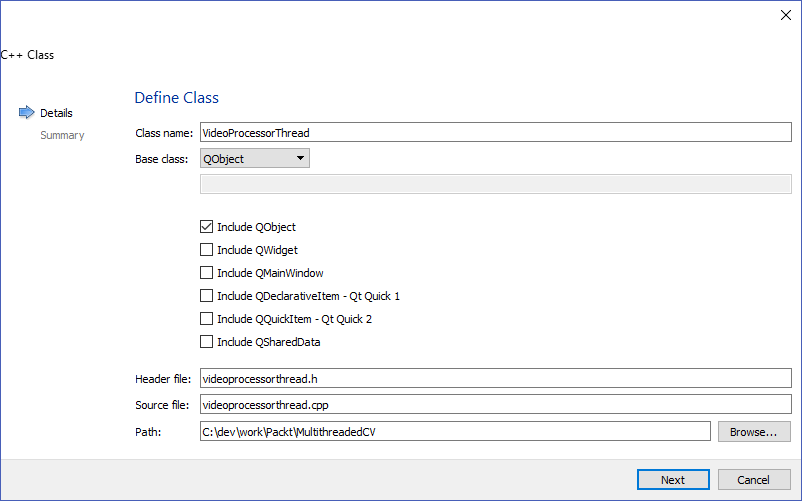
After your class is created, you’ll have two new files in your project called videoprocessorthread.h and videoprocessor.cpp, in which you’ll implement a video processor that works in a thread separate from the mainwindow files and GUI threads. First, make sure that this class inherits QThread by adding the relevant include line and class inheritance, as seen here (just replace QObject with QThread in the header file). Also, make sure you include OpenCV headers:
#include <QThread>

#include "opencv2/opencv.hpp"

class VideoProcessorThread : public QThread
You need to similarly update the videoprocessor.cpp file so that it calls the correct constructor:
VideoProcessorThread::VideoProcessorThread(QObject *parent)

: QThread(parent)
Now, we need to add some required declarations to the videoprocessor.h file. Add the following line to the private members area of your class:
void run() override;

And then, add the following to the signals section:

void inDisplay(QPixmap pixmap);

void outDisplay(QPixmap pixmap);

And finally, add the following code block to the videoprocessorthread.cpp file:

void VideoProcessorThread::run()

{

using namespace cv;

VideoCapture camera(0);

Mat inFrame, outFrame;

while(camera.isOpened() && !isInterruptionRequested())

{

camera >> inFrame;

if(inFrame.empty())

continue;

bitwise_not(inFrame, outFrame);

emit inDisplay(

QPixmap::fromImage(

QImage(

inFrame.data,

inFrame.cols,

inFrame.rows,

inFrame.step,

QImage::Format_RGB888)

.rgbSwapped()));

emit outDisplay(

QPixmap::fromImage(

QImage(

outFrame.data,

outFrame.cols,

outFrame.rows,

Multithreading Chapter 8

[ 309 ]

outFrame.step,

QImage::Format_RGB888)

.rgbSwapped()));

}

}
The run function is overridden and it’s implemented to do the required video processing task. If you try to do the same inside the mainwindow.cpp code in a loop, you’ll notice that your program becomes unresponsive, and, eventually, you have to terminate it. However, with this approach, the same code is now in a separate thread. You just need to make sure you start this thread by calling the start function, not run! Note that the run function is meant to be called internally, so you only need to reimplement it as seen in this example; however, to control the thread and its execution behavior, you need to use the following functions:
- start: This can be used to start a thread if it is not already started. This function
starts the execution by calling the run function we implemented. You can pass
one of the following values to the start function to control the priority of the
thread:-
- QThread::IdlePriority (this is scheduled when no other thread
is running) - QThread::LowestPriority
- QThread::LowPriority
- QThread::NormalPriority
- QThread::HighPriority
- QThread::HighestPriority
- QThread::TimeCriticalPriority (this is scheduled as much as
possible)
QThread::InheritPriority (this is the default value, which - simply inherits priority from the parent)
- QThread::IdlePriority (this is scheduled when no other thread
-
- terminate: This function, which should only be used in extreme cases (means
never, hopefully), forces a thread to terminate. - setTerminationEnabled: This can be used to allow or disallow the terminate
Function. - wait: This function can be used to block a thread (force waiting) until the thread
is finished or the timeout value (in milliseconds) is reached. - requestInterruption and isRequestInterrupted: These functions can be
used to set and get the interruption request status. Using these functions is a
useful approach to make sure the thread is stopped safely in the middle of a
process that can go on forever. - isRunning and isFinished: These functions can be used to request the
execution status of the thread.
Apart from the functions we mentioned here, QThread contains other functions useful for dealing with multithreading, such as quit, exit, idealThreadCount, and so on. It is a good idea to check them out for yourself and think about use cases for each one of them. QThread is a powerful class that can help maximize the efficiency of your applications. Let’s continue with our example. In the run function, we used an OpenCV VideoCapture class to read the video frames (forever) and apply a simple bitwise_not operator to the Mat frame (we can do any other image processing at this point, so bitwise_not is only an example and a fairly simple one to explain our point), then converted that to QPixmap via QImage, and then sent the original and modified frames using two signals. Notice that in our loop that will go on forever, we will always check if the camera is still open and also check if there is an interruption request to this thread. Now, let’s use our thread in MainWindow. Start by including its header file in the mainwindow.h file:
#include "videoprocessorthread.h"

Then, add the following line to the private members' section of MainWindow, in the mainwindow.h file:

VideoProcessorThread processor;

Now, add the following code to the MainWindow constructor, right after the setupUi line:

connect(&processor,

SIGNAL(inDisplay(QPixmap)),

ui->inVideo,

SLOT(setPixmap(QPixmap)));

connect(&processor,

SIGNAL(outDisplay(QPixmap)),

ui->outVideo,

SLOT(setPixmap(QPixmap)));

processor.start();

And then add the following lines to the MainWindow destructor, right before the delete

ui; line:

processor.requestInterruption();

processor.wait();
We simply connected the two signals from the VideoProcessorThread class to two labels we had added to the MainWindow GUI, and then started the thread as soon as the program started. We also request the thread to stop as soon as MainWindow is closed and right before the GUI is deleted. The wait function call makes sure to wait for the thread to clean up and safely finish executing before continuing with the delete instruction. Try running this code to check it for yourself. You should see something similar to the following image as soon as the program starts:
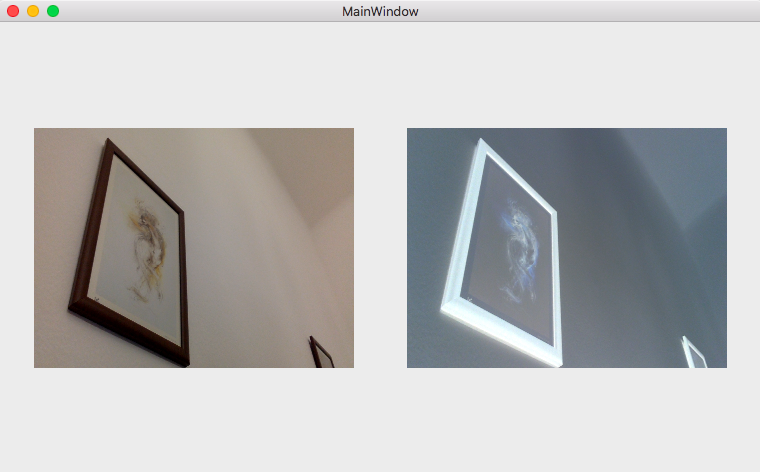
The video from your default webcam on the computer should start as soon as the program starts, and it will be stopped as soon as you close the program. Try extending the VideoProcessorThread class by passing a camera index number or a video file path into it. You can instantiate as many VideoProcessorThread classes as you want. You just need to make sure to connect the signals to correct widgets on the GUI, and this way you can have multiple videos or cameras processed and displayed dynamically at runtime.
Using the moveToThread function
As we mentioned earlier, you can also use the moveToThread function of any QObject subclass to make sure it is running in a separate thread. To see exactly how this works, let’s repeat the same example by creating exactly the same GUI, and then creating a new C++ class (same as before), but, this time, naming it VideoProcessor. This time though, after the class is created, you don’t need to inherit it from QThread, leave it as QObject (as it is). Just add the following members to the videoprocessor.h file:
signals:

void inDisplay(QPixmap pixmap);

void outDisplay(QPixmap pixmap);

public slots:

void startVideo();

void stopVideo();

private:

bool stopped;
The signals are exactly the same as before. The stopped is a flag we’ll use to help us stop the video so that it does not go on forever. The startVideo and stopVideo are functions we’ll use to start and stop the processing of the video from the default webcam. Now, we can switch to the videoprocessor.cpp file and add the following code blocks. Quite similar to what we had before, with the obvious difference that we don’t need to implement the run function since it’s not a QThread subclass, and we have named our functions as we like:
void VideoProcessor::startVideo()

{

using namespace cv;

VideoCapture camera(0);

Mat inFrame, outFrame;

stopped = false;

while(camera.isOpened() && !stopped)

{

camera >> inFrame;

if(inFrame.empty())

continue;

bitwise_not(inFrame, outFrame);

emit inDisplay(

QPixmap::fromImage(

QImage(

inFrame.data,

inFrame.cols,

inFrame.rows,

inFrame.step,

QImage::Format_RGB888)

.rgbSwapped()));

emit outDisplay(

QPixmap::fromImage(

QImage(

outFrame.data,

outFrame.cols,

outFrame.rows,

outFrame.step,

QImage::Format_RGB888)

.rgbSwapped()));

}

}

void VideoProcessor::stopVideo()

{

stopped = true;

}
Now we can use it in our MainWindow class. Make sure to add the include file for the VideoProcessor class, and then add the following to the private members’ section of MainWindow:
VideoProcessor *processor;

Now, add the following piece of code to the MainWindow constructor in the mainwindow.cpp file:

processor = new VideoProcessor();

processor->moveToThread(new QThread(this));

connect(processor->thread(),

SIGNAL(started()),

processor,

SLOT(startVideo()));

connect(processor->thread(),

SIGNAL(finished()),

processor,

SLOT(deleteLater()));

connect(processor,

SIGNAL(inDisplay(QPixmap)),

ui->inVideo,

SLOT(setPixmap(QPixmap)));

connect(processor,

SIGNAL(outDisplay(QPixmap)),

ui->outVideo,

SLOT(setPixmap(QPixmap)));

processor->thread()->start();
In the preceding code snippet, first, we created an instance of VideoProcessor. Note that we didn’t assign any parents in the constructor, and we also made sure to define it as a pointer. This is extremely important when we intend to use the moveToThread function. An object that has a parent cannot be moved into a new thread. The second highly important lesson in this code snippet is the fact that we should not directly call the startVideo function of VideoProcessor, and it should only be invoked by connecting a proper signal to it. In this case, we have used its own thread’s started signal; however, you can use any other signal that has the same signature. The rest is all about connections. In the MainWindow destructor function, add the following lines:
processor->stopVideo();

processor->thread()->quit();

processor->thread()->wait();
If you found our post useful, do check out this book Computer Vision with OpenCV 3 and Qt5 which will help you understand how to build a multithreaded computer vision applications with the help of OpenCV 3 and Qt5.
Read Next
Top 10 Tools for Computer Vision
OpenCV Primer: What can you do with Computer Vision and how to get started?
Image filtering techniques in OpenCV