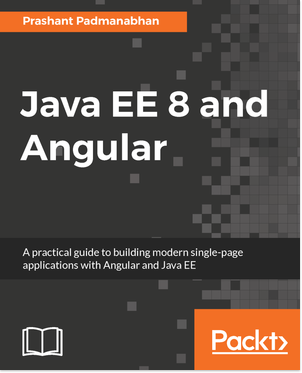
Today, we will learn to build microservices using REST framework. Our microservices are Java EE 8 web projects, built using maven and published as separate Payara Micro instances, running within docker containers. The separation allows them to scale individually, as well as have independent operational activities. Given the BCE pattern used, we have the business component split into boundary, control, and entity, where the boundary comprises of the web resource (REST endpoint) and business service (EJB). The web resource will publish the CRUD operations and the EJB will in turn provide the transactional support for each of it along with making external calls to other resources. Here’s a logical view for the boundary consisting of the web resource and business service:
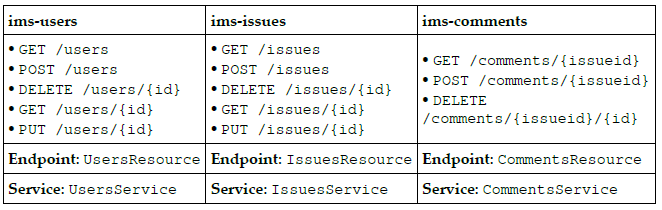
The microservices will have the following REST endpoints published for the projects shown, along with the boundary classes XXXResource and XXXService:
Power Your APIs with JAXRS and CDI, for Server-Sent Events. In IMS, we publish task/issue updates to the browser using an SSE endpoint. The code observes for the events using the CDI event notification model and triggers the broadcast.
The ims-users and ims-issues endpoints are similar in API format and behavior. While one deals with creating, reading, updating, and deleting a User, the other does the same for an Issue. Let’s look at this in action. After you have the containers running, we can start firing requests to the /users web resource.
The following curl command maps the URI /users to the @GET resource method named getAll() and returns a collection (JSON array) of users. The Java code will simply return a Set<User>, which gets converted to JsonArray due to the JSON binding support of JSON-B.
The method invoked is as follows:
@GET

public Response getAll() {... }

curl -v -H 'Accept: application/json'

http://localhost:8081/ims-users/resources/users

...

HTTP/1.1 200 OK

...

[{ "id":1,"name":"Marcus","email":"[email protected]"

"credential":{"password":"1234","username":"marcus"}

},

{ "id":2,"name":"Bob","email":"[email protected]"

"credential":{"password":"1234","username":"bob"}

}]
Next, for selecting one of the users, such as Marcus, we will issue the following curl command, which uses the /users/xxx path. This will map the URI to the @GET method which has the additional @Path(“{id}”) annotation as well. The value of the id is captured using the @PathParam(“id”) annotation placed before the field. The response is a User entity wrapped in the Response object returned.
The method invoked is as follows:
@GET @Path("{id}")

public Response get(@PathParam("id") Long id) { ... }

curl -v -H 'Accept: application/json'

http://localhost:8081/ims-users/resources/users/1

...

HTTP/1.1 200 OK

...

{

"id":1,"name":"Marcus","email":"[email protected]"

"credential":{"password":"1234","username":"marcus"}

}
In both the preceding methods, we saw the response returned as 200 OK. This is achieved by using a Response builder. Here’s the snippet for the method:
return Response.ok( ..entity here..).build();Next, for submitting data to the resource method, we use the @POST annotation. You might have noticed earlier that the signature of the method also made use of a UriInfo object. This is injected at runtime for us via the @Context annotation. A curl command can be used to submit the JSON data of a user entity.
The method invoked is as follows:

@POST

public Response add(User newUser, @Context UriInfo uriInfo)
We make use of the -d flag to send the JSON body in the request. The POST request is implied:
curl -v -H 'Content-Type: application/json'

http://localhost:8081/ims-users/resources/users -d '{"name": "james",

"email":"[email protected]",

"credential": {"username":"james","password":"test123"}}'

...

HTTP/1.1 201 Created

...

Location: http://localhost:8081/ims-users/resources/users/3
The 201 status code is sent by the API to signal that an entity has been created, and it also returns the location for the newly created entity. Here’s the relevant snippet to do this:
//uriInfo is injected via @Context parameter to this method

URI location = uriInfo.getAbsolutePathBuilder()

.path(newUserId) // This is the new entity ID

.build();

// To send 201 status with new Location

return Response.created(location).build();

Similarly, we can also send an update request using the PUT method.

The method invoked is as follows:

@PUT @Path("{id}")

public Response update(@PathParam("id") Long id, User existingUser)

curl -v -X PUT -H 'Content-Type: application/json'

http://localhost:8081/ims-users/resources/users/3 -d '{"name": "jameson",

"email":"[email protected]"}'

...

HTTP/1.1 200 Ok
The last method we need to map is the DELETE method, which is similar to the GET operation, with the only difference being the HTTP method used. The method invoked is as follows:
@DELETE @Path("{id}")

public Response delete(@PathParam("id") Long id)

curl -v -X DELETE http://localhost:8081/ims-users/resources/users/3

...

HTTP/1.1 200 Ok
You can try out the Issues endpoint in a similar manner.
For the GET requests of /users or /issues, the code simply fetches and returns a set of entity objects. But when requesting an item within this collection, the resource method has to look up the entity by the passed in id value, captured by @PathParam(“id”), and if found, return the entity, or else a 404 Not Found is returned. Here’s a snippet showing just that:
final Optional<Issue> issueFound = service.get(id); //id obtained

if (issueFound.isPresent()) {

return Response.ok(issueFound.get()).build();

}

return Response.status(Response.Status.NOT_FOUND).build();
The issue instance can be fetched from a database of issues, which the service object interacts with. The persistence layer can return a JPA entity object which gets converted to JSON for the calling code. We will look at persistence using JPA in a later section.
For the update request which is sent as an HTTP PUT, the code captures the identifier ID using @PathParam(“id”), similar to the previous GET operation, and then uses that to update the entity. The entity itself is submitted as a JSON input and gets converted to the entity instance along with the passed in message body of the payload. Here’s the code snippet for that:
@PUT @Path("{id}")

public Response update(@PathParam("id") Long id, Issue updated) {

updated.setId(id);

boolean done = service.update(updated);

return done ?

Response.ok(updated).build() :

Response.status(Response.Status.NOT_FOUND).build();

}
The code is simple to read and does one thing—it updates the identified entity and returns the response containing the updated entity or a 404 for a non-existing entity. The service references that we have looked at so far are @Stateless beans which are injected into the resource class as fields:
// Project: ims-comments

@Stateless

public class CommentsService {... }

// Project: ims-issues

@Stateless

public class IssuesService {... }

// Project: ims-users

@Stateless

public class UsersService {... }
These will in turn have the EntityManager injected via @PersistenceContext. Combined with the resource and service, our components have made the boundary ready for clients to use.
Similar to the WebSockets section in Chapter 6, Power Your APIs with JAXRS and CDI, in IMS, we use a @ServerEndpoint which maintains the list of active sessions and then uses that to broadcast a message to all users who are connected. A ChatThread keeps track of the messages being exchanged through the @ServerEndpoint class. For the message to besent, we use the stream of sessions and filter it by open sessions, then send the message for each of the sessions:
chatSessions.getSessions().stream().filter(Session::isOpen)

.forEach(s -> {

try {

s.getBasicRemote().sendObject(chatMessage);

}catch(Exception e) {...}

});
To summarize, we practically saw how to leverage REST framework to build microservices.
This article is an excerpt from the book, Java EE 8 and Angular written by Prashant Padmanabhan. The book covers building modern user friendly web apps with Java EE