Today, we will demonstrate in detail how to create and build dockers with microservices. We will also explore commands used to manage the building process with microservices.
First, we will create a simple microservice that we will use for this tutorial. Then we will get familiar with the Docker building process, and finally, we will create and run our microservice within a Docker.
Creating an example microservice
In order to create our microservice, we will use Spring Initializr.
We can start by visiting the URL: https://start.spring.io/:
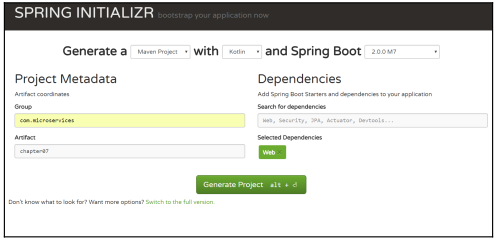
We have chosen to create a Maven Project using Kotlin and Spring Boot 2.0.0 M7, and we’ve chosen the Group to be com.microservices and Artifact chapter07. For Dependencies, we have set Web. Now we can click on Generate Project to download it as a ZIP file. After we unzip it, we can open it with IntelliJ IDEA to start working on our project. After some minutes, our project will be ready and we can open the Maven window to see the different lifecycle phases, Maven plugins, and their goals.
Now we will modify our application to create a simple microservice. Open the Chapter07Application.kt file from the project window, and modify it by adding a @RestController:
package com.microservices.chapter07

import org.springframework.boot.autoconfigure.SpringBootApplication

import org.springframework.boot.runApplication

import org.springframework.web.bind.annotation.GetMapping

import org.springframework.web.bind.annotation.RestController

@SpringBootApplication

class Chapter07Application

@RestController

class GreetingsController {

@GetMapping("/greetings")

fun greetings() = "hello from a Docker"

}

fun main(args: Array<String>) {

runApplication<Chapter07Application>(*args)

}
Let’s run to see our microservice start somehow. In the Maven window, just double-click on the spring-boot plugin, or just run goal from the command line in the microservice folder:
mvnw spring-boot:runAfter some seconds, we will see several log lines, including something like the following:
INFO 11960 --- [ main] o.s.b.w.embedded.tomcat.TomcatWebServer : Tomcat

started on port(s): 8080 (http)

INFO 11960 --- [ main] c.m.chapter07.Chapter07ApplicationKt : Started

Chapter07ApplicationKt in 1.997 seconds (JVM running for 8.154)
Our service is ready, and we can just navigate to the http://localhost:8080/greetings URL, but it’s still not running in a Docker; let’s stop with Ctrl + C, and continue.
Creating a Dockerfile
In order to create a Docker image, we need to first create a Dockerfile, a file that will include the instructions that we will give to Docker in order to build our image. To create this file, on the top of the Project window, right-click on chapter07 and then select in the drop-down menu New | File, and type Dockerfile. In the next window, click OK, and the file will be created.
IntelliJ will recognize that file and offer a plugin to handle it. At the top of the editing window, a message will appear as Plugins supporting Dockerfile files found. On the right of this message, we will see Install Plugins Ignore extension. Let’s click on Install Plugins to allow IntelliJ to handle this file. This will require the IDE to restart, and after some seconds it should start again.
Now we can add this to our Dockerfile:
FROM openjdk:8-jdk-alpine

ENTRYPOINT ["java","-version"]
Here, we are telling Docker that our image will be based on Java OpenJDK 8 in Alpine Linux. Then, we configure the entry point of our Docker and the command that will be executed when our Docker runs to be just the java command with a parameter, -version. Each of the lines on the Dockerfile will be a step, one of those layers that our Docker is completed with. Now, we should open a command line in our chapter07 directory and run this command to build our image:
docker build . -t chapter07This will create output that will look something like this:
Sending build context to Docker daemon 2.302MB
Step 1/2 : FROM openjdk:8-jdk-alpine
8-jdk-alpine: Pulling from library/openjdk
b56ae66c2937: Pull complete
81cebc5bcaf8: Pull complete
9f7678525069: Pull complete
Digest:
sha256:219d9c2e4c27b8d1cfc6daeaf339e3eb7ceb82e67ce85857bdc55254822802bc
Status: Downloaded newer image for openjdk:8-jdk-alpine
---> a2a00e606b82
Step 2/2 : ENTRYPOINT java --version
---> Running in 661d47cd0bbd
---> 3a1d8bea31e7
Removing intermediate container 661d47cd0bbd
Successfully built 3a1d8bea31e7
Successfully tagged chapter07:latest
What has happened now is that Docker has built an image for us, and the image has been tagged as chapter07, since we used the -t option. Let’s now run it with:
docker run chapter07This output should look something like this:
openjdk version "1.8.0_131"

OpenJDK Runtime Environment (IcedTea 3.4.0) (Alpine 8.131.11-r2)

OpenJDK 64-Bit Server VM (build 25.131-b11, mixed mode)
This has run our Docker image that simply displays the Java version, but we need to add our microservice to it. Before that, let’s understand clearly what a Docker is. A Dockerfile produces a binary image of a set of commands creating layers for each of them. Those commands are executed at build time to output the desired image. An image will have an entry point, a command that will be executed when we run the image itself.
A Docker is a containerized instance of a particular image. We usually refer to them as containers. When we run them, a copy of the original image is containerized and run through the defined entry point, outputting the results of their execution.
We have just briefly discussed creating Dockerfiles, but it is a technique that we should eventually master. We strongly recommend reviewing the Docker file reference on the Docker page https://docs.Docker.com/engine/reference/builder/, also see Dockerfile best practices at: https://docs.Docker.com/engine/userguide/eng-image/dockerfile_bestpractices/.
Dockerize our microservice
In order to create a Docker with our microservice, we first need to package it into a JAR. So let’s use Maven to do it, using the package lifecycle:
mvnw packageWith the package created, now we need to modify our Dockerfile to actually use it:
FROM openjdk:8-jdk-alpine

ADD target/*.jar microservice.jar

ENTRYPOINT ["java","-jar", "microservice.jar"]
We use the ADD command to include our microservice JAR from the target folder. We get it from our target directory, and we add it to the Docker as microservices.jar. Then, we change our entry point to actually execute our JAR.
Now we can build our image again, repeating the build command:
docker build . -t chapter07This should now give the following output:
Sending build context to Docker daemon 21.58MB

Step 1/3 : FROM openjdk:8-jdk-alpine

---> a2a00e606b82

Step 2/3 : ADD target/*.jar microservice.jar

---> 5c385fee6516

Step 3/3 : ENTRYPOINT java -jar microservice.jar

---> Running in 11071fdd0eb2

---> a43186cc4ea0

Removing intermediate container 11071fdd0eb2

Successfully built a43186cc4ea0

Successfully tagged chapter07:latest
However, this build is quicker than before, since the Docker command is an intelligent command; the things that have no changes from our FROM command are cached, and will not be built again.
Now we can run our microservice again by using:
docker run chapter07We can now see our Spring Boot application running; however, if we try to navigate in our browser to it, we will not be able to reach it, so let’s stop it with Ctrl + C.
Sometimes, doing Ctrl + C will not stop our Docker from just returning to the terminal. If we really want to completely stop it, we could follow these steps.
First, we should list our Docker with:
docker psThis should list our Docker status, and actually, tell us that the Docker is still up:
CONTAINER ID IMAGE COMMAND STATUS

d6bd15780353 chapter07 "java -jar microse..." Up About a minute
We can just stop it with the kill command:
docker kill d6bd15780353Now, if we repeat our Docker ps command again, the Docker should not be shown, but it will if we do a Docker ps -a:
CONTAINER ID IMAGE COMMAND STATUS

d6bd15780353 chapter07 "java -jar microse..." Exited (137) 2 minutes ago
The status of our Docker has changed from up to existed, as we’d expect.
Running the microservice
The reason we can’t access the microservice when we run our previous example is that we need to expose the port that is running on the container outside of it.
So, we need to modify our Docker run command to:
docker run -d -p8080:8080 chapter07Now we can just navigate to the URL http://localhost:8080/greetings, and we should get the following output:
hello from a DockerWe have just exposed our Docker internal port 8080, but the -p option allows us to expose a different port too. So inside, the Docker can run on port 8080, but we can externally run on another port. When we run our microservice via the command line, we actually wait until we press Ctrl + C to terminate it. We can instead just run it as a daemon.
A daemon is a process that runs in the background of our system, so we could continue executing other commands while our process keeps running behind the scenes.
To run a Docker as a daemon, we could use the following command:
docker run -d -p8080:8080 chapter07This will run the Docker as a daemon in the background, but it is still accessible. It should be listed when we do the following:
docker psHere, we can get the CONTAINER ID from our running Docker:
CONTAINER ID IMAGE COMMAND STATUS

741bf50a0bfc chapter07 "java -jar microse..." Up About a minute
To see the logs, we can now run the following command:
docker logs 741bf50a0bfcThis will display the log of a running Docker; however, it will just exit after displaying the current logs. If we can wait for more output, as the Unix command tail does, we can instead
do the following:

docker logs 741bf50a0bfc -f
With this, we learned quickly the building process of a docker along with various commands in microservices. Do check out the book Hands-On Microservices with Kotlin to start creating Docker containers for your microservices and scale them in your production environment.