Payara Micro offers a new way to run Java EE or microservice applications. It is based on the Web profile of Glassfish and bundles few additional APIs. The distribution is designed keeping modern containerized environment in mind. Payara Micro is available to download as a standalone executable JAR, as well as a Docker image. It’s an open source MicroProfile compatible runtime. Today, we will learn to use payara micro to build and deploy microservices.
Here’s a list of APIs that are supported in Payara Micro:
- Servlets, JSTL, EL, and JSPs
- WebSockets
- JSF
- JAX-RS
- Chapter 4
- [ 91 ]
- EJB lite
- JTA
- JPA
- Bean Validation
- CDI
- Interceptors
- JBatch
- Concurrency
- JCache
We will be exploring how to build our services using Payara Micro in the next section.
Building services with Payara Micro
Let’s start building parts of our Issue Management System (IMS), which is going to be a one-stop-destination for collaboration among teams. As the name implies, this system will be used for managing issues that are raised as tickets and get assigned to users for resolution. To begin the project, we will identify our microservice candidates based on the business model of IMS. Here, let’s define three functional services, which will be hosted in their own independent Git repositories:
- ims-micro-users
- ims-micro-tasks
- ims-micro-notify
You might wonder, why these three and why separate repositories? We could create much more fine-grained services and perhaps it wouldn’t be wrong to do so. The answer lies in understanding the following points:
- Isolating what varies: We need to be able to independently develop and deploy
each unit. Changes to one business capability or domain shouldn’t require
changes in other services more often than desired. - Organisation or Team structure: If you define teams by business capability, then
they can work independent of others and release features with greater agility.
The tasks team should be able to evolve independent of the teams that are
handling users or notifications. The functional boundaries should allow
independent version and release cycle management. - Transactional boundaries for consistency: Distributed transactions are not easy,
thus creating services for related features that are too fine grained, and lead to
more complexity than desired. You would need to become familiar with concepts
like eventual consistency, but these are not easy to achieve in practice. - Source repository per service: Setting up a single repository that hosts all the
services is ideal when it’s the same team that works on these services and the
project is relatively small. But we are building our fictional IMS, which is a large
complex system with many moving parts. Separate teams would get tightly
coupled by sharing a repository. Moreover, versioning and tagging of releases
will be yet another problem to solve.
The projects are created as standard Java EE projects, which are Skinny WARs, that will be deployed using the Payara Micro server. Payara Micro allows us to delay the decision of using a Fat JAR or Skinny WAR. This gives us flexibility in picking the deployment choice at a later stage.
As Maven is a widely adopted build tool among developers, we will use the same to create our example projects, using the following steps:
mvn archetype:generate -DgroupId=org.jee8ng -DartifactId=ims-micro-users -

DarchetypeArtifactId=maven-archetype-webapp -DinteractiveMode=false

mvn archetype:generate -DgroupId=org.jee8ng -DartifactId=ims-micro-tasks -

DarchetypeArtifactId=maven-archetype-webapp -DinteractiveMode=false

mvn archetype:generate -DgroupId=org.jee8ng -DartifactId=ims-micro-notify -

DarchetypeArtifactId=maven-archetype-webapp -DinteractiveMode=false
Once the structure is generated, update the properties and dependencies section of pom.xml with the following contents, for all three projects:
<properties>
<project.build.sourceEncoding>UTF-8</project.build.sourceEncoding>
<maven.compiler.source>1.8</maven.compiler.source>
<maven.compiler.target>1.8</maven.compiler.target>
<failOnMissingWebXml>false</failOnMissingWebXml>
</properties>
<dependencies>
<dependency>
<groupId>javax</groupId>
<artifactId>javaee-api</artifactId>
<version>8.0</version>
<scope>provided</scope>
</dependency>
Chapter 4
[ 93 ]
<dependency>
<groupId>junit</groupId>
<artifactId>junit</artifactId>
<version>4.12</version>
<scope>test</scope>
</dependency>
</dependencies>
Next, create a beans.xml file under WEB-INF folder for all three projects:
<?xml version="1.0" encoding="UTF-8"?>

<beans xmlns="http://xmlns.jcp.org/xml/ns/javaee"

xmlns:xsi="http://www.w3.org/2001/XMLSchema-instance"

xsi:schemaLocation="http://xmlns.jcp.org/xml/ns/javaee

http://xmlns.jcp.org/xml/ns/javaee/beans_2_0.xsd"

bean-discovery-mode="all">

</beans>
You can delete the index.jsp and web.xml files, as we won’t be needing them. The following is the project structure of ims-micro-users. The same structure will be used for ims-micro-tasks and ims-micro-notify:
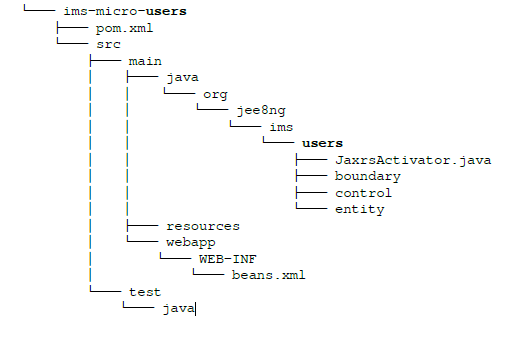
The package name for users, tasks, and notify service will be as shown as the following:
- org.jee8ng.ims.users (inside ims-micro-users)
- org.jee8ng.ims.tasks (inside ims-micro-tasks)
- org.jee8ng.ims.notify (inside ims-micro-notify)
Each of the above will in turn have sub-packages called boundary, control, and entity. The structure follows the Boundary-Control-Entity (BCE)/Entity-Control-Boundary (ECB) pattern.
The JaxrsActivator shown as follows is required to enable the JAX-RS API and thus needs to be placed in each of the projects:
import javax.ws.rs.ApplicationPath;

import javax.ws.rs.core.Application;

@ApplicationPath("resources")

public class JaxrsActivator extends Application {}
All three projects will have REST endpoints that we can invoke over HTTP. When doing RESTful API design, a popular convention is to use plural names for resources, especially if the resource could represent a collection. For example:
- /users
- /tasks
The resource class names in the projects use the plural form, as it’s consistent with the resource URL naming used. This avoids confusions such as a resource URL being called a users resource, while the class is named UserResource. Given that this is an opinionated approach, feel free to use singular class names if desired.
Here’s the relevant code for ims-micro-users, ims-micro-tasks, and ims-micronotify projects respectively.
Under ims-micro-users, define the UsersResource endpoint:

package org.jee8ng.ims.users.boundary;

import javax.ws.rs.*;

import javax.ws.rs.core.*;

@Path("users")

public class UsersResource {

@GET

Chapter 4

[ 95 ]

@Produces(MediaType.APPLICATION_JSON)

public Response get() {

return Response.ok("user works").build();

}

}
Under ims-micro-tasks, define the TasksResource endpoint:
package org.jee8ng.ims.tasks.boundary;
import javax.ws.rs.*;
import javax.ws.rs.core.*;
@Path("tasks")
public class TasksResource {
@GET
@Produces(MediaType.APPLICATION_JSON)
public Response get() {
return Response.ok("task works").build();
}
}Under ims-micro-notify, define the NotificationsResource endpoint:
package org.jee8ng.ims.notify.boundary;
import javax.ws.rs.*;
import javax.ws.rs.core.*;
@Path("notifications")
public class NotificationsResource {
@GET
@Produces(MediaType.APPLICATION_JSON)
public Response get() {
return Response.ok("notification works").build();
}
}Once you build all three projects using mvn clean install, you will get your Skinny WAR files generated in the target directory, which can be deployed on the Payara Micro server.
Running services with Payara Micro
Download the Payara Micro server if you haven’t already, from this link: https://www.payara.fish/downloads.
The micro server will have the name payara-micro-xxx.jar, where xxx will be the version number, which might be different when you download the file.
Here’s how you can start Payara Micro with our services deployed locally. When doing so, we need to ensure that the instances start on different ports, to avoid any port conflicts:
>java -jar payara-micro-xxx.jar --deploy ims-micro-users/target/ims-microusers.

war --port 8081

>java -jar payara-micro-xxx.jar --deploy ims-micro-tasks/target/ims-microtasks.

war --port 8082

>java -jar payara-micro-xxx.jar --deploy ims-micro-notify/target/ims-micronotify.

war --port 8083
This will start three instances of Payara Micro running on the specified ports. This makes our applications available under these URLs:
- http://localhost:8081/ims-micro-users/resources/users/
- http://localhost:8082/ims-micro-tasks/resources/tasks/
- http://localhost:8083/ims-micro-notify/resources/notifications/
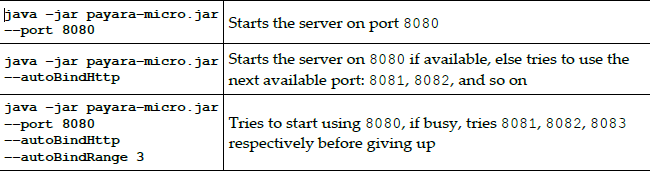
Payar Micro can be started on a non-default port by using the –port parameter, as we did earlier. This is useful when running multiple instances on the same machine. Another option is to use the –autoBindHttp parameter, which will attempt to connect on 8080 as the default port, and if that port is unavailable, it will try to bind on the next port up, repeating until it finds an available port. Examples of starting Payara Micro:
Uber JAR option: Now, there’s one more feature that Payara Micro provides. We can generate an Uber JAR as well, which would be the Fat JAR approach that we learnt in the Fat JAR section. To package our ims-micro-users project as an Uber JAR, we can run the following command:
java -jar payara-micro-xxx.jar --deploy ims-micro-users/target/ims-microusers.

war --outputUberJar users.jar
This will generate the users.jar file in the directory where you run this command. The size of this JAR will naturally be larger than our WAR file, since it will also bundle the Payara Micro runtime in it. Here’s how you can start the application using the generated JAR:
java -jar users.jarThe server parameters that we used earlier can be passed to this runnable JAR file too. Apart from the two choices we saw for running our microservice projects, there’s a third option as well. Payara Micro provides an API based approach, which can be used to programmatically start the embedded server. We will expand upon these three services as we progress further into the realm of cloud based Java EE.
We saw how to leverage the power of Payara Micro to run Java EE or microservice applications.
You read an excerpt from the book, Java EE 8 and Angular written by Prashant Padmanabhan. This book helps you build high-performing enterprise applications using Java EE powered by Angular at the frontend.