


This guide will go through some simple programming for VR apps using the Google VR SDK (software development kit) and the Unity3D game engine. This guide will assume that you already have a mobile device capable of running Google VR apps with a Google Cardboard, as well as a computer able to run Unity3D.
Getting Started
First and foremost, download the latest version of Unity3D from their website.
Out of the four options, select “Personal” since it costs nothing to the user. Then download and run the installer.
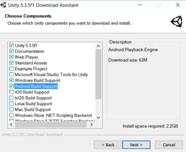
The installation process is straightforward. However, you must make sure that you select the “Android Build Support” component if you are planning on using an Android device or “iOS Build Support” for an iOS device. If you are unsure at this point, just select both, as neither of them requires a lot of space.
Now that you have Unity3D installed, the next step is to set it up for the Google VR SDK which can be found here. After agreeing to the terms and conditions, you will be given a link to download the repository directly.

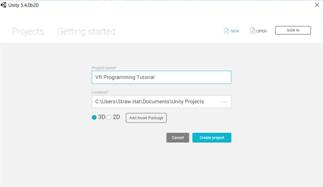
After downloading and extracting the ZIP file, you will notice that it contains a Unity Package file. Double-click on the file, and Unity will automatically load up. You will then see a window similar to the pop up below on your screen.

Click the “NEW” button on the top right corner to begin your first Google VR project. Give it any project name other than the default “New Unity Project” name. For this guide, I have chosen “VR Programming Tutorial” as the project name.
As soon as your new project loads up, so will the Google VR SDK Unity Package. The relevant files should all be selected by default, so simply click the “Import” button on the bottom right corner to include the SDK into your project.
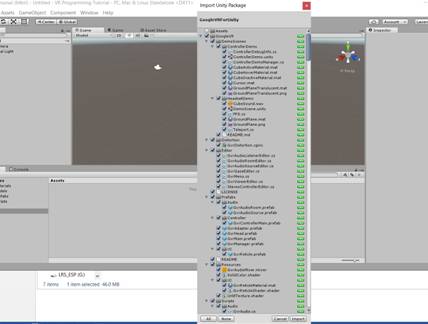
In your project’s “Assets” folder, there should be a folder named “GoogleVR”. This is where all the necessary components are located in order to begin working with the SDK.

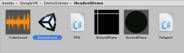
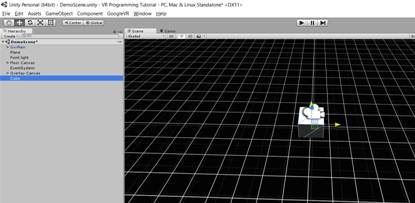
From the “Assets” folder, go into “GoogleVR”->”DemoScenes”->”HeadSetDemo”. Double-click on the Unity icon that is named “DemoScene”.
You should see something similar to this upon opening the scene file.
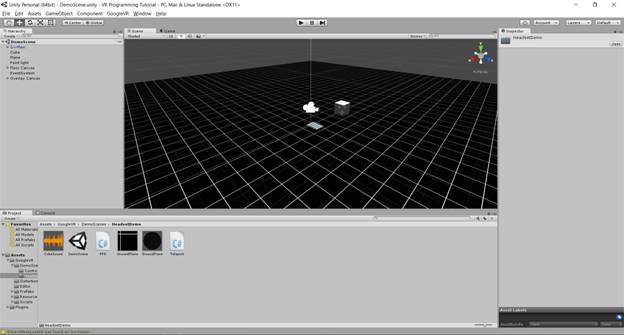
This is where you can preview the scene before playing it to get an idea of how the game objects will be laid out in the environment. So let’s try that by clicking on the “Play” button.
The scene will start out from the user’s perspective, which would be the main camera.
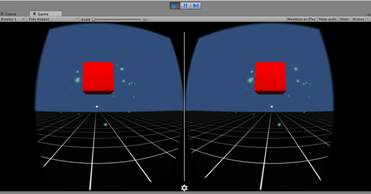
There is a slight difference in how the left eye and right eye camera are displaying the environment. This is called distortion correction, which is intentionally designed that way in order to accustom the display to the Google Cardboard eye lenses.
You may be wondering why you are unable to look around with your mouse. This design is also intentional to allow the developer to hover the mouse pointer in and out of the game window without disrupting the scene while it is playing. In order to look around in the environment, hold down the Ctrl key, and then the Alt key to enable head movement. Make sure to press the keys in this order, otherwise you will only be rotating the display along the Z-axis.
You might also be wondering where the interactive menu on the floor canvas has gone. The menu is still there, it’s just that it does not appear in VR mode. Notice that the dot in the center of the display will turn into a halo when you move it over the hovering cube.
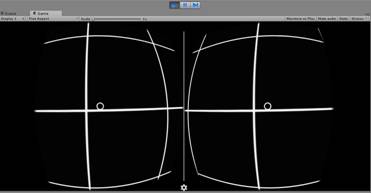
This happens whenever the dot is placed over a game object in the environment that is interactive. So even if the menu is not visible, you are still able to select the menu items. If you happen to click on the “VR Mode” button, the left eye and right eye cameras will simply go away and the main camera will be the only camera that displays the world space.
VR Mode can be enabled/disabled by clicking on the “VR Mode Enabled” checkbox in the project’s inspector. Simply select “GvrMain” in the DemoScene hierarchy to have the inspector display its information.
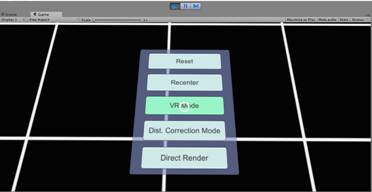
How the scene is displayed when VR mode is disabled.
Note that as of the current implementation of Google VR, it is impossible to add UI components into the world space. This is due to the stereoscopic functionality of Google VR and the mathematics involved in calculating the distance of the game objects from the left eye and right eye cameras relative to the world environment. However, it is possible to add non-interactive UI elements (i.e. player HUD) as a child 3D element with the main camera being its parent. If you wish to create interactive UI components, they must be done strictly as game objects in the world space. This also implies that the interactive UI components must be selected by the user from a fixed position in the world space, as they would find it difficult to make their selections otherwise.
Now that we have gone over the basics of the Google VR SDK, let’s move onto some programming.
Applying Attributes to Game Objects
When creating an interactive medium of any kind (in this case a VR app), some of the most basic functions can end up being more complicated than they initially seem to be. We will demonstrate that by incorporating, what seems to be, simple user movement.
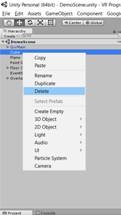
In the same DemoScene scene, we will add four more cubes to the environment. For the sake of cleanliness, first we will remove the existing cube as it will be an obstruction for our new cube. To delete a game object from a scene, simply right-click it in the hierarchy and select “Delete”.
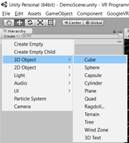
Now that we have removed the existing cube, add a new one by clicking “Create” in the hierarchy, select “3D Object” and then “Cube”.
Move the cube about 4-5 units along the X or Z axis away from the origin. You can do so by clicking and dragging the red or blue arrow.
Now that we have added our cube, the next step is to add a script to the player’s perspective object. For this project, we can use the “GvrMain” game object to incorporate the player’s movement.
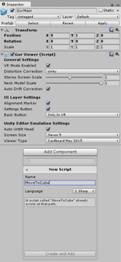
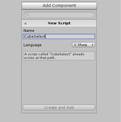
In the inspector tab, click on the “Add Component” button, select “New Script” and create a new script titled “MoveToCube”.
Once the script has been created, click on the cogwheel icon and select “Edit Script”.
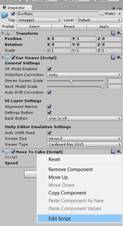
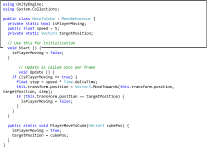
Copy and paste this code below into MoveToCube.cs
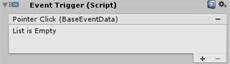
Next, add an Event Trigger component to your cube.

Create a new script titled “CubeSelect”. Then select the cogwheel icon and select “Edit Script” to open the script in the script editor.
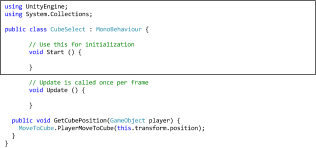
Copy and paste the code below into your CubeSelect.cs script.
Click on the “Add New Event Type” button.
![]()
Select “PointerClick”.

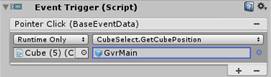
Click the + icon to add a method to refer to.
In the left box, select the “Cube” game object. For the method, select “CubeSelect” and then click on “GetCubePosition”. Finally, select “GvrMain” as the target game object for the method.
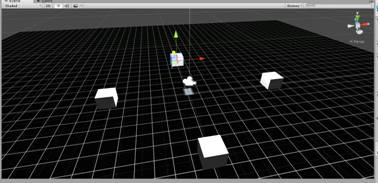
When you are finished adding the necessary components, copy and paste the cube in the project hierarchy tab three times in order to get four cubes. They will seem as if they did not appear on the scene, only because they are overlapping each other. Change the positions of each cube so that they are separated from each other along the X and Z axis.
Once completed, the scene should look something similar to this:
Now you can run the VR app and see for yourself that we have now incorporated player movement in this basic implementation.
Tips and General Advice
- Many developers recommend that you do not incorporate any acceleration and/or deceleration to the main camera. Doing so will cause nausea to the users and thus give them a negative experience with your VR application.
- Keep your VR app relatively simple! The user only has two modes of input: head tracking and the Cardboard trigger button. Trying to force functionality with multiple gestures (i.e. looking straight down and/or up) will not be intuitive to the user and will more than likely cause frustration.
About the Author
Jake Rheude is the Director of Business Development for Red Stag Fulfillment, a US-based e-commerce fulfillment provider focused primarily on serving ecommerce businesses shipping heavy, large, or valuable products to customers all around the world. Red Stag is so confident in its fulfillment software combined with their warehouse operations, that for any error, inaccuracy, or late shipment, not only will they reimburse you for that order, but they’ll write you a check for $50.