Let's get to it shall we?
System requirements
In order for you to run GameSalad and create amazingly awesome games, you must meet the minimum system requirements, which are as follows:
- Intel Mac (Any Mac from 2006 and above)
- Mac OS X 10.6 or higher
- At least 1GB RAM
- A device running iOS (iPad, iPhone 3G and up, or iPod Touch)
If your computer exceeds these requirements, perfect! If not, you will need to upgrade your computer. Keep in mind, these are the minimum requirements, having a computer with better specs is recommended.
Let's get into GameSalad
Let's start by downloading GameSalad and registering for an account. Let's go to GameSalad's website, www.gamesalad.com. Click the "Download Free App – GameSalad Creator" button.
While you are waiting for GameSalad to download, you should sign up for a free account. At the top of the page click Sign Up, enter your email address and create a username and password. You have two options for GameSalad membership, you can keep the Basic Pricing, which is completely free or select Professional Pricing. The difference is when you publish your App, you will have a Created with GameSalad splash screen, not a big deal right? Especially, not when you can get this awesome program for free! The Professional Pricing, which is $499 (USD) per year gives you all the features of the free version of GameSalad, plus it allows you to use iAds, Game Center, Promotional Links, your own Custom Splash Screen, and Priority Technical Support.
This does not include your Apple developer cost, which is $99 a year
Other tools that are recommended for game development:
Getting familiar with GameSalad's interface
Once you open GameSalad, you are presented with several options on the screen.
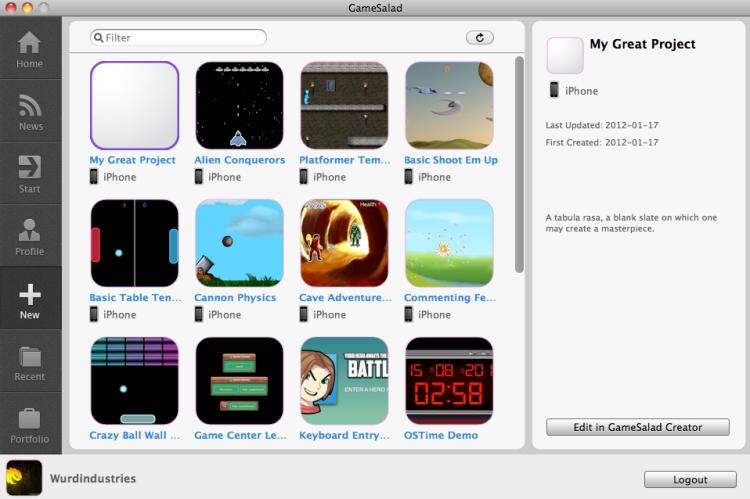
Following are the options:
- Home: It shows you the latest GameSalad links (Success stories, their latest game release, and so on...).
- News: It is self-explanatory, this shows you the latest update notes, and what is new in the GS community.
- Start: The getting started screen, here you have video tutorials, Wiki Docs, Blog, and more.
- Profile: This shows you, your GameSalad's profile page, messages, followers, and likes.
- New: These are all your new projects, Blank templates, and various bare bone templates to get you started.
- Recent: This shows you all of your recently saved projects.
- Portfolio: This shows all your published Apps through GameSalad.
-
- Back/Forward buttons: Used when navigating back and forth between windows
- Web Preview: Allows you to see what your game will look like within the browser (HTML5)
- Home: This takes you right back to the project's main window
- Publish: Brings up the Publish window, here you can chose to deploy your game to the web, iPhone, iPad, Mac, or Android
- Scenes: Gives you a drop-down menu of all your scenes
- Feedback: Have some thoughts about GameSalad? Click this to send them to the Creators!
- Preview: At the main menu, or while editing an actor this starts your game from the beginning. If you are in a level, it will preview the level
- Help: Brings up the GameSalad documentation, which lists many help topics.
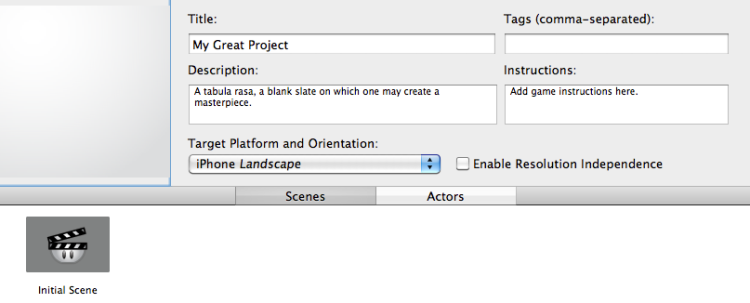
- Target Platform and Orientation: This drop-down menu gives you, your device options, iPhone Landscape, iPhone Portrait, GameSalad.com, iPad Landscape, iPad Portrait, and 720p HD
- Enable Resolution Independence (only when iPhone and iPad device is set): Check this option if you are creating a game specifically for the iPhone 4, 4S, iPad, or Kindles and Nooks. This takes your high resolution images and converts them for iPhone 3GS, 3G, and iPhone (1st Gen)
- Scenes Tab: Switch to this to see all your wonderful levels!
- Actors Tab: Select this tab to see all your actors in the game project. From this tab, you can group different types of actors, such as platforms and enemies. This comes in handy when an actor has to collide with numerous other actors (enemies or platforms)
- + button: Adds a Level
- - button (when a level is selected): Deletes a level
- Inspector (with Game selected)
- Actors: Here, you will see all your in-game items (Players, platforms, collectables, and so on)
- Attributes: Here, you can edit all the attributes of the game such as the display size.
- Devices: Here, you can edit all the settings for the mouse, touch screen, accelerometer, screen, and audio.
- Inspector (with Scene selected)
- o Attributes: Here, you can edit all the attributes of the current level, such as the size of the level, screen wrap (X,Y), Gravity, background color, camera settings, and autorotate.
- o Layers: Here, you can create numerous layers with scrollable on or off. For example, a layer called UI with scrollable deselected will have all your user interface items, and they will stay on the screen.
- Library (with Behaviors selected)
- o Standard: These are all the standard GameSalad behaviors (Movements, change actor attributes, and more)
- o Custom: These are your own custom behaviors. Let's say, you needed the same behavior throughout numerous actors but you didn't want to keep re-adding and changing the behavior for each actor. Once, you create the Behavior, drag it into this box and you can use it as much as you want.
- o Pro: These are all the professional behaviors (only available when you have paid for the professional membership). These include Game Center Connect, iAd, and Open URL
- Library (with Images selected)
- Project: This shows all your imported images into this project.
- Purchased: This is a new feature that shows the images you have purchased through GameSalad's Marketplace. (When you click Purchase Images..., this will take you to the GameSalad Marketplace where you will have a plethora of Content packs and more to purchase and import into your game)
- When you click the "+" button, you can import images from your hard drive, alternately, you can drag them directly into the Library from the Finder
- Library (with Sounds selected): This shows you all of your sound effects and music that you have imported into your project. As with images, when you click the "+" button you can import sound effects or music from your hard drive, or drag them directly in from the Finder.
- Actor Mode: This involves normal mouse functions; it allows you to select actors within the level. Following is the screenshot of the icon:
- Camera Mode: It allows you to edit the camera, position, and scrolling hot spots for characters that control the camera. Following is the screenshot of the icon:
- Reset Scene: While previewing your level and if this button is pressed, everything will go back to its initial state. Following is the screenshot of the icon:
- Play: This will start a preview of the current level. This is different from the green Project Preview button, as this will only preview the current level, and not the whole project. When you complete the level, an alert will appear telling you the scene has ended, and you can either select to preview the next level, or reset the current scene. Following is the screebshot of the icon:
- Show Initial State: If you have run a preview, and want to see the initial state without ending the preview, then pause the preview, click on the following icon and the initial state is seen. Following is the screenshot of the icon:
For now, let's click New | My Great Project
Unlock access to the largest independent learning library in Tech for FREE!
Get unlimited access to 7500+ expert-authored eBooks and video courses covering every tech area you can think of.
Renews at $19.99/month. Cancel anytime
This is a fresh project; everything is empty. You can see that you have one level so far, but you can add more at a later time. See the Scenes and Actors Tabs? Currently, Scenes is selected, this shows you all of your levels, but if you click the Actors tab, you will be able to see all your actors (or game objects, characters, collectables, and so on.) in the game. You can also rearrange all of the actors in Actor Tags, to give you an idea of what these are useful for. Take for example, if you have 30 different enemies, when you are setting up your collisions within behaviors, you won't have to set up 30 different collisions. Rather, when you set up all the enemies within a tag named Enemies you can do a single collision behavior for all actors of the tag! This reduces a lot of time when coding. We will get into more detail about actor tags, when we get into creating some games later in the book.
If you double-click on the Initial Scene, you will be taken to the level editor. Before we do that, let's go through the buttons shown in the following screenshot:

The descriptions of the buttons in the previous screenshot are as as follows:
Seems pretty easy, right? It is! GameSalad's user interface is simple. Even if you don't know what a certain button does, just hover your mouse over the button and a tooltip appears and tells you what the button does. Even though it's a very simple user interface, it is very powerful. Take for example, something as simple as the Enable Resolution Independence option. Simply selecting this takes out a lot of time from having to create two sets of images, a high resolution retina-friendly image, and a lower quality set for non-retina display images. With this option, all you have to do is create a high resolution set. Choose this option and GameSalad automatically creates a lower quality set of images for non-retina devices. How great is that? Such a simple option and yet it saves so much time and effort, and isn't simplicity what everyone wants?
Now let's get into the scene editor
Double-click our initial scene and you will see the Scene Editor, yes it may be a little daunting, but once you get used to the user interface, it is really quite simple. Let's break down all the buttons and see what they do:
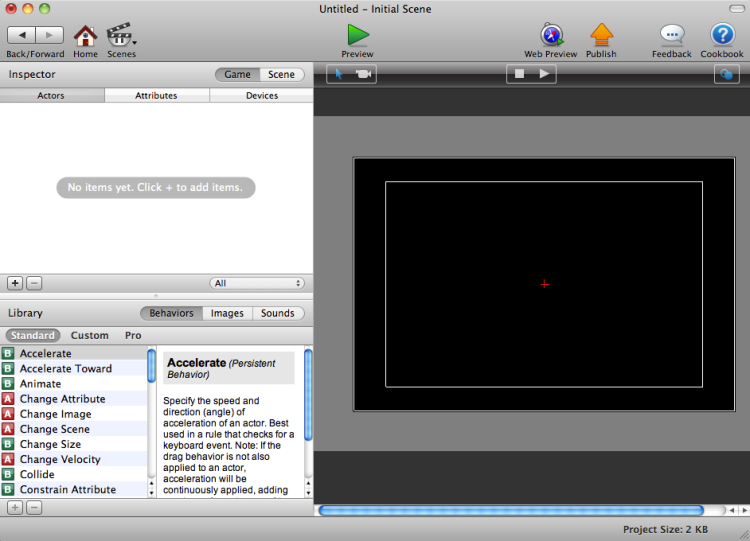
What do all these buttons mean? Following is a description of all the buttons and boxes:
There we go! The GameSalad interface really is that easy to navigate! In this article, you set up an account with GameSalad, you downloaded and installed it and now you know how to use the interface. GameSalad has such a simple interface, but it is really powerful. As we looked at earlier, an option as simple as Resolution Independence is so easy to select and yet one click takes off so much time from creating different sets of images that can be used for developing. This is what makes GameSalad so great; it's such a simple user interface and yet it is so powerful. What is so amazing about all of it, is that there's no programming involved whatsoever! For those who don't have the smartness to program a full game, this is what everyone else wants, simple, quick, and super powerful.

 United States
 Great Britain
 India
India
 Germany
 France
 Canada
 Russia
 Spain
Spain
 Brazil
 Australia
 Singapore
 Canary Islands
 Hungary
 Ukraine
 Luxembourg
 Estonia
 Lithuania
 South Korea
 Turkey
 Switzerland
 Colombia
 Taiwan
 Chile
Chile
 Norway
 Ecuador
 Indonesia
 New Zealand
 Cyprus
 Denmark
 Finland
 Poland
 Malta
Malta
 Czechia
 Austria
 Sweden
 Italy
Italy
 Egypt
Egypt
 Belgium
 Portugal
 Slovenia
 Ireland
 Romania
 Greece
 Argentina
 Netherlands
 Bulgaria
 Latvia
 South Africa
 Malaysia
 Japan
Japan
 Slovakia
 Philippines
 Mexico
 Thailand


