


In this article by Raimon Ràfols Montané, author of the book Learning Android Application Development, we will go through all the steps required to start developing Android devices. We have to be aware that Android is an evolving platform and so are its development tools. We will show how to download and install Android Studio and how to create a new project and run it on either an emulator or a real device.
(For more resources related to this topic, see here.)
Setting up Android Studio
Before being able to build an Android application, we have to download and install Android Studio on our computer. It is still possible to download and use Eclipse with the Android Development Tools (ADT) plugin, but Google no longer supports it and they recommend that we migrate to Android Studio. In order to be aligned with this, we will only focus on Android Studio in this article. for more information on this, visit http://android-developers.blogspot.com.es/2015/06/an-update-on-eclipse-android-developer.html.
Getting the right version of Android Studio
The latest stable version of Android Studio can be found at http://developer.android.com/sdk/index.html.

If you are among the bravest developers, and you are not afraid of bugs, you can always go to the Canary channel and download the latest version. The Canary channel is one of the preview channels available on the Android tools download page (available at http://tools.android.com/download/studio) and contains weekly builds.
The following are other preview channels available at that URL:
- The Canary channel contains weekly builds. These builds are tested but they might contain some issues. Just use a build from this channel if you need or want to see the latest features.
- The Dev channel contains selected Canary builds.
- The beta channel contains the beta milestones for the next version of Android Studio.
- The stable channel contains the most recent stable builds of Android Studio.
The following screenshot illustrates the Android tools download page:

It is not recommended to use an unstable version for production. To be on the safer side, always use the latest stable version. In this article, we will use the version 2.2 preview. Although it is a beta version at this moment, we will have the main version quite soon.
Installing Android Studio
Android Studio requires JDK 6 or higher and, at least, JDK 7 is required if you aim to develop for Android 5.0 and higher. You can easily check which version you have installed by running this on your command line:
javac –versionIf you don’t have any version of the JDK or you have an unsupported version, please install or update your JDK before proceeding to install Android Studio.
Refer to the official documentation for a more comprehensive installation guide and details on all platforms (Windows, Linux, and Mac OSX):
http://developer.android.com/sdk/installing/index.html?pkg=studio
Once you have JDK installed, unpack the package you have just downloaded from the Internet and proceed with the installation. For example, let’s use Mac OSX. If you download the latest stable version, you will get a .dmg file that can be mounted on your filesystem. Once mounted, a new finder window that appears will ask us to drag the Android Studio icon to the Applications folder. Just doing this simple step will complete the basic installation.

If you have downloaded a preview version, you will have a ZIP file that once unpacked will contain the Android Studio Application directly (can be just dragged to the Applications folder using finder).

For other platforms, refer to the official installation guide provided by Google at the web address mentioned earlier.
First run
Once you have finished installing Android Studio, it is time to run it for the first time. On the first execution (at least if you have downloaded version 2.2), will let you configure some options and install some SDK components if you choose the custom installation type. Otherwise, both these settings and SDK components can be later configured or installed.
The first option you will be able to choose is the UI theme. We have the default UI theme or the Darcula theme, which basically is a choice of light or dark background, respectively.

After this step, the next window will show the SDK Components Setup where the installation process will let you choose some components to automatically download and install. On Mac OS, there is a bug in some versions of Android Studio 2.0 that sometimes does not allow selecting any option if the target folder does not exist. If that happens, follow these steps for a quick fix:
- Copy the contents of the Android SDK Location field, just the path or something like /Users/<username>/Library/Android/sdk, to the clipboard.
- Open the terminal application.
- Create the folder manually as mkdir /Users/<username>/Library/Android/sdk.
- Go back to Android Studio, press the Previous button and then the Next button to come back to this screen. Now, you will be able to select the components that you would like to install.
- If that still does not work, cancel the installation process, ensuring that you checked the option to rerun the setup on the next installation. Quit Android Studio and rerun it.

Creating a sample project
We will introduce some of the most common elements on Android Studio by creating a sample project, building it and running it on an android emulator or on a real android device. It is better to dispaly those elements when you need them rather than just enumerate a long list without a real use behind.
Starting a new project
Just click on the Start a new Android Studio project button to start a project from scratch. Android Studio will ask you to make some project configuration settings, and you will be able to launch your project. If you have an already existing project and would like to import it to Android Studio, you could do it now as well. Any projects based on Eclipse, Ant, or Gradle build can be easily imported into Android Studio. Projects can be also checked out from Version Control software such as Subversion or Git directly from Android Studio.

When creating a new project, it will ask for the application name and the company domain name, which will be reversed into the application package name.

Once this information is filled out, Android Studio will ask the type of devices or form factors your application will target. This includes not only phone and tablet, but also Android Wear, Android TV, Android Auto, or Google Glass. In this example, we will target only phone and tablet and require a minimum SDK API level of 14 (Android 4.0 or Ice Cream Sandwich). By setting the minimum required level to 14, we make sure that the app will run on approximately 96.2% of devices accessing Google Play Store, which is good enough. If we set 23 as the minimum API level (Android 6.0 Marshmallow), our application will only run on Android Marshmallow devices, which is less than 1% of active devices on Google Play right now.
Unless we require a very specific feature available on a specific API level, we should use common sense and try to aim for as many devices as we can. Having said that, we should not waste time supporting very old devices (or very old versions of the Android), as they might be, for example, only 5% of the active devices but may imply lots and lots of work to make your application support them. In addition to the minimum SDK version, there is also the target SDK version. The target SDK version should be, ideally, set to the latest stable version of Android available to allow your application to take advantage of all the new features, styles, and behaviors from newer versions.
As a rule of thumb, Google gives you the percentage of active devices on Google Play, not the percentage of devices out there in the wild. So, unless we need to build an enterprise application for a closed set of devices and installed ad hoc, we should not mind those people not even accessing Google Play, as they will not the users of our application because they do not usually download applications, unless we are targeting countries where Google Play is not available. In that case, we should analyze our requirements with real data from the available application stores in those countries.
To see the Android OS version distribution, always check the Android’s developer dashboard at http://developer.android.com/about/dashboards/index.html.
Alternatively, when creating a new project from Android Studio, there is a link to help you choose the version that you would like to target, which will open a new screen with the cumulative percentage of coverage.

If you click on each version, it will give you more details about that Android OS version and the features that were introduced.

After this step, and to simplify our application creation process, Android Studio will allow us to add an Activity class to the project out from some templates. In this case, we can add an empty Activity class for the moment being. Let’s not worry for the name of the Activity class and layout file at this moment; we can safely proceed with the prefilled values.
As defined by Android developer documentation an: Activity is a single, focused thing that the user can do.
http://developer.android.com/reference/android/app/Activity.html
To simplify further, we can consider an Activity class as every single screen of our application where the user can interact with it. If we take into consideration the MVC pattern, we can assume the activity to be the controller, as it will receive all the user inputs and events from the views, and the layouts XML and UI widgets to be the views.
To know more about the MVC pattern, visit https://en.wikipedia.org/wiki/Model%E2%80%93view%E2%80%93controller.
So, we have just added one activity to our application; let’s see what else the Android Studio wizard created for us.
Running your project
Android Studio project wizard not only created an empty Activity class for us, but it also created an AndroidManifest, a layout file (activity_main.xml) defining the view controlled by the Activity class, an application icon placed carefully into different mipmaps (https://en.wikipedia.org/wiki/Mipmap) so that the most appropriate will be used depending on the screen resolution, some Gradle scripts, and and some other .xml files containing colors, dimensions, strings, and style definitions.

We can have multiple resources, and even repeated resources, depending on screen resolution, screen orientation, night mode, layout direction, or even mobile country code of the SIM card. Take a look at the next topic to understand how to add qualifiers and filters to resources. For the time being, let’s just try to run this example by pressing the play button next to our build configuration named app at the top of the screen.

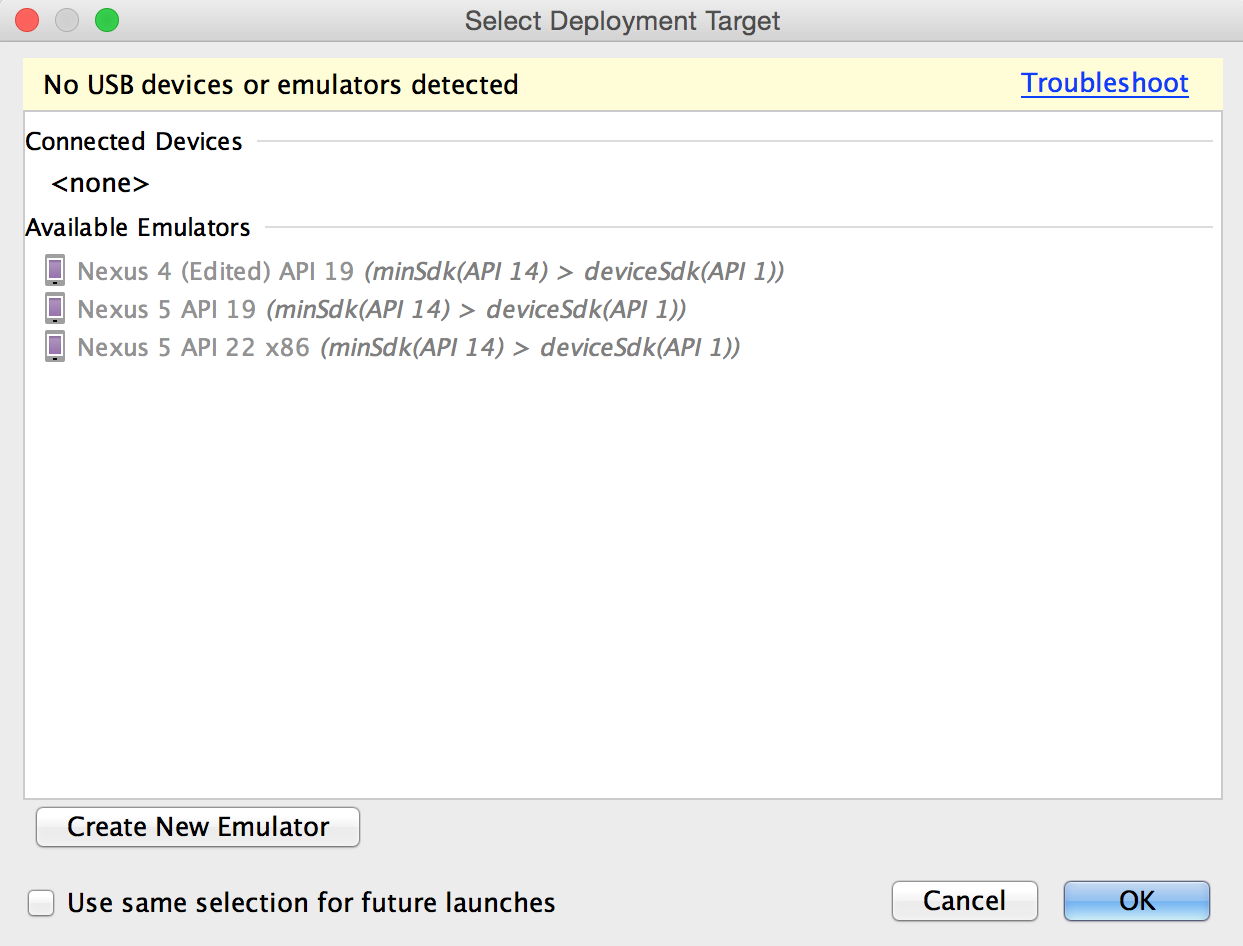
Android Studio will show us a small window where we can select the deployment target: a real device or emulator where our application will be installed and launched. If we have not connected any device or created any emulator, we can do it from the following screen. Let’s press the Create New Emulator button.
From this new screen, we can easily select a device and create an emulator that looks like that device. A Nexus 5X will suit us. After choosing the device, we can choose which version of the Android OS and architecture on which the platform will run. For instance, if we want to select Android Marshmallow (API level 23), we can choose from armeabi-v7a, x86 (Intel processors) and x86_64 (Intel 64bit processors). As we previously installed HAXM during our first run (https://software.intel.com/en-us/android/articles/intel-hardware-accelerated-execution-manager), we should install an Intel image, so emulator will be a lot faster than having to emulate an ARM processor. If we do not have the Android OS image downloaded to our computer, we can do it from this screen as well. Note that you can have an image of the OS with Google APIs or without them. We will use one image or another depending on whether the application uses any of the Google-specific libraries (Google Play Services) or only the Android core libraries.
Once the image is selected (and downloaded and installed, if needed), we can proceed to finish the Android Virtual Device (AVD) configuration. On the last configuration screen, we can fine-tune some elements of our emulator, such as the default orientation (portrait or landscape), the screen scale, the SD card(if we enable the advanced settings), the amount of physical RAM, network latency, and we can use the webcam in our computer as emulator’s camera.

You are now ready to run your application on the Android emulator that you just created. Just select it as the deployment target and wait for it to load and install the app. If everything goes as it should, you should see this screen on the Android emulator:

If you want to use a real device instead of an emulator, make sure that your device has the developer options enabled and it is connected to your computer using a USB cable (to enable development mode on your device or get information on how to develop and debug applications over the network, instead of having the device connected through an USB cable; check out the following links:
- http://developer.android.com/tools/help/adb.html
- http://developer.android.com/tools/device.html)
If these steps are performed correctly, your device will appear as a connected device on the deployment target selection window.
Resource configuration qualifiers
As we introduced in the previous section, we can have multiple resources depending on the screen resolution or any other device configuration, and Android will choose the most appropriate resource in runtime. In order to do that, we have to use what is called configuration qualifiers. These qualifiers are only strings appended to the resource folder. Consider the following example:
drawable
drawable-hdpi
drawable-mdpi
drawable-en-rUS-land
layout
layout-en
layout-sw600dp
layout-v7
Qualifiers can be combined, but they must always follow the order specified by Google in the Providing Resource documentation, available at http://developer.android.com/guide/topics/resources/providing-resources.html.
This allows us, for instance, to target multiple resolutions and have the best experience for each of them. It can be also used to have different images based on the country, in which the application is executed, or language.
We have to be aware that putting too many resources (basically, images or any other media) will make our application grow in size. It is always good to apply common sense. And, in the case of having too many different resources or configurations, do not bloat the application and produce different binaries that can be deployed selectively to different devices on Google Play. We will briefly explain on the Gradle build system topic in this article, how to produce different binaries from one single source code. It will add some complexity on our development but will make our application smaller and more convenient for end users. For more information on multiple APK support, visit http://developer.android.com/google/play/publishing/multiple-apks.html.
Summary
In this article, we covered how to install Android Studio and get started with it. We also introduced some of the most common elements on Android Studio by creating a sample project, building it and running it on an android emulator or on a real android device. %MCEPASTEBIN%
Resources for Article:
Further resources on this subject:
- Hacking Android Apps Using the Xposed Framework [article]
- Speeding up Gradle builds for Android [article]
- The Art of Android Development Using Android Studio [article]