(For more resources related to this topic, see here.)
Getting the story right!
This is basic housekeeping and ignoring it is like making your own editing life much more frustrating. So take a deep breath, think of calm blue oceans, and begin by getting this project organized. First you need to set the Timeline correctly and then you will create a short storyboard of the interview; again you will do this by focusing on the beginning, middle, and end of the story. Always start this way as a good story needs these elements to make sense.
For frame-accurate editing it's advisable to use the keyboard as much as possible, although some actions will need to be performed with the mouse. Towards the end of this task you will cover some new ground as you add and expand Timeline tracks in preparation for the tasks ahead.
Prepare for Lift Off
Once you have completed all the preparations detailed in the Mission Checklist section, you are ready to go. Launch Premiere Pro CS6 in the usual way and then proceed to the first task.
Engage Thrusters
First you will open the project template, save it as a new file, and then create a three-clip sequence; the rough assembly of your story. Once done, perform the following steps:
- When the Recent Projects splash screen appears, select Hotshots Template – Montage. Wait for the project to finish loading and save this as Hotshots – Interview Project. Close any sequences open on the Timeline.
- Select Editing Optimized Workspace.
- Select the Project panel and open the Video bin without creating a separate window.
If you would like Premiere Pro to always open a bin without creating a separate window, select Edit | Preferences | General from the menu. When the General Options window displays, locate the Bins option area and change the Double-Click option to Open in Place.
- Import all eight video files into the Video folder inside the Project 3 folder.
- Create a new sequence. Pick any settings at random, you will correct this in the next step. Rename the sequence as Project 3.
- Match the Timeline settings with any clip from the Video bin, and then delete the clip from the Timeline.
- Set the Project panel as the active panel and switch to List View if it is not already displayed.
- Create the basic elements of a short story for this scene using only three of the available clips in the Video bin. To do this, hold down the Ctrl or command key and click on the clips named ahead. Make sure you click on them in the same order as they are presented here:
- Intro_Shot.avi
- Two_Shot.avi
- Exit_Shot.avi
- Ensure the Timeline indicator is at the start of the Timeline and then click on the Automate to Sequence icon.
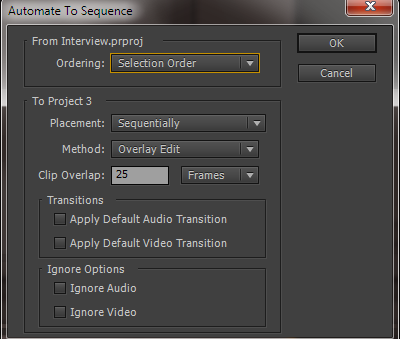
- When the Automate To Sequence window appears, change Ordering to Selection Order and leave Placement as the default (Sequentially). Uncheck the Apply Default Audio Transition , Apply Default Video Transition, and Ignore Audio checkboxes. Click on OK or press Enter on the keyboard to complete this action.
- Right-click on the Video 1 track and select Add Tracks from the context menu. When the Add Tracks window appears, set the number of video tracks to be added as 2 and the number of audio tracks to be added as 0. Click on OK or press Enter to confirm these changes.
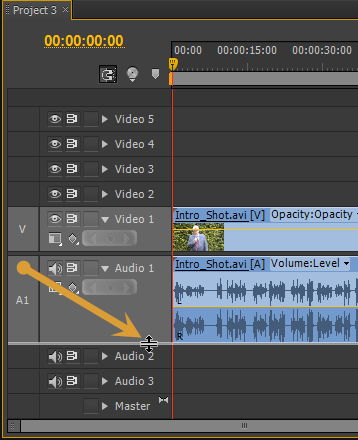
- Dial open the Audio 1 track (hint – small triangle next to Audio 1), then expand the Audio 1 track by placing the cursor at the bottom of the Audio 1 area, and clicking on it, and dragging it downwards. Stop before the Master audio track disappears below the bottom of the Timeline panel.
The Master audio track is used to control the output of all the audio tracks present on the Timeline; this is especially useful when you come to prepare your timeline for exporting to DVD. The Master audio track also allows you to view the left and right audio channels of your project. More details on the use of the Master audio track can be found in the Premiere Pro reference guide, which can be downloaded from http://helpx.adobe.com/pdf/premiere_pro_reference.pdf.
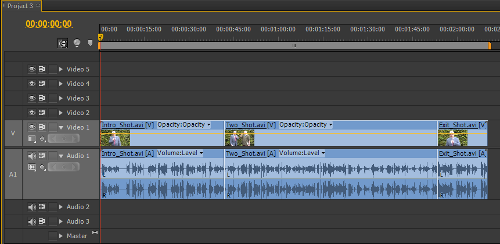
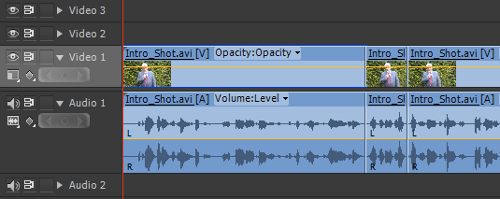
- Make sure the Timeline panel is active and zoom in to show all the clips present (hint – press backslash). You should end this section with a Timeline that looks something like the following screenshot. Save your project (Press Ctrl + S or command + S) before moving on to the next task.
Objective Complete - Mini Debriefing
How did you do? Review the shortcuts listed next. Did you remember them all?
In this task you should have automatically matched up the Timeline to the clips with one drag-and-drop, plus a delete. You should have then sent three clips from the Project panel to the Timeline using the Automate to Sequence function. Finally you should have added two new video tracks and expanded the Audio 1 track.
Keyboard shortcuts covered in this task are as follows:
- (backslash): Zoom the Timeline to show all populated clips
- Ctrl or command + double-click: Open bin without creating a separate Project panel (also see the tip after step 3 in the Engage Thrusters section)
- Ctrl or command + N: Create a new sequence
- Ctrl or command + (backslash): Create new bin in the Project panel
- Ctrl or command + I: Open the Import window
- Shift + 1: Set the Project panel as active
- Shift + 3: Set Timeline as active
Classified Intel
In this project, the Automate to Timeline function is being used to create a rough assembly of three clips. These are placed on the Timeline in the order that you clicked on them in the project bin. This is known as the selection order and allows the Automate to Timeline function to ignore the clips-relative location in the project bin. This is not a practical work flow if you have too many clips in your Project panel (how would you remember the selection order of twenty clips?). However, for a small number of clips, this is a practical workflow to quickly and easily send a rough draft of your story to the Timeline in just a few clicks. If you remember nothing else from this book, always remember how to correctly use Automate To Timeline!
Extracting audio fat
Raw material from every interview ever filmed will have lulls and pauses, and some stuttering. People aren't perfect and time spent trying to get lines and timing just right can lead to an unfortunate waste of filming time. As this performance is not live, you, the all-seeing editor, have the power to cut those distracting lulls and pauses, keeping the pace on beat and audience's attention on track. In this task you will move through the Timeline, cutting out some of the audio fat using Premiere Pro's Extract function, and to get this frame accurate, you will use as many keyboard shortcuts as possible.
Engage Thrusters
You will now use the Extract function to remove "dead" audio areas from the Timeline. Perform the following steps:
- Set the Timeline panel as active then play the timeline back by pressing the L key once. Make a mental note of the silences that occur in the first clip (Intro_Shot.avi).
- Return the Timeline indicator to the start of the Timeline using the Home key.
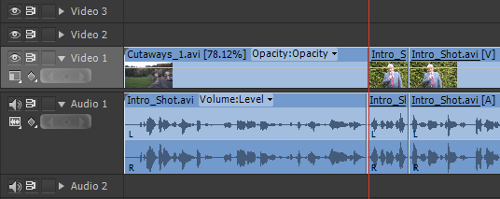
- Zoom in on the Timeline by pressing the + (plus) key on the main keyboard area. Do this until your Timeline looks something like the screenshot just after the following tip:
To zoom in and out of the Timeline use the + (plus) and - (minus) keys in the main keyboard area, not the ones in the number pad area. Pressing the plus or minus key in the number area allows you to enter an exact number of frames into whichever tool is currently active.
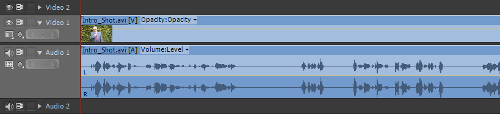
- You should be able to clearly see the first area of silence starting at around 06;09 on the Timeline. Use the J, K, and L keyboard shortcuts to place the Timeline indicator at this point.
- Press the I key to set an In point here, then move the Timeline indicator to the end of the silence (around 08;17), and press the O key to set an Out point.
- Press the # (hash) key on your keyboard to remove the marked section of silence using Premiere Pro's Extract function.
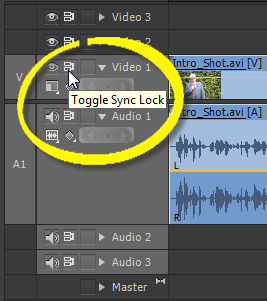
Important information on Sync Locking tracks
The above step will only work if you have the Sync Lock icons toggled on for both the Video 1 and Audio 1 tracks. The Sync Lock icon controls which Timeline tracks will be altered when using a function such as Extract. For example; if the Sync Lock icon was toggled off for the Audio 1 track, then only the video would be extracted, which is counterproductive to what you are trying to achieve in this task!
By default each new project should open with the Sync Lock icon toggled on for all video and audio tracks that already exist on the Timeline, and those added at a later point in the project. More information on Sync Lock can be found in the Premiere Pro reference guide (tinyurl.com/cz5fvh9).
Unlock access to the largest independent learning library in Tech for FREE!
Get unlimited access to 7500+ expert-authored eBooks and video courses covering every tech area you can think of.
Renews at $19.99/month. Cancel anytime
- Repeat steps 5 and 6 to remove silences from the following Timeline areas (you should judge these points for yourself rather than slavishly following the suggestions given next):
i. Set In point at 07;11 and Out point at 08;10.
ii.Press # (hash).
iii.Set In point at 11;05 and Out point at 12;13.
iv.Press # (hash).
- Play back the Timeline to make sure you haven't extracted away too much audio and clipped the end of a sentence. Use the Trim tool to restore the full sentence.
You may have spotted other silences on the Timeline; for the moment leave them alone. You will deal with these using other methods later in this project.
- Save the project before moving on to the next section.
Objective Complete - Mini Debriefing
At the end of this section you should have successfully removed three areas of silence from the Intro_Shot.avi clip. You did this using the Extract function, an elegant way of removing unwanted areas from your clips. You may also have refreshed your working knowledge of the Trim tool. If this still feels a lit le alien to you, don't worry, you will have a chance to practice trimming skills later in this project.
Classified Intel
Extract is another cunningly simple function that does exactly what it says; it extracts a section of footage from the Timeline, and then closes the gap created by this ac i on. In one step it replicates the razor cut and ripple delete.
Creating a J-cut (away)
One of the most common video techniques used in interviews and documentaries (not to mention a number of films) is called a J-cut. This describes cutting away some of the video, while leaving the audio beneath intact. The deleted video area is then replaced with alternative footage. This creates a voice-over effect that allows for a seamless transfer between the alternative viewpoints and the original speaker.
In this task you will create a J-cut by replacing the video at the start of Intro_Shot.avi, leaving the voice of the newsperson and replacing his image with cutaway shots of what he is describing. You will make full use of four-point edits.
Engage Thrusters
Create J-cuts and cutaway shots using work flows you should now be familiar with. Perform the following steps to do so:
- Send the Cutaways_1.avi clip from the Project panel to the Source Monitor.
- In the Source Monitor, create an In point at 00;00 and an Out point just before the shot changes (around 04;24).
- Switch to the Timeline and send the Timeline indicator to the start of the Timeline (00;00). Create an In point here.
- Use a keyboard shortcut of your choice to identify the point just before the newsperson mentions the "Local village shop". (hint – roughly at 06;09). Create an Out point here.
- You want to create a J-cut, which means protecting the audio track that is already on the Timeline. To do this click once on the Audio 1 track header so it turns dark gray.
- Switch back to the Source Monitor and send the marked Cutaways_1.avi clip to the Timeline using the Overwrite function (hint – press the '.' (period) key).
- When the Fit Clip window appears, select Change Clip Speed (Fit to Fill), and click on OK or press Enter on the keyboard. The village scene cutaway shot should now appear on Video 1, but Audio 1 should retain the newsperson's dialog. His inserted village scene clip will have also slowed slightly to match what's being said by the newsperson.
- Repeat steps 2 to 7 to place the Cutaways_1.avi clip that shows the shot of the village shop, to match the village church and the village pub on the Timeline with the newsperson's dialog. The following are some suggestions on times, but try to do this step first of all without looking too closely at them:
- For the village shop cutaway, set the Source Monitor In point at 05;00 and Out point at 09;24. Set the Timeline In point at 06;10 and Out point at 07;13. Switch back to Source Monitor. Send the clip in the Overwrite mode and set Change Clip Speed to Fit to Fill.
- For the village church cutaway, set the Source Monitor In point at 10;00 and Out point at 14;24. Set the Timeline In point at 07;14 and Out point at 09;03. Switch back to Source Monitor. Send the clip in the Overwrite mode and set Change Clip Speed to Fit to Fill.
- For the pub cutaway, send Reconstruction_1.avi to the Source Monitor. Set the Source Monitor In point at 04;11 and Out point at 04;17. Set the Timeline In point at 09;04 and Out point at 12;00. Switch back to Source Monitor. Send the clip in the Overwrite mode and set Change Clip Speed to Fit to Fill.
The last cutaway shot here is part of the reconstruction reel and has been used because your camera person was unable (or forgot) to film a cutaway shot of the pub. This does sometimes happen and then it's down to you, the editor in charge, to get the piece on air with as few errors as possible. To do this you may find yourself scavenging footage from any of the other clips. In this case you have used just seven frames of Reconstruction_1.avi, but using the Premiere Pro feature, Fit to Fill , you are able to match the clip to the duration of the dialogue, saving your camera person from a production meeting dressing down!
- Review your edit decisions and use the Trim tool or the Undo command to alter edit points that you feel need adjustments. As always, being an editor is about experimentation, so don't be afraid to try something out of the box, you never know where it might lead.
- Once you are happy with your edit decisions, render any clips on the Timeline that display a red line above them.
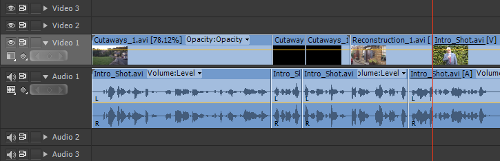
- You should end up with a Timeline that looks something like the following screenshot; save your project before moving on to the next section.
Objective Complete - Mini Debriefing
In this task you have learned how to piece together cutaway shots to match the voice-over, creating an effective J-cut, as seen in the way the dialog seamlessly blends between the pub cutaway shot and the news reporter finishing his last sentence. You also learned how to scavenge source material from other reels in order to find the necessary shot to match the dialog.
Classified Intel
The last set of time suggestions given in this task allow the pub cutaway shot to run over the top of the newsperson saying "And now, much to the surprise…". This is an editorial decision that you can make on whether or not this cutaway should run over the dialog. It is simply a matter of taste, but you are the editor and the final decision is yours!
In this article, we learned how to extract audio fat and create a J-cut.
Resources for Article :
Further resources on this subject:

 United States
 Great Britain
 India
India
 Germany
 France
 Canada
 Russia
 Spain
Spain
 Brazil
 Australia
 Singapore
 Canary Islands
 Hungary
 Ukraine
 Luxembourg
 Estonia
 Lithuania
 South Korea
 Turkey
 Switzerland
 Colombia
 Taiwan
 Chile
Chile
 Norway
 Ecuador
 Indonesia
 New Zealand
 Cyprus
 Denmark
 Finland
 Poland
 Malta
Malta
 Czechia
 Austria
 Sweden
 Italy
Italy
 Egypt
Egypt
 Belgium
 Portugal
 Slovenia
 Ireland
 Romania
 Greece
 Argentina
 Netherlands
 Bulgaria
 Latvia
 South Africa
 Malaysia
 Japan
Japan
 Slovakia
 Philippines
 Mexico
 Thailand


