Unlike a deployment environment, it is common to have just once machine acting both as server and client in a development environment. The machine will have SmartFoxServer, web server, and database installed. In this case, there are no noticeable differences between using the embedded or third-party web server and database.
It is a good habit to simulate the deployment environment as much as possible in development stage. As we are going to use a third-party web server and database, we will set up a development environment that also uses the third-party server instead of the embedded web server and database in the third part of this article series.
Installing Java Development Kit
The Java Development Kit includes the essential development tools (JDK) and the Java Runtime Environment (JRE). The development tool compiles the Java source code into byte codes and the JRE is the response to execute the byte codes. We will need several Java compilations in later chapters. SmartFoxServer is build on the Java environment and we need the JRE to start up the server. The JDK and JRE may be pre-installed in some OSs.
Installing JDK On Windows
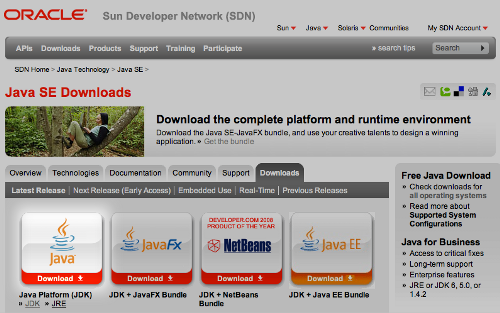
The steps for installing JDK on Windows are as follows:
Click on the Download button of Java. It will lead to the Java SE Downloads page.
Select Windows (or Windows x64 for 64-bits Windows) in Platform.
Click on Download.
If it prompts an optional login request, we can click the Skip this Step to bypass it.
Launch the installer after the download.
Install the Java Development Kit with all default settings.
The Java environment is ready after installation completes.
Installing JDK on Mac OSX
The Mac OSX comes with its own set of Java environment. We can check the JDK and JRE version by following steps:
Launch terminal from Applications | Utilities | Terminal.
Type the following and press the Enter key:
javac -version
The command will output the currently installed version of the Java in the Mac OSX. In my case, it outputs: javac 1.6.0_17.
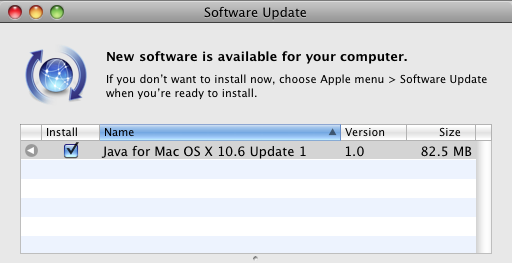
The current version of SmartFoxServer at the time of writing recommends the version 1.6. If the Java is not updated, we can update it via Apple Menu | Software Update.
The software update will check for any updates for your existing Mac software, including the Java environment.
Unlock access to the largest independent learning library in Tech for FREE!
Get unlimited access to 7500+ expert-authored eBooks and video courses covering every tech area you can think of.
Renews at $19.99/month. Cancel anytime
Installing JDK on Linux
We can use the general method to download and install the JDK or use the system specific method to install the package. We will show the general method and the Ubuntu method.
The platform Linux should be selected automatically. Otherwise, select Linux (or Linux x64 for 64-bit Linux).
Click on Continue.
If it prompts for login, click on Skip this Step to bypass it.
For Redhat or Fedora Linux, choose the rpm-bin file to download. For other Linux, choose the .bin file to download.
Launch terminal via Applications | Accessories | Terminal after the download completes.
Change the directory to the folder that contains the downloaded package. The download destination varies from different profile settings. In my case, it is in Downloads folder.
cd ~/Downloads/
The version is Java 6 Update 20 at the time of writing and the filename is jdk-6u20-linux-i586.bin or jdk-6u20-linux-i586-rpm.bin.
Then we make it executable and launch the installer by the following commands:
chmod a+x jdk-6u20-linux-i586.bin
./jdk-6u20-linux-i586.bin
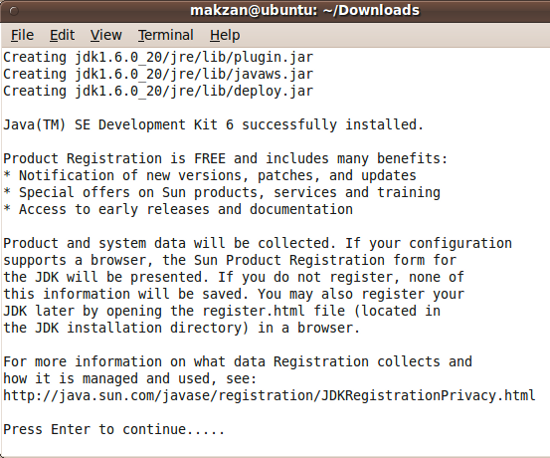
The installer displays the license agreement. Type Yes at the end to agree and continue installation.
Press the Enter key after the file’s extraction to end the installation.
Installing for Ubuntu Linux
Ubuntu users can install the JDK via the apt-get command.
We will search for the latest package name of the JDK by the following command:
apt-cache search --names-only sun-java.*-jdk
The result shows the available JDK packet names. At the time of writing, it is JDK6:
sun-java6-jdk - Sun Java(TM) Development Kit (JDK) 6
We use the apt-get command to install the JDK:
sudo apt-get install sun-java6-jdk
Type in the user password because it requires user’s password and the privilege to use apt-get.

 United States
 Great Britain
 India
India
 Germany
 France
 Canada
 Russia
 Spain
Spain
 Brazil
 Australia
 Singapore
 Canary Islands
 Hungary
 Ukraine
 Luxembourg
 Estonia
 Lithuania
 South Korea
 Turkey
 Switzerland
 Colombia
 Taiwan
 Chile
Chile
 Norway
 Ecuador
 Indonesia
 New Zealand
 Cyprus
 Denmark
 Finland
 Poland
 Malta
Malta
 Czechia
 Austria
 Sweden
 Italy
Italy
 Egypt
Egypt
 Belgium
 Portugal
 Slovenia
 Ireland
 Romania
 Greece
 Argentina
 Netherlands
 Bulgaria
 Latvia
 South Africa
 Malaysia
 Japan
Japan
 Slovakia
 Philippines
 Mexico
 Thailand