Extending the Application using Microsoft Dynamics NAV 2009 (Part 2)
Read more
Extending the Application using Microsoft Dynamics NAV 2009 (Part 2)
Packt
1200 min read
2009-10-28 00:00:00
0 Likes
0 Comments
Sidebar gadget
A sidebar gadget is a simple single-tasked tool that sits in the sidebar on Windows Vista. If you don't have Windows Vista, you're out of luck and won't be able to run this sample. You can explore the free gadgets available for download at http://gallery.live.com/. Typical gadgets include:
RSS Feed Readers
News Readers
Weather Reports
Clocks
Performance Monitoring Tools
Mini Notepads
Photo Slideshows
Hopefully you get the idea.
We're going to create a sidebar gadget that will use the Web service capabilities of Dynamics NAV 2009 to display a cue (a stack of documents similar to those shown in the RoleTailored client), based upon the document approvals features that have been available since NAV 5.0. We want to display a document stack that represents the number of documents requiring approval from the current user and will allow the user to select the type of document as a configuration setting. In our example, clicking the document stack will show a list of documents and clicking an individual document will launch the RoleTailored client. There's no reason why you can't take this example and extend it to include the ability to display the actual documents and carry out the approval, all from the comfort of your Windows Vista desktop.
Design time
When we start to de sign NAV solutions, we use our knowledge of the standard application to create a solution that fits nicely within the NAV paradigm. We try to emulate the way the standard application solves common business problems and use the components that are used by the product team in a consistent manner.
Designing applications for .NET, or in this case for a sidebar gadget, follows the same conventions. First of all we need to understand a little bit about what makes a sidebar gadget so that we can know the constraints of our design.
What are little gadgets made of?
There is an excellent tutorial on MSDN Magazine's web site by Donavon West that tells you how to build a sidebar gadget for displaying MSDN Magazine articles in a news-ticker format with the ability to click an article to see more details and click another link to read the full article on the Web. We're going to use that article and the gadget provided for download as the basis for exploring what a gadget is, which will in turn help us to design our own gadget.
Essentially a gadget is little more than a mini web page (HTML file with some supporting resources such as images and JavaScript) and an XML definition file called gadget.xml. When we're writing a sidebar gadget for Windows Vista, the HTML page is rendered in Microsoft Internet Explorer 7, so there is no need to worry about cross-browser support. Which is nice.
If you download the gadget and save it somewhere instead of installing it, you will see an icon for the gadget like this:
Before we can use this gadget there is a little problem that needs to be fixed—unfortunately it is pointing to an RSS Feed URL that is not valid and therefore the gadget doesn't work correctly.
Donavon explains that a sidebar gadget is simply a collection of files that are stored in a ZIP or CAB file with a .gadget extension, so we can rename the file with a .zip extension and we should be able to open it as a folder. If you open the compressed folder, or extract it, you will see the following files:
There is a file called local.js that we will need to edit in order to fix the problem. Gadgets support multi-language capabilities and if your language matches the folder names shown, you are going to need to open that folder and edit the local.js thatit contains.
The languages supported by this gadget are as follows:
Folder Name
Language
de
German (Standard)
es
Spanish (Spain)
fr
French (Standard)
it
Italian (Standard)
ja
Japanese
kr
I don't think this is a valid language code, so we'll just ignore this.
pt
Portuguese (Portugal)
ru
Russian
zh-CN
Chinese (PRC)
Unlock access to the largest independent learning library in Tech for FREE!
Get unlimited access to 7500+ expert-authored eBooks and video courses covering every tech area you can think of.
According to the tutorial, whenever the sidebar tries to load a file, it searches for the file in folders in the following order:
Full locale (en-us, es-us, ja-jp)
Language portion of the locale (en, es, ja)
Gadget root folder
So what does this mean? If your locale has a language component that is one of the folders listed in the table, you are going to need to edit the local.js within that folder in order for the gadget to work correctly.
When you edit the local.js file (any text editor will do), you will see the following:
If you copy the feedUrl string and paste it into a web browser address bar, you will see a runtime error telling you this is not a valid address. A little bit of digging soon reveals an address that we can use for the gadget:
http://msdn.microsoft.com/en-nz/magazine/rss/default(en-us).aspx?issue=1
You need to replace the old URL with the new one so that your line in the fi le looks like the following:
Now we can rename the file back to a .gadget extension and install it. This is to help us examine the main components of a sidebar gadget so we can consider how we will design our own gadget.
The gadget
The most obvious part of a gadget is the gadget itself. This is the gadget's main HTML page that is provided in the base src property of our gadget.xml file. For us, we want this to show a single document cue that represents the number of approval entries that are awaiting action for the current user. We want the main docked gadget to look something like this:
The image is meant to look like a cue from an Activities Part in a Role Center. The pencil sketch is there to give you an idea. Since the 22 approval actions could be for multiple different document types, we will have some text underneath the stack of documents that tells us how many of each of the different document types there are. It could either fade in and out, or scroll horizontal like a marquee.
That takes care of the docked state of the gadget. When we undock it, we can get a larger area to play with, so it would be nice if the undocked state showed one stack of documents for each of the approval document types with the name of the document type shown underneath. This may be a little time-consuming, so maybe we'll add that to version 2. For now the undocked image will be the same as the docked image.
There are a couple of other pages that need to be considered: Flyouts and Options dialog.
Flyouts
When you click on a part of gadget, you can activate a flyout, which is basically a web page that gets displayed at the side of the gadget. The flyout file is specified by setting System.Gadget.Flyout.file to the name of the flyout HTML file. In the case of our MSDN Ticker gadget, the flyout looks like the following:
For our flyout, we are going to show a list of approval entries with the ability to click a hyperlink to open the approval entries screen. An obvious next extension to this gadget is to provide the ability to approve, reject, or delegate the approval entry directly from the gadget without needing to open the RoleTailored client. For now, we'll concentrate on making this work with our NAV Web service. After taking a quick look at the fields available on the approval entry screen, our flyout will look something like the following:
It's a simple table showing the documents with a document type and number, the ID of the sender and the amount that the document is for.
Options
There is one more part of the gadget to consider for our design and that is the options dialog page. Let's take a look at that for the MSDN Magazine Ticker sample gadget.
When I hover my mouse over the gadget, a mini tool bar appears allowing me to close the gadget, show the options, and drag the gadget to a different position. Click the spanner to show the options page.
As you can see it's just another little web page with some options on it. You need to instruct the gadget to enable the options icon by setting System.Gadget.settingsUI to the name of the options HTML file, generally in the gadget initialization area of our script. Donavon's article explains how this is done, and provides sample code for how to set up a callback function for when the options dialog closes (so your gadget can read the new user preferences).
For our gadget we are going to need a place where we can enter the URL for our Web service. For more advanced options, we could possibly provide the ability to specify how often the gadget will call the Web service.
Our options page will look something like this:
These pencil sketches are just there to convey the intended layout of the pages; it's a lot quicker to scribble something on a piece of paper (for us) than to start playing around with graphics programs and although they're a little rough, if you squint at them, you can sort of work out what's intended in the final solution. Remember it's important to get an understanding of the design at this stage but it doesn't need to look great; form follows function.
The tricky bits
Now that we' ve done the high-level design for our sidebar gadget, and we know that a sidebar gadget is just a series of HTML pages, we can start to look at the technical design. There are a couple of tricky bits to take care of: how are we going to call our Web service from within what is essentially a web page, and how are we going to take our list of documents requiring approval and convert them into the table and graphics we want to display.
The great thing about sidebar gadgets and the way they are constructed is that you can simply rename the file and take a look at how they are doing what they do (and, of course, you can borrow ideas and code). If you search on the Web, you'll find quite a few examples of sidebar gadgets that call Web services, so there're plenty of examples to look at. Let's pick an example from Microsoft that uses the Exchange 2007 Web service to display email, calendar, and task information. You can download it from:
http://www.microsoft.com/downloads/details.aspx?FamilyID=F9A0D33CC894-4EA1-AD20-4E418C715175&displaylang=en
A quick search for Exchange Web services Gadget will help you locate it. Actually finding this gadget was a stroke of luck because it does pretty much everything we are after:
It has a setup page with a time interval on it.
It calls a Web service to find how many items there are in a folder and shows a summary.
It displays a flyout with a more detailed view of the folder contents.
Finding good examples on the Internet and learning from them is a key skill for doing this kind of development.
Just a little bit of SOAP
Calling a NAV Web service from within a Visual Studio.NET project is dead easy as we've already seen. We just add our Web service as a web reference and Visual Studio does all the hard work for us. It creates a proxy class that allows us to call the member functions and access the properties of the service as though it was a piece of code that we had written ourselves and not just some black box at the end of a URL. But how do we do this when we don't have Visual Studio?
Essentially a Web service is just some text sent over the Internet that generates a response (which is also text). It just so happens that the text being sent and received is formatted as XML which is handy because there is lots of support for reading XML text. Web services typically use a protocol called Simple Object Access Protocol (or SOAP) to allow any system that can post a request to a URL (and read a response message) to call to a function exposed by the Web service. In order to do this for our sidebar gadget, we need two things: we need to know how to send and receive our request, and we need to know what the SOAP request should look like.
Figuring out the HTTP call and response handling isn't too hard and you can do this by looking at the Exchange Web service gadget source code or, once again, searching the Internet.
Looking at how Microsoft did it in their Exchange Web service gadget shows us we can use the native Microsoft.XMLHTTP object provided by Internet Explorer (remember that a sidebar gadget runs in Internet Explorer only, so we don't need to worry about cross-browser support) to make an HTTP post to our Web service and read the response.
Finding the XML for the SOAP request that is needed to invoke a NAV Web service is going to be a little trickier. If we do a Web search for 'how to view a soap request in Visual Studio?', it doesn't take much to find a link to a freeware product called Fiddler that will allow me to inspect messages to and from my web server. Here is the URL:
http://www.fiddler2.com/fiddler2/
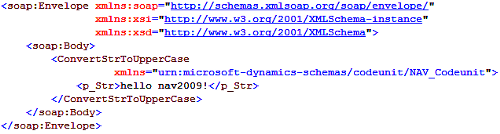
If we use this tool on the simple example we started the chapter with, we can see the SOAP request is:
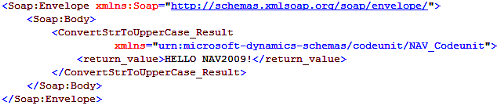
And the response is:
We can guess we could have worked out this request and response format by reading the WSDL (pronounced 'wiz-dal'), that we get when we type the URL to the Codeunit in our web browser; however, we can think that using Visual Studio to test calling our Web service is by far the easiest way, and using the Fiddler tool to be able to inspect and copy the SOAP Envelope XML has got to be better than thinking.
Now before we get too carried away trying to create a series of Web service calls to allow us to pull data from a page type Web service, we're going to create a simple proof-of-concept web page that will make a JavaScript call to this NAV Web service with our ConvertStrToUpperCase function.
An HTML page that calls a NAV Codeunit
This next script is 72 lines of text. The point of the exercise is to show how easy it is to do things in the .NET world even when you don't know what you're doing. Here is the code in full; we'll go through it in detail later:
<HTML>
<HEAD>
<TITLE>Hello NAV 2009 With JavaScript</TITLE>
</HEAD>
<BODY>
<b>Input: </b>hello nav2009!<br/>
<div id="resultContainer"><b>Output: </b></div>
<SCRIPT LANGUAGE="JavaScript">
<!--
function HelloNAV2009 ()
{
var data = "";
data += '<?xml version="1.0" encoding="utf-8"?>';
data += '<soap:Envelope ';
data += ' ';
data += ' >';
data += ' <soap:Body>';
data += ' <ConvertStrToUpperCase ';
data += ' >';
data += ' <p_Str>hello nav2009!</p_Str>';
data += ' </ConvertStrToUpperCase>';
data += ' </soap:Body>';
data += '</soap:Envelope>';
var xmlHttpRequest = new ActiveXObject("Microsoft.XMLHTTP");
var url = 'http://ds-srv-01:7047/DynamicsNAV/ws/CRONUS_
International_Ltd/Codeunit/NAV_Codeunit';
You can download the HelloNAV2009.html file from www.teachmenav.com (or http://www.packtpub.com/support). You may need to edit the file on the line where the url variable is assigned to point to the Web service URL available on your computer. When you open the file in your browser, you will need to allow the blocked content in order for the example to run.
When you click the Call NAV button, the screen updates to show the following:
Wooohooo! It works!
OK, let's take a look at what's going on in the code. First of all we assign our variable called data to the XML for the SOAP request body (this is found by using the Fiddler application earlier). That block of code is not included for analysis, so let's move on.
This next block of code creates an instance of the Microsoft.XMLHTTP object that we are going to use to make the HTTP post and read the response.
var xmlHttpRequest = new ActiveXObject("Microsoft.XMLHTTP");
var url = 'http://ds-srv-01:7047/DynamicsNAV/ws/CRONUS_International_
Ltd/Codeunit/NAV_Codeunit';
The highlighted text in the code caused a good deal of grief. Without the SOAPAction request header, the response always contained the WSDL definition of the Web service (the XML document that is shown when you type the Web service URL into the address bar on your browser). Once again this was the missing bit if we look at the results of the Fiddler application trace of .NET application we wrote at the start of this chapter.
The following code will hookup the readResponse function to the xmlHttpRequest so that the response can be read when the call is finished. I borrowed this code from the Exchange Web service gadget (although I had to wade up to my armpits in functions in order to find the code that actually did the business).
var xmlDoc = new ActiveXObject("Microsoft.XMLDOM");
xmlDoc.loadXML(xmlHttpRequest.responseText);
This next bit of code assigns the resultText variable to the contents of the SOAP response and it took a while to figure out. This example has been taken from the W3 schools site by searching for Microsoft.XMLDOM (http://www.w3schools.com/Xml/xml_dom.asp).
The code is reading the text result from the SOAP envelope. A real example will have to do a lot more with this XML document but for now, this does the job.
Finally, we dispose of some objects and then inject the result text in to the body of our HTML page using the innerHTML property for our resultContainer div class.
I now know that we've broken the back of the problem. We have successfully called a NAV Web service from a web page (which is essentially all a sidebar gadget is). The next tricky bit is to see how to use a page Web service to get the records back that match our documents requiring approval. We'll use the same approach of first writing the code in .NET as a console application and then after we have this working the easy way, we'll convert the code into JavaScript. After that, it's just a case of tidying everything up and making it look pretty.
Hey, Good Lookin'
If there's one thing you need for a sidebar gadget, it's nice graphics. Vista is a beautiful operating system and, to be honest, if a gadget doesn't look good, we don't want it on our desktop. The idea is to use a single image and position the images on top of each other and create the image by taking a document and flipping it and applying perspective. Here are the document stacks.
The images were created using Photoshop (and a lot of professional skill), and the original image that the stack is built from actually has the Microsoft Dynamics NAV logo at the top (how's that for attention to detail?) Here's the image of the document:
HTML is used to render these documents as a stack with the number floating over the top, and the HTML to produce the previous image can be found on the www.teachmenav.com site under the Simple Document Stack sample for this article.
We would generate the HTML dynamically based upon the number of documents requiring approval. The HTML used to generate the previous image is manipulated to give 12 document stacks that will be used by the application. The largest stack is 10 images high but this would be used to represent 31 or more documents. The question mark on the final empty stack shown in the following image will be used when the gadget gets no response from the Web service or has not been properly configured.
Now we have nearly everything we need to be able to put together the sidebar gadget. There's just one piece of the puzzle missing; we need to be able to call a Web service to tell us how many documents we have for approval and also return the details of those documents, the rest is just applying more of what we know and writing a lot of code.
We've covered calling a page Web service in an earlier example, so I won't go into details here but we do need to know what we are calling. As you know Web services from NAV can be based on either Codeunits or Pages, so which should we use?
The temptation may be to use a Page Web service as this will allow us to bring back the Approval Entry records for the current user, but we need to do far more than read the records. Our first interaction will be to get a count of the records for approval so we can display the gadget; we don't want the gadget to have a lot of work to do in order to draw its initial state, so ideally we want a quick call that will return just the number of documents and maybe the document name.
If you remember from the beginning, our gadgets are meant to be simple, single-tasked applications, so we want a single document approval gadget to work for any one document type. This way our users can have multiple gadgets on their desktop if they want to be notified on multiple document types. We can achieve this by using a Codeunit type Web service and have one of the parameters an identifier of the type of document we are interested in. The following is an overview of the functions we will need.

 United States
 Great Britain
 India
India
 Germany
 France
 Canada
 Russia
 Spain
Spain
 Brazil
 Australia
 Singapore
 Canary Islands
 Hungary
 Ukraine
 Luxembourg
 Estonia
 Lithuania
 South Korea
 Turkey
 Switzerland
 Colombia
 Taiwan
 Chile
Chile
 Norway
 Ecuador
 Indonesia
 New Zealand
 Cyprus
 Denmark
 Finland
 Poland
 Malta
Malta
 Czechia
 Austria
 Sweden
 Italy
Italy
 Egypt
Egypt
 Belgium
 Portugal
 Slovenia
 Ireland
 Romania
 Greece
 Argentina
 Netherlands
 Bulgaria
 Latvia
 South Africa
 Malaysia
 Japan
Japan
 Slovakia
 Philippines
 Mexico
 Thailand

")
")
")
")
")
")
")
")
")
")
")
")
")
")


