Web enabling business data is one of the key devices used to advertise and market products. This can be done with various technologies such as VB, ASP, JSP, ASP.Net and many others. This article shows how you may view data from a table on a MySQL database server on a web page using ASP.NET. The table used in this tutorial was the one described in the first article in this series on Exporting data from MS Access 2003 to MySQL.
This article by Dr. Jay Krishnaswamy explains how to populate a GridView on an ASP.NET web page by data retrieved from a MySQL Server. MySQL.Data.MySqlClient is a connector (provider) provided by MySQL which you can use with the .NET Framework applications whose details may be reviewed here. MySQL is well integrated with Visual Studio (MySQL Visual Studio Tools: MySQL.VisualStudio.dll).
Overview
We first create an ASP.NET 3.5 Website Project (even .NET Framework 2.0 should be OK) in Visual Studio 2008. We then drag and drop a GridView ASP.NET control on to the Default.aspx page. We will then use the smart task on the GridView and follow it up to bring data to the GridView. Then we build the web site project and display the data in the GridView on the Default.aspx page.
Create a ASP.NET 3.5 Web Site Project
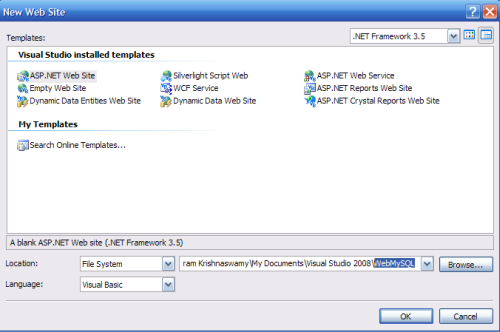
Launch Visual Studio 2008. Click File | New |Web Site... to open up the New Web Site window as shown. Change the default name of the web site to something suitable. Herein it is named WebMySQL as shown.
Drag and drop a GridView Control
From Toolbox under Data find the GridView Control. Drag and drop this control on to the Default.aspx page as shown. The GridView is 'unbound' when it is dropped and has a few template columns and the smart tasks menu. The menu item is shown in its drop-down state and displays the menu items under 'Choose Data Source'.

Click on the <New Data Source...> item in Choose data source. This will bring up the Data Source Configuration wizard as shown. Herein you need to choose a source of the data you are trying to bring into the application to be bound to the GridView control.

You have several options here and for the present article we will be using data from a database. Click on the Database icon as shown in the previous figure. With this you will be specifying an instance of SQLDataSource1 as your source of data. Click OK.
This will take you to the next window shown here. Herein you will try to establish a connection to the data source. In the combo-box shown you may see some of the existing connections you have previously established one of which may initially show up. Herein we will be making a new connection. Click the New Connection... button.

This brings up the Add Connection window which gets displayed with the default data source, the Microsoft SQL Server Compact 3.5 as shown.

Connecting to MySQL
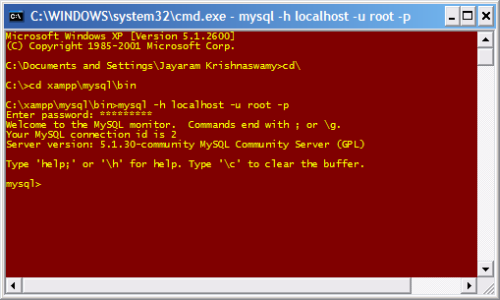
Before establishing the connection make sure that your MySQL Server is running. If you have not started you may do so as described in the article mentioned earlier(the first article). You can start the server from the command line as shown in the next figure.
Unlock access to the largest independent learning library in Tech for FREE!
Get unlimited access to 7500+ expert-authored eBooks and video courses covering every tech area you can think of.
Renews at $19.99/month. Cancel anytime
Click the Change... button to open the Change Data Source window as shown in the next figure.

This window shows a number of Data Sources one of which is the MySQL Database. Scroll down and highlight MySQL Database as shown and click OK. This will bring you back to the Add Connection window with form controls appropriate for making a connection to a MySQL Database.

The Server name; user name and Password are appropriate to the MySQL Server on the local computer and you should enter those appropriate for your installation. You may also test the connection as shown. Click OK after the connection is successful. This adds the connection information to the Configure Data Source wizard. You may expand the connection string item to review the connection string created by your entries.

Click Next. Here you have an option to save the connection string to the Application Configuration File. This is a recommended practice and hence shown checked.

Click Next. Here you will be selecting the set of columns that you want to bring in to your application. It has already chosen the 'employees' table on the MySQL database Testmove.

Choose several columns from the list of columns. The SELECT statement is shown at the bottom of the above figure. If you were to click Next you would probably face a page which throws an exception. The square braces [ ] shown for each of the columns is not acceptable to the server. Click on the first option, "Specify a custom SQL Statement or stored procedure" and then click Next. This opens the "Define Custom Statements or Stored Procedures" page with a Query Builder... button. Here you can not only select columns but also other data modification operations such as Update, Insert and Delete. For now we will be doing just a selection.

 United States
 Great Britain
 India
India
 Germany
 France
 Canada
 Russia
 Spain
Spain
 Brazil
 Australia
 Singapore
 Canary Islands
 Hungary
 Ukraine
 Luxembourg
 Estonia
 Lithuania
 South Korea
 Turkey
 Switzerland
 Colombia
 Taiwan
 Chile
Chile
 Norway
 Ecuador
 Indonesia
 New Zealand
 Cyprus
 Denmark
 Finland
 Poland
 Malta
Malta
 Czechia
 Austria
 Sweden
 Italy
Italy
 Egypt
Egypt
 Belgium
 Portugal
 Slovenia
 Ireland
 Romania
 Greece
 Argentina
 Netherlands
 Bulgaria
 Latvia
 South Africa
 Malaysia
 Japan
Japan
 Slovakia
 Philippines
 Mexico
 Thailand


