 |
Use the fascinating Inkscape graphics editor to create attractive layout designs, images, and icons for your website
- The first book on the newly released Inkscape version 0.48, with an exclusive focus on web design
- Comprehensive coverage of all aspects of Inkscape required for web design
- Incorporate eye-catching designs, patterns, and other visual elements to spice up your web pages
- Learn how to create your own Inkscape templates in addition to using the built-in ones
- Written in a simple illustrative manner, which will appeal to web designers and experienced Inkscape users alike
|
Architecting a web site
Although as a web designer you will usually be regarded as the "look and feel" person for a web site, you are also a key partner in determining the site architecture. As you design, you often define how the site will be navigated. Is this web site one page or will an end-user "click around" the site to other areas or sub-pages and explore? Where will each page inter-link or link out to other websites? What is the main navigational element: a navigation bar? Where will it reside on all the pages? Is this site content or search driven? All these questions (and many more) require the entire team's involvement (and a client's opinion) to make the appropriate decisions. As the web designer, it is your job to work with all of these elements at a visual level—navigation bars, search fields, buttons, title bars, footers, and more—and fit them into the overall web site design.
Web layout—principles and basics
Designing for the web and for print are similar in that they have the same principles and goals for an end-viewer: appealing content that works together in the space. Although the principles are basic, they represent guidelines that improve any web page design. Here are the techniques:
Proximity
or grouping similar information together on a web page. You can get creative in how you group this information by using alignment, icons, and even just white space, but regardless, the technique and principles are the same. Information that belongs together should be together.
- Alignment is the simple idea of making sure all of the elements line up on the screen. If you have everything left aligned, keep it that way on the page. Use natural alignments within an entire web space when you use more than one graphical element such as photos, graphics, and/or text.
- Repetition can help unify a web page. Repeating elements such as buttons, shapes (graphical or just placement), or colors can really make an impact and keep the design simple and clean, thus, easier for a viewer to navigate.
- Contrast can have a huge and favorable impact in web design, as long as it is used effectively. Contrast is achieved with size, colors, direction, shapes, and fonts (mixing modern with old style). Even font weight can help create contrast. Just make sure that all of these elements still work well with the content on the web page itself—not for the sake of contrast.
The basic design
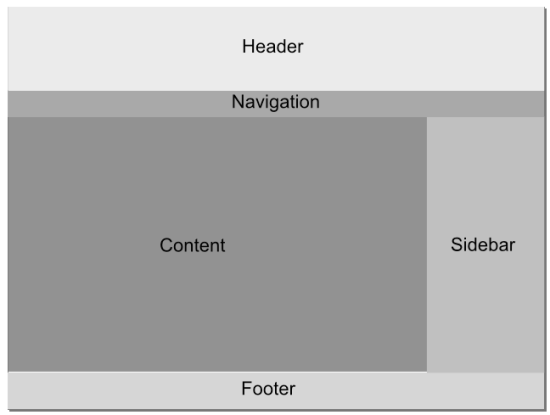
Before designing the layout in Inkscape, it can help to plan the placement of the main areas of a web page—in essence to help with the design's overall alignment of items and proximity of similar items. For our purposes, we'll create a simple main web page for a small business. This main page will have these areas:
- Header
- Footer
- Sidebar
- Content
- Navigation
Each web page project is different and you may have to add more page elements to this list or delete some so that the final list of elements fits the needs of the overall design. For the purposes of getting agreement from a team working on this project, a good practice is to create a basic layout showing where each of the areas will be placed on the screen—and is often referred to as the web page wireframe. Typically, wireframes are completed before any graphics are created. The following screenshot illustrates a basic layout or wireframe:

This high-level approach is a great start to actually building the page design. It gives us general placements of each area of the design and then we can set up grids and guidelines.
Starting a new design project
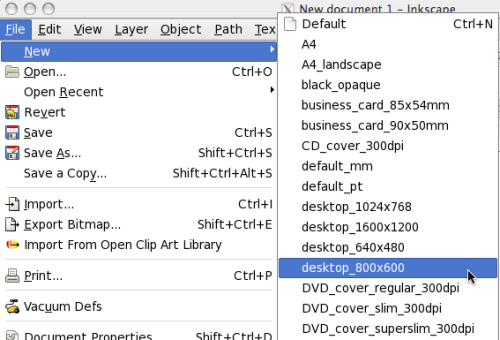
When you open Inkscape, it opens to a new document. However, we want to ensure that we have a page size that is the right size for our web page, so we create a new document based on predefined desktop sizes, which are common web page sizes, as follows:
- From the main menu select File and then New. A pop-up menu appears showing a number of default page sizes to choose from.

Choose a template size based on the browser standards or specifications.
Most of the templates in this menu are based on web designs. If you want to view the print media template sizes, go to the main menu and select File and Document Properties and view the Format section.
- We'll choose desktop_800x600. However, the dimensions should be specified by how your target viewer will view the site, whether it is via a computer, or via a mobile device. Also, sometimes your client or company will specify a specific size your web pages need to be.
A new document opens in Inkscape and you are ready to begin.
Let's set a few more preferences and then save the file with your project name before we start designing.
Using grids and guidelines
When designing any space on the web keep the page clean and—as stated in the design principles and techniques—aligned. So let's make the canvas grid viewable on the screen and set up some guidelines based on our wireframes.
Viewing the grid
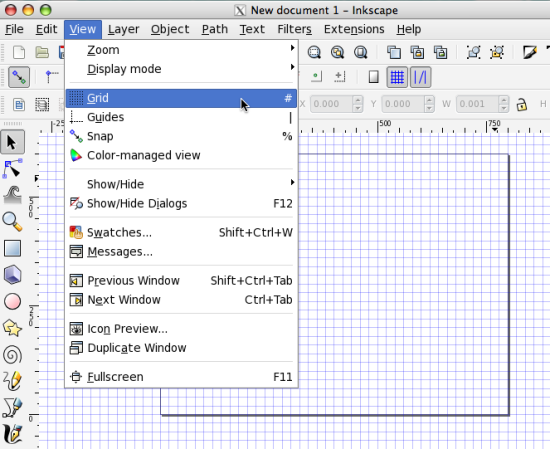
With your new document still open on your computer, on the Inkscape main menu select View and then Grid.

You'll see that a blue grid will appear across the entire canvas area. We'll use these grids to create basic areas of our layout and then create guides to begin creating our actual layout elements.
Making guides
Guides are lines on the screen that you will use for aligning i.e. guiding objects. These lines are only seen while you are working in Inkscape and we can set objects to "snap to" them when we are designing. Both of these simple tools (guides and the Snap to feature) will give you automatic alignment for the basic areas of your web page layout—which in turn will help your web page have the best design.
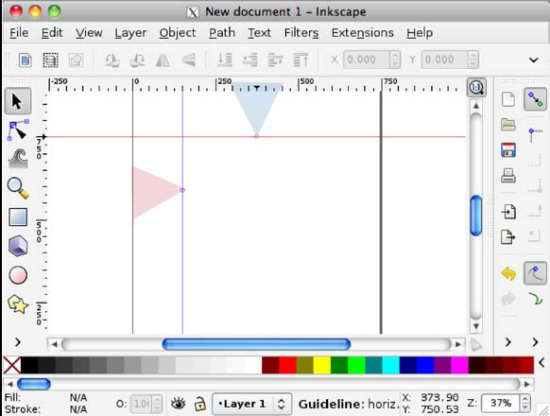
To create a guide in any open document, make sure the Select tool is selected and drag from the left side or top of the screen towards your page as shown in the following screenshot. A red line represents the guide until you 'let go' of the guide and place it on the page. Then the line turns blue.

You can move the guides after placing them on the page, by using the select tool and clicking and dragging the circle node on the guide.
Now let's discuss how to use wireframes and create guides based on those web page layout elements.
Unlock access to the largest independent learning library in Tech for FREE!
Get unlimited access to 7500+ expert-authored eBooks and video courses covering every tech area you can think of.
Renews at $19.99/month. Cancel anytime
Creating a new layer
When you create documents within Inskcape, you can have layers of objects. This gives great flexibility when creating web layouts. You can move groups of objects on a layer, separate objects by layer, and 'stack', re-ordered, or hide layers. Settings can be set by layer, so you can save drafts or different versions of mockups and keep all of this in one file.
The layer you are currently using is called the drawing layer. It is selected in the Layer Dialog and is shown in a darker color. In your open document with viewable grids let's make the layers viewable and create a layer called Basic Layout.
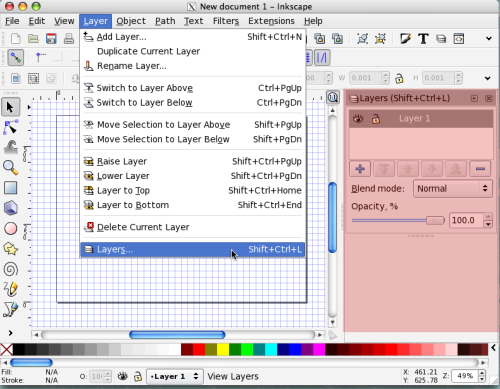
- To make the Layers Dockable Dialog viewable, from the main menu select Layer and then Layers. On the right side of your screen the Layers Dialog is displayed.

You can also press Shift + Ctrl + L on your keyboard to display the Layers Dialogue.
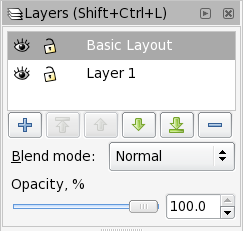
- In the Layers Dialog, press the + button to create a new layer.

- In the Layer Name field type the name: Basic Layout and click Add. You will notice the new layer is added above the existing one in the Layers Dialog.

Creating basic design areas in Inkscape
Here's where we begin to transfer our wireframes into Inkscape so we can start the design process. To start:
- Use the Rectangle Tool to draw rectangles for each of your layout areas in your basic design.

- For now, use different shades of gray for each area so you can easily distinguish between them at a glance. To change the fill color of a particular rectangle, left click the rectangle and choose a gray shade for the rectangle. Or drag the gray shade from the color palette onto the rectangle.
- Use sharp edged (not rounded) rectangles. If you need to change to sharp, click the Make Corners Sharp button in the Tool Controls Bar.

- Make sure your rectangle shapes do not have an outline or stroke. Use the Shift + Left click keypad shortcut to open the Stroke dialog and choose No Color (the icon with an X) to delete the stroke.
- Position the rectangles so there are no white spaces in between them.
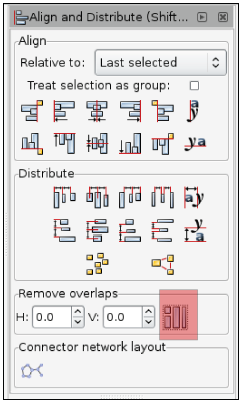
- From the main menu choose Object and then Align and Distribute. In the Remove Overlaps section, click the icon. This makes sure that the bounding boxes around each object don't overlap each other and place the objects tangent to each other.

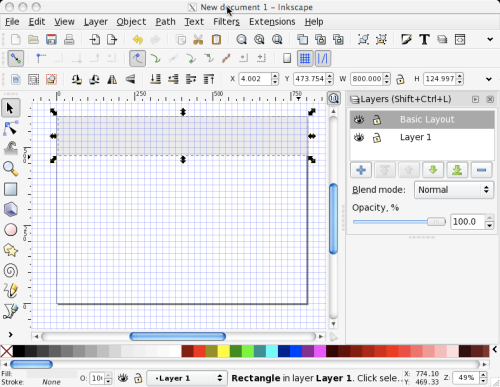
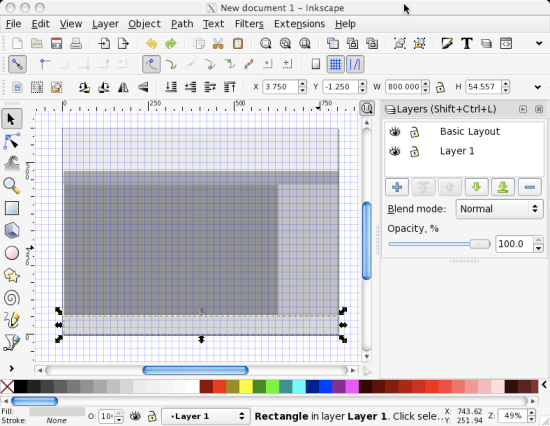
- Use the Tool Controls Bar W(width): number field to apply a setting of 800.0 px. The X:0.0 and Y:0.0 fields reference the bottom left corner of your page border.

Here's roughly what your canvas should look like:

Converting shapes to guides
Once all of your areas are blocked out on the canvas, we'll need to convert the current rectangles into guides so we can use the guides when creating our web page layout graphics.
- We can easily keep the Basic Layout Export layer intact; we need to copy all of the rectangles in this layer. On the main menu, select Edit and then Select All (or use the keyboard shortcut keys Ctrl + A).
- Then select Edit and Duplicate (or use the keyboard shortcut Ctrl + D) to duplicate all of the elements in this layer.
- Now you are ready to convert these current shapes into guides. First, select all the rectangles in the top (duplicate) layout. Do this by clicking a rectangle and then hold the Shift key on your keypad. Then click/select the next rectangle.
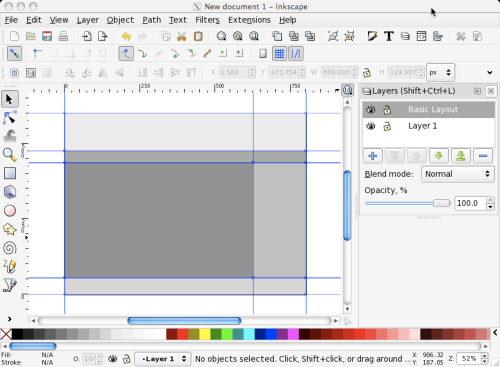
- When you have all five rectangles selected, from the main menu select Object and then Object to Guide. Your duplicate rectangles will be removed from the canvas and replaced with blue guides. To better see the guides, turn off the grid (from the main menu choose View and Grid).

- You'll also notice your originally created basic layout areas defined on the screen. We'll use these shapes later on to help export our design into workable graphics for the HTML programmers.
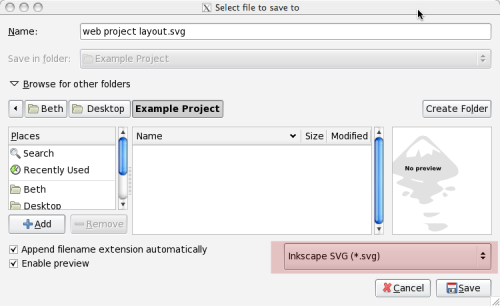
- Now it is time to save this new document before you start the details of the design. From the main menu select File and then Save As. Choose an appropriate file name for your project and save it.

- Make sure you save this document in the native Inkscape format of SVG to retain its editable features and layers.
Project file management
To keep all files for this project in an easy-to-find location, it might make sense to create a project folder on your computer and save this design file within that folder. As you export designs for use within web pages and HTML, you will need a number of files. Using a directory or folder to house all project files makes them easier to find.
Summary
In this article we took a look at architecting a web site. We discussed design techniques that can make web pages move from good to great.
In the next article, Creating a Layout Example in Inkscape, we will see an example to create a web page layout.
Further resources on this subject:
 United States
 Great Britain
 India
India
 Germany
 France
 Canada
 Russia
 Spain
Spain
 Brazil
 Australia
 Singapore
 Canary Islands
 Hungary
 Ukraine
 Luxembourg
 Estonia
 Lithuania
 South Korea
 Turkey
 Switzerland
 Colombia
 Taiwan
 Chile
Chile
 Norway
 Ecuador
 Indonesia
 New Zealand
 Cyprus
 Denmark
 Finland
 Poland
 Malta
Malta
 Czechia
 Austria
 Sweden
 Italy
Italy
 Egypt
Egypt
 Belgium
 Portugal
 Slovenia
 Ireland
 Romania
 Greece
 Argentina
 Netherlands
 Bulgaria
 Latvia
 South Africa
 Malaysia
 Japan
Japan
 Slovakia
 Philippines
 Mexico
 Thailand


