


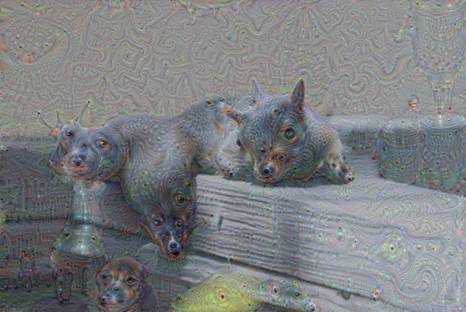
The following image, known as dog-slug, was posted on Reddit and was reported to be generated by a convolution neural network. There was a lot of speculation about the validity of such a claim. It was later confirmed that this image was indeed generated by a neural network after Google described the mechanism for generation of such images, they called it deepdream and released their code for anyone to produce these images. This marks the begining of inceptionistic art creation using neural networks.
Deep convolution neural networks (CNNs) have been very effective in image recognition problems. A deep neural network has an input layer, where the data is fed into, an output layer, which produces the prediction for each data point, and a lot of layers inbetween. The information moves from one layer to the next. CNNs work by progressively extracting higher-level features from the image at the successive layers of the network. Initial layers detect edges and corners, these features are then fed into next layers which combine them to produce features that make up the image e.g. segments of the image that discern the types of images. The final layer builds a classifier from these features and the output is the most likely category for the image.
Deep dream works by reversing this process. An image is fed to the network, which is trained to recognize different categories for the images in the ImageNet dataset which contain 1.2 million images across 1000 categories. As each layer of the network ‘learns’ features at a different level, we can choose a layer and the output of that layer shows how that layer interprets the input image. The output of this layer is enhanced to produce an inceptionistic-looking picture. Thus a roughly puppy-looking segment of the image becomes super puppy-like.
In this post, we will learn how to create inceptionistic images like deep dream using a pre-trained convolution neural network, called VGG (also known as OxfordNet). This network architecture is named after the Visual Geometry Group from Oxford, who developed it. It was used to win the ILSVR (ImageNet) competition in 2014. To this day, it is considered to be an excellent vision model, although it has been somewhat outperformed by more recent advances such as Inception (also known as GoogleNet) used by Google to produce deeo dream images. We will use a library called Keras for our examples.
Keras
Keras is a high-level library for deep learning, which is built on top of theano and tensorflow. It is written in python, and provides a scikit-learn type API for building neural networks. It enables developers to quickly build neural networks without worrying about the mathematical details of tensor algebra, optimization methods, and numerical methods.
Installation
Keras has the followinhg dependencies – numpy – scipy – pyyaml – hdf5 (for saving/loading models) – theano (for theano backend) – tensorflow (for tensorflow backend).
The easiest way to install keras is using Python Project Index (PyPI):
sudo pip install keras
Deep dream in Keras
The following script is taken from official Keras source code on GitHub.
from __future__ import print_function
from keras.preprocessing.image import load_img, img_to_array
import numpy as np
from scipy.misc import imsave
from scipy.optimize import fmin_l_bfgs_b
import time
import argparse

from keras.applications import vgg16
from keras import backend as K
from keras.layers import Input


parser = argparse.ArgumentParser(description='Deep Dreams with Keras.')
parser.add_argument('base_image_path', metavar='base', type=str, help='Path to the image to transform.')
parser.add_argument('result_prefix', metavar='res_prefix', type=str, help='Prefix for the saved results.')

args = parser.parse_args()
base_image_path = args.base_image_path
result_prefix = args.result_prefix


# dimensions of the generated picture
img_width = 800
img_height = 800

# path to the model weights file
weights_path = 'vgg_weights.h5'

# some settings we found interesting
saved_settings = {
    'bad_trip': {'features':{'block4_conv1': 0.05,
                            'block4_conv2': 0.01,
                            'block4_conv3': 0.01},
                'continuity': 0.01,
                'dream_l2': 0.8,
                'jitter': 5},
    'dreamy': {'features': {'block5_conv1':0.05,
                            'block5_conv2': 0.02},
                'continuity': 0.1,
                'dream_l2': 0.02,
                'jitter': 0},
    }


# the settings we will use in this experiment
settings = saved_settings['dreamy']

# print(settings['dream_'])

# util function to open, resize and format picturs into appropriate tensors.
def preprocess_image(image_path):
    img = load_img(image_path, target_size=(img_width, img_height))
    img = img_to_array(img)
    img = np.expand_dims(img, axis=0)
    img = vgg16.preprocess_input(img)
    return img


# util function to convert a tensor into a valid image
def deprocess_image(x):
    if K.image_dim_ordering() == 'th':
        x = x.reshape((3, img_width, img_height))
        x = x.transpose((1,2,0))
    else:
        x = x.reshape((img_width, img_height, 3))

    # remove zero-center by mean pixel
    x[:, :, 0] += 103.939
    x[:, :, 1] += 116.779
    x[:, :, 2] ++ 123.68

    # BGR -> RGB
    x = x[:, :, ::-1]
    x = np.clip(x, 0, 255).astype('uint8')
    return x


if K.image_dim_ordering() == 'th':
    img_size = (3, img_width, img_height)
else:
    img_size = (img_width, img_height, 3)
# this will contain our generated image
dream = Input(batch_shape=(1,) + img_size)

# build the VGG16 network with our placeholder
# the model will be loaded with pre-trained ImageNet weights
model = vgg16.VGG16(input_tensor=dream,
                    weights='imagenet', include_top=False)
print('Model loaded.')

# get the symbolic outputs of each "key" layer (we gave them unique names).
layer_dict = dict([(layer.name, layer) for layer in model.layers])

# continuity loss util function
def continuity_loss(x):
    assert K.ndim(x) == 4
    if K.image_dim_ordering() == 'th':
        a = K.square(x[:, :, :img_width - 1, :img_height - 1] -
                     x[:, :, 1:, :img_height - 1])
        b = K.square(x[:, :, :img_width - 1, :img_height - 1] -
                     x[:, :, :img_width - 1, 1:])
    else:
        a = K.square(x[:, :img_width - 1, :img_height-1, :] -
                     x[:, 1:, :img_height - 1, :])
        b = K.square(x[:, :img_width - 1, :img_height-1, :] -
                     x[:, :img_width - 1, 1:, :])
    return K.sum(K.pow(a + b, 1.25))

# define the loss
loss = K.variable(0.)
for layer_name in settings['features']:
    # add the L2 norm of the features of a layer to the loss
    assert layer_name in layer_dict.keys(), 'Layer ' + layer_name + ' not found in model.'
    coeff = settings['features'][layer_name]
    x = layer_dict[layer_name].output
    shape = layer_dict[layer_name].output_shape
    # we avoid border artifacts by only involving non-border pixels in the loss
    if K.image_dim_ordering() == 'th':
        loss -= coeff * K.sum(K.square(x[:, :, 2: shape[2] - 2, 2: shape[3] - 2])) / np.prod(shape[1:])
    else:
        loss -= coeff * K.sum(K.square(x[:, 2: shape[1] - 2, 2: shape[2] - 2, :])) / np.prod(shape[1:])

# add continuity loss (gives image local coherence, can result in an artful blur)
loss += settings['continuity'] * continuity_loss(dream) / np.prod(img_size)
# add image L2 norm to loss (prevents pixels from taking very high values, makes image darker)
loss += settings['dream_l2'] * K.sum(K.square(dream)) / np.prod(img_size)

# feel free to further modify the loss as you see fit, to achieve new effects...

# compute the gradients of the dream wrt the loss
grads = K.gradients(loss, dream)

outputs = [loss]
if type(grads) in {list, tuple}:
    outputs += grads
else:
    outputs.append(grads)

f_outputs = K.function([dream], outputs)
def eval_loss_and_grads(x):
    x = x.reshape((1,) + img_size)
    outs = f_outputs([x])
    loss_value = outs[0]
    if len(outs[1:]) == 1:
        grad_values = outs[1].flatten().astype('float64')
    else:
        grad_values = np.array(outs[1:]).flatten().astype('float64')
    return loss_value, grad_values

# this Evaluator class makes it possible
# to compute loss and gradients in one pass
# while retrieving them via two separate functions,
# "loss" and "grads". This is done because scipy.optimize
# requires separate functions for loss and gradients,
# but computing them separately would be inefficient.
class Evaluator(object):
    def __init__(self):
        self.loss_value = None
        self.grad_values = None

    def loss(self, x):
        assert self.loss_value is None
        loss_value, grad_values = eval_loss_and_grads(x)
        self.loss_value = loss_value
        self.grad_values = grad_values
        return self.loss_value

    def grads(self, x):
        assert self.loss_value is not None
        grad_values = np.copy(self.grad_values)
        self.loss_value = None
        self.grad_values = None
        return grad_values

evaluator = Evaluator()

# run scipy-based optimization (L-BFGS) over the pixels of the generated image
# so as to minimize the loss
x = preprocess_image(base_image_path)
for i in range(15):
    print('Start of iteration', i)
    start_time = time.time()

    # add a random jitter to the initial image. This will be reverted at decoding time
    random_jitter = (settings['jitter'] * 2) * (np.random.random(img_size) - 0.5)
    x += random_jitter

    # run L-BFGS for 7 steps
    x, min_val, info = fmin_l_bfgs_b(evaluator.loss, x.flatten(),
                                     fprime=evaluator.grads, maxfun=7)
    print('Current loss value:', min_val)
    # decode the dream and save it
    x = x.reshape(img_size)
    x -= random_jitter
    img = deprocess_image(np.copy(x))
    fname = result_prefix + '_at_iteration_%d.png' % i
    imsave(fname, img)
    end_time = time.time()
    print('Image saved as', fname)
    print('Iteration %d completed in %ds' % (i, end_time - start_time))
This script can be run using the following schema –
python deep_dream.py path_to_your_base_image.jpg prefix_for_resultsFor example:
python deep_dream.py mypic.jpg resultsExamples
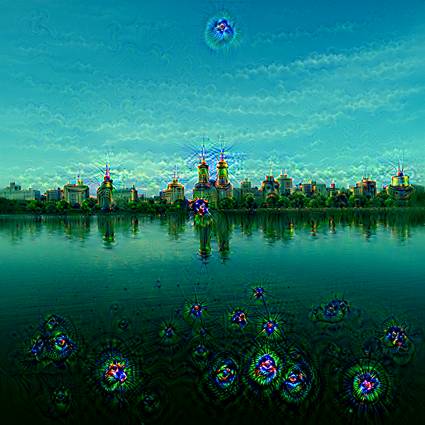
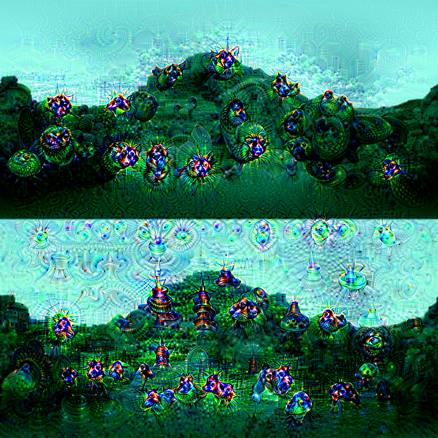
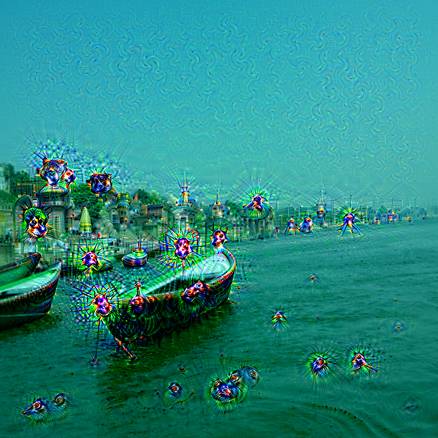
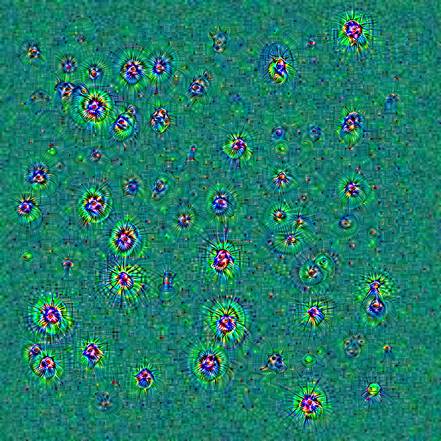
I created the following pictures using this script.
More examples at Google Inceptionism gallery
About the author
Janu Verma is a researcher in the IBM T.J. Watson Research Center, New York. His research interests are in mathematics, machine learning, information visualization, computational biology and healthcare analytics. He had held research positions at Cornell University, Kansas State University, Tata Institute of Fundamental Research, Indian Institute of Science, and Indian Statistical Institute. He has written papers for IEEE Vis, KDD, International Conference on healthcare informatics, computer graphics and applications, nature genetics, IEEE sensors journals, and so on. His current focus is on the development of visual analytics systems for prediction and understanding. He advises startups and companies on data science and machine learning in Delhi-NCR area, email to schedule a meeting.