 |
Create enterprise-ready websites and applications that access Microsoft SharePoint on Windows Phone 7
|
(For more resources on Microsoft Sharepoint, see here.)
Let's get started with the discussion of SharePoint communities by taking a look at blogs.
Blogs
At this point in the 21st century, everyone is familiar with what a blog is. In SharePoint, a blog is a site that is characterized by entries of content being listed from newest at the top of the page to oldest at the bottom. Content is determined by the author and can contain metadata such as the author, date, and keywords or tags to designate the categories in which the content belongs.
Creating a blog site in SharePoint
A blog site can either be the root site or a site contained within another site. This is consistent with all site types in SharePoint. The reason this is pointed out though, is that when creating a new SharePoint engagement, it is important to truly think of the overall goal of the website as a whole. If the website will essentially be a blog with other content thrown in from time to time, then it makes sense for the root site to be of the type blog. Otherwise, it makes sense to make the root site something else like the team site or a blank site and then add a blog site within that root site.
This is important to think about because to add a blog to an existing site is fairly straightforward. Simply, carry out the following steps:
- From the root site, click on the Site Actions menu.
- On the Site Actions menu, select the New Site option.
- From the Installed Items list, select Blog.
- Give the new blog site a Title and a URL name.
- Finally, click on the Create button.
At this point, SharePoint will create a new blog site. The new blog will contain some seed data to get the blog going. There are three categories named appropriately:
- Category 1
- Category 2
- Category 3
The new blog site will also have a location for archives containing the one entry that was seeded in the site titled Welcome to your Blog! This can all be seen in the following screenshot:

Customizing a SharePoint blog site
Although this blog site is ready to go right now, we will probably want to customize it for our usage scenario. There are several places to customize it, which are as follows:
- About this blog
- Categories
- Blog Tools
- Links
About this blog
When new readers reach a blog they look for information about the blog so they can get a high level overview of what to expect from the content of the site. This is usually found in the "about this blog" section of the site. In the SharePoint blog site, the About this blog section is a Wiki Web Part found in the right column. Although we will learn more about Wikis in the next section, for now just know that this web part allows us a what-you-see-is-what-you-get (WYSIWYG) editing surface to enter any content we want. To get into this editing mode, carry out the following steps:
- From the Site Actions menu, select Edit Page.
- When the page changes to edit mode, click on the text inside the About this blog section.
- At this point, the ribbon at the top will have the following four main sections:
- Editing Tools: This has the basic text editing tools that are familiar to anyone who has used Word.
- Table Tools: The about section is actually a table with two rows and one column. The top cell has the image, and the bottom has the text. The Table Tools section of the ribbon allows us to manage this table.
- Page Tools: These are the basic tools that are global to the page and not specific to this section.
- Web Part Tools:This part of the ribbon contains tools that allow us to minimize, restore, or delete the web part. It also allows us to edit the Web Part Properties. These properties include the title, as well as other appearance features such as height and width. It also includes layout information and some advanced features.
Categories
The next section to customize on this blog site is the list of categories. When creating a blog entry, we can categorize the contents with a tag. The default categories for a new blog are as follows:
- Category 1
- Category 2
- Category 3
The following steps show how to customize these categories:
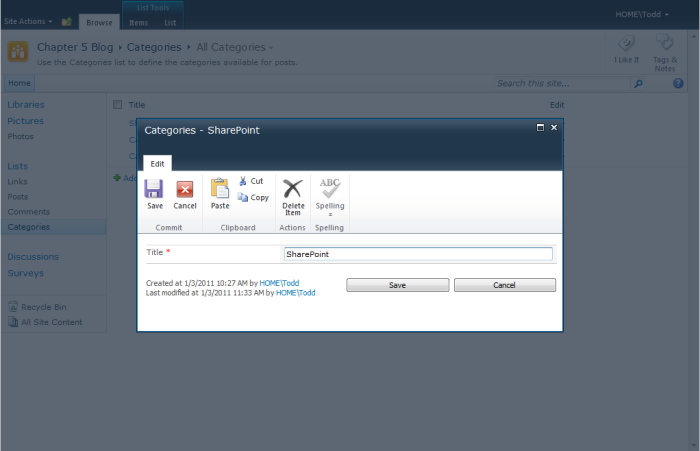
- Click on the title Categories in the left column. This will open the list page for the categories.
- The categories list will display the three default categories. For each category, click on the Edit icon, as shown in the following screenshot:
(Move the mouse over the image to enlarge.)
Unlock access to the largest independent learning library in Tech for FREE!
Get unlimited access to 7500+ expert-authored eBooks and video courses covering every tech area you can think of.
Renews at $19.99/month. Cancel anytime
- Change the Title to something that makes sense for the blog which we are creating.
- Click on the Save button.
Repeat these steps for all three of the default categories. To add more categories, click on the Add new item link below the list of categories. To delete a category, carry out the following steps:
- Move the pointer over the title of the category.
- This will trigger an arrow to appear to the right of the title next to the edit icon. Click on this down arrow.
- In the context menu that appears, select the Delete Item option.
- A confirmation message will appear asking if we are sure we want to send it to the recycle bin. Click on OK and the category will be deleted.
Blog Tools
Now that we have a blog, how do we manage the content? This is where the Blog Tools section comes into use. There are 4 links to help us manage the blog, which are as follows:
- Create a post
- Manage posts
- Manage comments
- Launch blog program to post
Create a post
Clicking on the Create a post link will open a modal dialog with a form to fill out to create a new blog entry. The fields include the following:
- Title: This is a plain text field used for the title of the entry.
- Body: This is a rich text field that utilizes the edit ribbon.
- Category: Here we can select the categories that the entry is a part of.
- Published: Here we can set a date for our entry to be published. Publishing an entry in the future is helpful when we have information that isn't supposed to be public knowledge until a specifi c time and date, or when information needs to be published at a specifi c time and date.
The preceding fields are shown in the following screenshot:

Manage posts
Blog entries, like most things in SharePoint, are items in a list. Clicking on the Manage posts link will display all the blog entries. From this list, we can perform many management functions such as the following:
- Manage approval status
- Edit entries
- View entries
- Manage permissions
- Delete entries
Manage comments
All of the comments are managed in a separate list from the blog entries. Clicking on the Manage comments link will display all of the comments for all of the blog entries in this site. From here we can view, edit, or delete the comments, as well as manage permissions.
Managing permissions on comments and posts is a lot like managing permissions elsewhere in SharePoint. By default, the list items inherit the parent permissions, but occasionally we will want to have specific permissions for special cases. We could have a blog entry that we only want a small group of people to see, or maybe we want to save a comment, so that only we can see it. The manage permissions section is how we can deal with these cases. More information on managing permissions can be found in the online help or on TechNet at the following URL:
http://technet.microsoft.com/en-us/library/cc721640.aspx
Launch blog program to post
Although creating a blog entry in the web browser works well, sometimes we may want to use a more powerful tool to create entries. The Launch blog program to post link will open Microsoft Word 2007, or a newer version, to edit a new blog entry.
Configuring Windows Live Writer
There is a link in Blog Tools to launch Microsoft Word 2007 or newer, to create a new blog entry. Although Word does a pretty good job of creating new blog entries, there is a free tool from Microsoft, named Windows Live Writer (http://explore.live.com/windows-live-writer) which is true genius when it comes to editing blog entries. Using this tool can make most, if not all, blog posting tasks much easier within SharePoint. Configuring Windows Live Writer for a SharePoint is simple:
- When setting up Windows Live Writer, select SharePoint from the What blog service do you use?
- Click on Next and enter the URL of the SharePoint blog.
- Click on Next and provide the SharePoint authentication information.
That's all there is to it. The Windows Live Writer interface also displays a preview of what the blog entry will look like in the site by clicking on the Preview tab at the bottom, as shown in the following screenshot:

Links
Finally, the links section allows us to add hyperlinks to the page for easy access to anything. The default entry is to a photo library named Photos. Adding a new link is as simple as the following steps:
- Click on the Add new link hyperlink.
- Enter the URL for the link.
- Optionally, enter a description that will be used in place of the raw URL for display.
- Optionally, add any notes. Notes show up when viewing the full list of links. The full list of links can be viewed by clicking on the title Links from the home page.
- Click on Save, as shown in the following screenshot:


 United States
 Great Britain
 India
India
 Germany
 France
 Canada
 Russia
 Spain
Spain
 Brazil
 Australia
 Singapore
 Canary Islands
 Hungary
 Ukraine
 Luxembourg
 Estonia
 Lithuania
 South Korea
 Turkey
 Switzerland
 Colombia
 Taiwan
 Chile
Chile
 Norway
 Ecuador
 Indonesia
 New Zealand
 Cyprus
 Denmark
 Finland
 Poland
 Malta
Malta
 Czechia
 Austria
 Sweden
 Italy
Italy
 Egypt
Egypt
 Belgium
 Portugal
 Slovenia
 Ireland
 Romania
 Greece
 Argentina
 Netherlands
 Bulgaria
 Latvia
 South Africa
 Malaysia
 Japan
Japan
 Slovakia
 Philippines
 Mexico
 Thailand


