(For more resources on PrestaShop 1.3, see here.)
The most basic level is using the back office panel to customize the layout. Using this knowledge, we can make some quick and easy changes without having any technical knowledge.
If you need more advanced changes than what can be achieved here, you will need to edit the theme and the CSS files, which will be explained in the next article on Customizing PrestaShop Theme Part 2.
It must be noted that all design changes that you can do in this back office can also be achieved through customization on the theme files (which involves editing of the file's markup) too. Although knowledge of this theme editing approach encased that of the back office setting, it is useful to know that there are reasons to choose the latter option with no "hacking" of scripts even if you are an advanced user as there could be some issues when you have to update to the next PrestaShop version. You will have to update some of these modified files as these changes may not be automatically included in the newer version.
We have to decide what kind of layout we would want, just like the interior design space of a building that you are erecting, you need to visualize the spaces and how users will navigate your retail outlet.
You will also need to know what kind of resources can help the successful function of your store, customers in real brick-and-mortar stores do not have to ask a lot of questions as they are prone to browsing the items while having the advantage of feeling, smelling, holding, or trying the items at the same time. While this is true for a real store/shop, the online store does not have this advantage. So, consider features/functions that can be a "replacement" to this disadvantage, such as a 30 day return policy.
In a real shop, customers may ask questions at the customer service desks. The same thing can be done with your online store; you can add a lot of information that your customers may need while balancing it with a good design, navigation, and browsing experience. This will ensure that the customer finds the information and this reduces the need to repetitively answer the same queries. This is one of the main reasons why an online store exists, which means that information can be obtained easily 24x7.
Therefore, in an online shop, you will have to decide on what kind of features you want to introduce, for example, one block for product information, another for customer service information where they can get information on return policy, how to make payment, and so on.
This is just a background that is needed to decide the functions of your store. We will not be discussing about what makes a good navigation or whether one way can be more effective than another. We will learn about how you can use the knowledge about theming for PrestaShop-based stores to build your online store or if you are a web designer, your clients' online stores suitable with the stores' concepts. You will also learn how to go about in applying the necessary modules to complement your theme setup.
Before we start this article, you should get acquainted with the back office panel. This will help you understand what we are exploring here.
In this article, we will be sticking with the default PrestaShop theme and learn how to:
- Install, uninstall, enable, and disable module blocks in the center, left, and right columns.
- Transplant and position modules by moving them to columns and within the columns.
The default layout
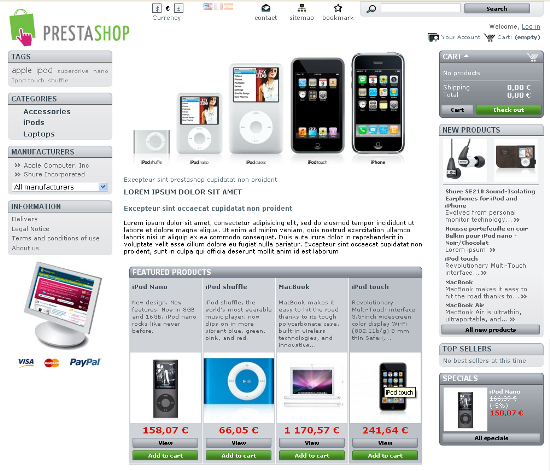
Let's have a look again at your current storefront and how the theme is governed by the back office control panel.

By looking at the screenshot, you can tell which back office items you need to modify, replace, or set according to your needs.
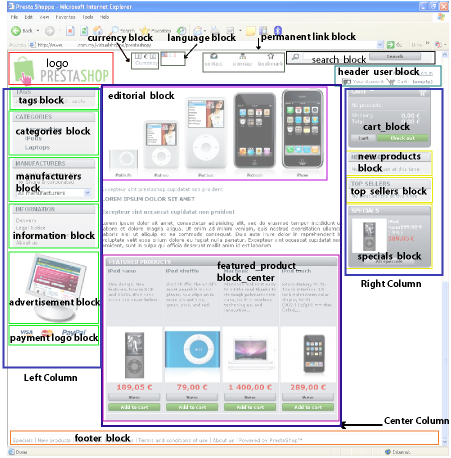
The basic layout outline can be seen in the following screenshot:

Unlock access to the largest independent learning library in Tech for FREE!
Get unlimited access to 7500+ expert-authored eBooks and video courses covering every tech area you can think of.
Renews at $19.99/month. Cancel anytime
Besides the back office control over appearance, our theme is also affected by the modules that control the functionality of your store. At this stage, we will be working on the existing modules in PrestaShop. This is where you decide whether your site visitor will see the product categories, the top selling products, your product listing, the specials, your featured products, and so on. If you run an e-commerce store with a payment option that links automatically to a payment gateway, you may want to study a bit more about each of these modules as well.
You will also notice that the default theme uses a three column layout with a header in the top block and a footer at the bottom. Through the back office panel, all the default blocks on the left and right columns can be moved or transplanted interchangeably.
Some of the blocks in the header (top blocks) can be moved into the left column or right column. The featured product block and the editorial block, which are at the center column, are pretty much stuck in this position.
Modules
The Modules tab allows you to control the modules you want to use in the store. You will be able to transplant the modules and move them around according to the site navigation you want, considering some limitations at this stage. You can move them up or down in the columns. You may also position them in the left or the right column or you may disable them. You also have the option of adding a new module or choosing ones that are available from the PrestaStore. PrestaShop has some already installed modules, and the number of newly developed ones is growing every day.
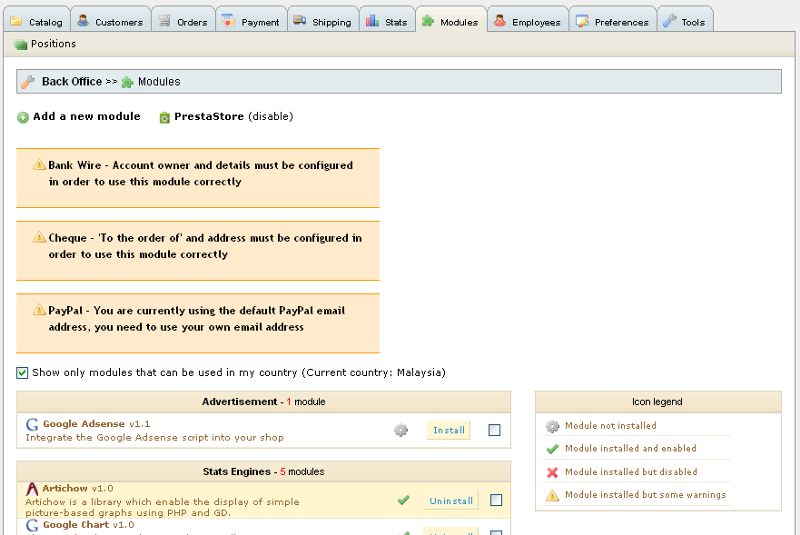
Now let's move on to Back Office | Modules, as shown in the following screenshot:
We will go into the listing and get some ideas on each one. However, we will focus in greater detail on the modules that affect theming directly.
Among the existing modules in this version (PrestaShop 1.3.1), which are readily available for installation, some of them are:
- Advertisement – 1 module: Google Adsense.
- Products module – 6 modules: Cross selling, RSS products feed, Products Comments, Products Category, Product tooltips, Send to a Friend module.
- Stats Engines – 5 modules: Artichow, Google Chart, Visifire, XML/SWF Charts, ExtJS.
- Payment – 8 modules: Bank Wire, Cash on delivery (COD), Cheque, Google Checkout, Hipay, Moneybookers, Paypal, PaypalAPI.
- Tools – 14 modules (but only 12 modules listed): Birthday Present, Canonical URL, Home text editor, Customers follow-up, Google sitemap, Featured Products on the homepage, Customers loyalty and rewards, Mail alerts, Newsletter, Customer referral program, SMS Tm4b, and Watermark.
- Blocks – 23 modules: Block advertising, Top seller block, Cart block, Categories block, Currency block, Info block, Language block, Link block, Manufacturers block, My Account block, New products block, Newsletter block, Block payment logo, Permanent links block, RSS feed block, Quick Search block, Specials block, Suppliers block, Tags block, User info block, Footer links block, Viewed products block, Wish list block.
- Stats – 25 modules: Google Analytics, Pages not found, Search engine keywords, Best categories, Best customers, Best products, Best suppliers, Best vouchers, Carrier distribution, Catalog statistics v1.0, Catalog evaluation, Data mining for statistics, Geolocation, Condensed stats for the Back Office homepage, Visitors online, Newsletter, Visitors origin, Registered Customer Info, Product details, Customer accounts, Sales and orders, Shop search, Visits and Visitors, Tracking - Front office.
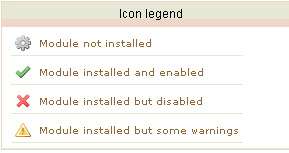
You should also see an Icon legend on the right that reads the following:

Apart from these three options of installing, enabling, and disabling, you may also add new modules using the button on the top-left corner of the module tab.
There are also plenty of third party modules that can be used to make the store more interactive and attractive. Discussing about them is not within the scope of this article.
 United States
 Great Britain
 India
India
 Germany
 France
 Canada
 Russia
 Spain
Spain
 Brazil
 Australia
 Singapore
 Canary Islands
 Hungary
 Ukraine
 Luxembourg
 Estonia
 Lithuania
 South Korea
 Turkey
 Switzerland
 Colombia
 Taiwan
 Chile
Chile
 Norway
 Ecuador
 Indonesia
 New Zealand
 Cyprus
 Denmark
 Finland
 Poland
 Malta
Malta
 Czechia
 Austria
 Sweden
 Italy
Italy
 Egypt
Egypt
 Belgium
 Portugal
 Slovenia
 Ireland
 Romania
 Greece
 Argentina
 Netherlands
 Bulgaria
 Latvia
 South Africa
 Malaysia
 Japan
Japan
 Slovakia
 Philippines
 Mexico
 Thailand


