Blogs and storefronts have some different elements when designing, however, they also have "pages" within them that use standard items, those that repeat over time.
Blogs have posts that all have (at least):
- headings/titles
- content in the body
- options to comment
Storefronts have some of the following:
- lists of items to purchase
- prices
- descriptions
- ratings/comments
- checkouts or shopping baskets
And since these items are common on a number of the website pages, it can use templates for the design. You can create a site based on a template. Here are two quick examples based on each type of site.
Designing for blogs
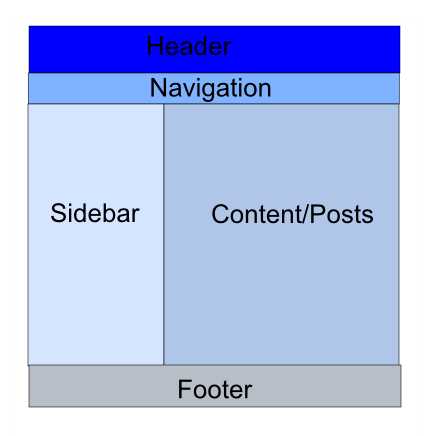
Some common parts of many blog site are: the blog header or banner, a sidebar with recent posts (or archives), about section, recent posts, blog roll and/or links section, a main content section that will contain all of the blog posts, then links to their relevant comments, and a footer of the site. Of course you can get as fancy as you would like here, or as simple, but let's design a site based on these simple sections. Here's how it's done:
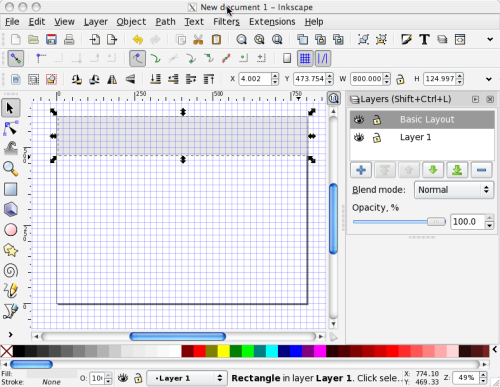
- Open Inkscape, and create a new document. From the file menu, select File, New, and Desktop_800x600.
- When open, create a new layer (Shift + Ctrl + N) and call it Basic Layout.
- Use the Rectangle Tool to draw rectangles for each of your layout areas in your blog design.

- For now, use different shades of gray for each area so you can easily distinguish between them at a glance. To change the fill color of a particular rectangle, left click the rectangle and choose a gray shade for the rectangle. Or drag the gray shade from the color palette onto the rectangle.
- Use sharp edged (not rounded) rectangles. If you need to change to sharp, click the Make Corners Sharp button in the Tool Controls Bar.

- Make sure your rectangle shapes do not have an outline or stroke. Use the Shift + Left click keypad shortcut to open the Stroke dialog and choose No Color (the icon with an X) to delete the stroke.
- Position the rectangles so there are no white spaces in-between them.
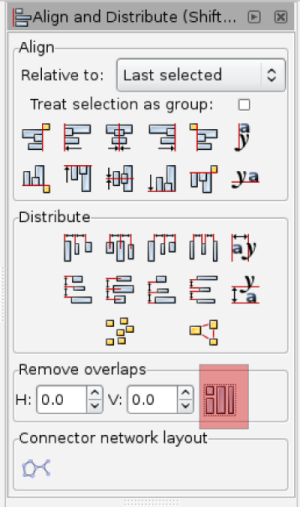
- From the main menu choose Object and then Align and Distribute. In the Remove Overlapssection, click the icon. This makes sure that the bounding boxes around each object don't over lap each other and place the objects tangent to each other.

- Use the Tool Controls Bar W (width): number fi eld to apply a setting of 800.0 px so the Header fills the entire width of the web page.

- Continue using the steps described to add rectangles for all areas shown below in the rough layout of the blog page we'll be creating.

- Once all of your areas are blocked out on the canvas, we'll need to convert the current rectangles into guides so we can use the guides when creating our web page layout graphics. We can easily keep the Basic Layout Export layer intact; we need to copy all of the rectangles in this layer. On the main menu, select Edit and then Select All (or use the keyboard shortcut keys Ctrl + A).
- Then select Edit and Duplicate (or use the keyboard shortcut Ctrl + D) to duplicate all of the elements in this layer.
- Now you are ready to convert these current shapes into guides. First, select all the rectangles in the top (duplicate) layout. Do this by clicking a rectangle and then holding the Shift key on your keypad. Then click/select the next rectangle.
- When you have all rectangles selected, from the main menu select Object and then Object to Guide. Your duplicate rectangles will be removed from the canvas and replaced with blue guides. To better see the guides, turn off the grid (from the main menu choose View and Grid) and hide the basic layout layer (click the eye icon).
- Create a new layer (Shift + Ctrl + N) called Background.
- Use the rectangle tool to draw a background that fills the entire canvas. Use the control bar, to set the width to 800 and the height to 600.
- Use the Color Palette to choose a fi ll color of white.
- In the Status bar, right-click the Stroke setting and select Remove Stroke.
- Create a new layer (Shift + Ctrl + N) called Header.
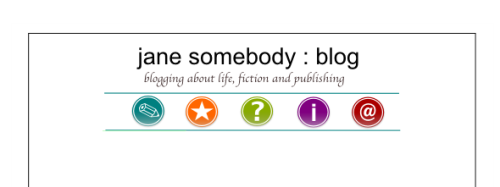
- Click the Create and Edit tool and enter the header title as shown in the following screenshot. Remember to use the control bar to adjust the font type and size.
- Then, still using the Create and Edit tool, type the sub-title as shown below and, again use the control bar to adjust the font type and size.

- Create a new layer (Shift + Ctrl + N) called Navigation.
- Now we need to import the icons that we have created. From the main menu, select File and then Import. Select the SVG file for the icon and then place it on the canvas. Repeat this until you have all five icons on the canvas.
Unlock access to the largest independent learning library in Tech for FREE!
Get unlimited access to 7500+ expert-authored eBooks and video courses covering every tech area you can think of.
Renews at $19.99/month. Cancel anytime
- Use the rectangle tool to draw the horizontal bars below the title and then below the navigation icons. Use the Color Palette to choose a fill color for the rectangles. For our example, we're using a turquoise color.
- Select both rectangles, and then in the Status bar, right-click the Stroke setting and select Remove Stroke.
- With the rectangles still selected open the Align and Distribute dialog (Shift + Ctrl + A) and click the Center on Vertical Axis button.
- Select all of the icons and then open the Align and Distribute dialog (Shift + Ctrl + A) and click the Distribute Centers Equidistantly Horizontally button.

- Next we will create the sidebar content. Most of this will be the links to help with navigating to previous posts or static content—content that doesn't change. Create a new layer (Shift + Ctrl + N) called Sidebar.
- Import a photograph (File and then Import).
- Place it on the upper left side of the page. Use your guides to place it appropriately on the page.
- Select the Create and Edit tool, and drag it across your canvas in the area you want to add a block of text to create a textbox. Then start typing placeholder text for an author bio.
- Use the control bar to adjust font styles and sizes.
- Again use the guides for left alignment placement.
- Continue to use the Create and Edit to create any Headings and other text content on the left sidebar. Note that Inkscape does not support bullets or numbers. So any "bullets" will need to be created manually with dashes (-) or importing graphics.
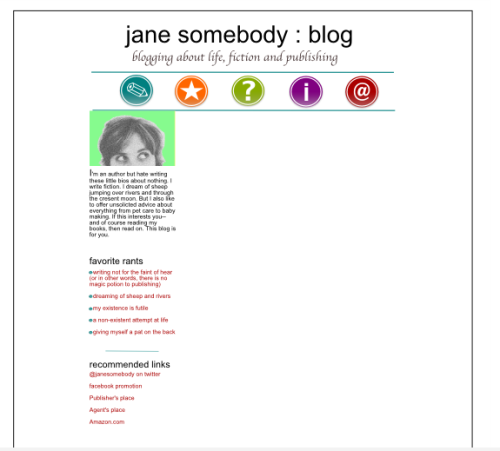
- Your blog web page should look similar to the following screenshot:

- Now it is time to create the look of the content portion of the site—where the blog posts will appear. Create a new layer (Shift + Ctrl + N) called Blog Post.
- Just like with the sidebar text, use the Create and Edit text tool to create text and use the control bar to adjust fonts and sizes. Start with a heading.
- Then with the Create and Edit text tool selected, drag it across the screen to create a textbox. Add in dummy text or write some placeholder blog post. Again, use the control bar to adjust font and size of the text.
- Select the heading and the blog post text and align it within your guides. Or use the Align and Distribute dialog (Shift + Ctrl + A) to align items on the page correctly.
- Now it is time to create the comment, permalink and share this link text. Create a new layer (Shift + Ctrl + N) called Blog Post Footer.
- Again select the Create and Edit text tool, and type: comment | 0 comments | permalink | share this post.
- Use the control bar to adjust font and size as needed.
- Then use the color palette to change the text to red.
- If desired, use the rectangle tool to draw the horizontal bars to show a break between blog posts. Use the color palette to choose a fill color for the rectangles. For our example, we're using turquoise color.
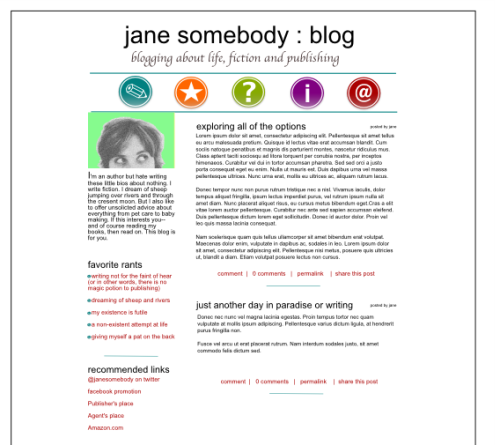
- You can save the file, or add additional post examples. Use Steps 37 – 44 to do a second blog post. Your page should now look something like the following example:

- There will likely also be a sub-page of this content that will show an individual blog post. We can design that page, based on how we want it to look here.
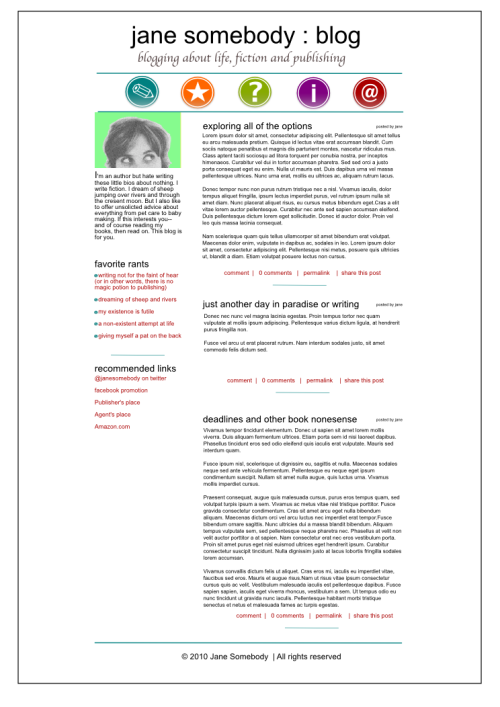
- Finally, for this page, let's add blog footer with some copyright information to see a completed blog design. Create a new layer (Shift + Ctrl + N) called Footer.
- Select the horizontal bar under the navigation icon. From the main menu select Edit and then Duplicate.
- Select the duplicate rectangle and use the guides to place it at the footer area of your web page.
- Select the Create and Edit text tool and type a copyright attribution statement. In the following example we entered: © 2010 Jane Somebody | All rights reserved.
- Select both the rectangle in the footer and the copyright text and open the Align and Distribute dialog (Shift + Ctrl + A). Click the Center on Vertical Axis button to center the footer content.

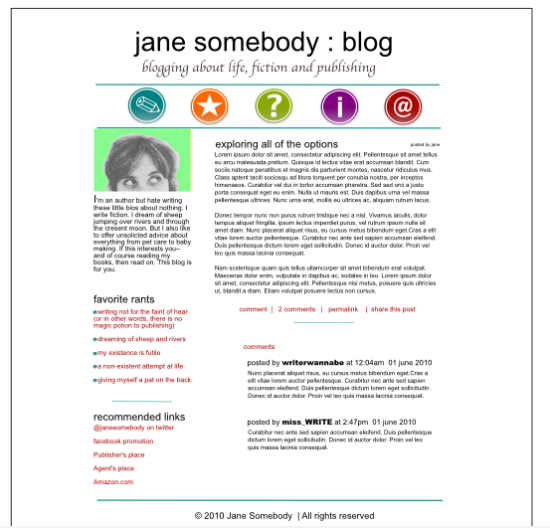
As stated in Step 46, there will also likely be a "sub-page" used in a blog to show each individual post as it's unique web address (if you want to link to the one blog post instead of the dynamic stream posts). Here's what this page would look like:

As you can see, it looks very much like the main blog page, just without any posts before it, or after it. And in this case, we display the comments on this post directly instead of just making it a link.
To modify the existing web page file to match the previous image, you would:
- Open the existing file in Inkscape.
- From the main menu select File and then Save a Copy. Give this a new file name.
- Delete any sample blog posts below the first one.
- Use the Create and Edit text tool to create the comments, headings, and text.
- Re-align all text appropriately with guides and the Align and Distribute dialog (Shift + Ctrl + A).
- Save the file again to save your work.
 United States
 Great Britain
 India
India
 Germany
 France
 Canada
 Russia
 Spain
Spain
 Brazil
 Australia
 Singapore
 Canary Islands
 Hungary
 Ukraine
 Luxembourg
 Estonia
 Lithuania
 South Korea
 Turkey
 Switzerland
 Colombia
 Taiwan
 Chile
Chile
 Norway
 Ecuador
 Indonesia
 New Zealand
 Cyprus
 Denmark
 Finland
 Poland
 Malta
Malta
 Czechia
 Austria
 Sweden
 Italy
Italy
 Egypt
Egypt
 Belgium
 Portugal
 Slovenia
 Ireland
 Romania
 Greece
 Argentina
 Netherlands
 Bulgaria
 Latvia
 South Africa
 Malaysia
 Japan
Japan
 Slovakia
 Philippines
 Mexico
 Thailand

