For many types of games, whether multiplayer FPS or 2D platformer, it is desirable to present the player with a list of levels they can play.

Sonic the Hedgehog © Sega
This tutorial will guide you through creating a simple level select screen in Unity.
For the first step, we need to create some simple test levels for the player to select from. From the menu, select File | New Scene to create a new scene with a main Camera and Directional Light. Then, from the hierarchy view, select Create | 3D Object | Plane to place a ground plane. Select Create | 3D Object | Cube to place a cube in the scene. Copy and paste that cube a few times, arranging the cubes on the plane and positioning the camera until you have a basic level layout as follows:

Save this Scene as “CubeWorld”, our 1st level.
Create another scene and repeat the above process, but instead of cubes, place spheres. Save this scene as “SphereWorld”, our second game level:

We will need preview images of each level for our level select screen. Take a screenshot of each scene, open up any image editor, paste your image, and resize/crop that image until it is 400 x 180 pixels.
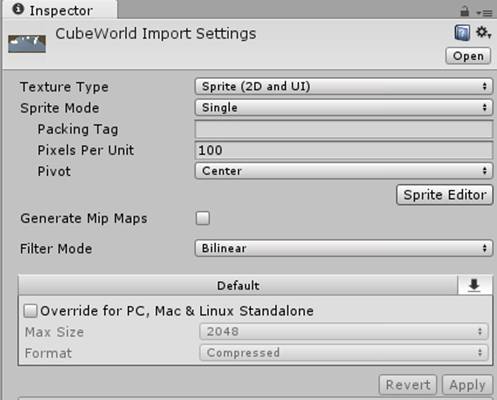
Do this for both the levels, save them as “CubeWorld.jpg” and “SphereWorld.jpg”, and then pull those images into your project. In the import settings, make sure to set the Texture Type for the images to Sprite (2D and UI):
Now that we have the game levels, it’s time to create the Level Select scene. As before, create a new empty scene and name it “LevelSelectMenu”. This time, select Create | UI | Canvas. This will create the canvas object that is the root of our GUI.
In an image editor, create a small 10 x 10 pixel image, fill it with black and save it as “Background.jpg”. Drag it into the project, setting its image settings, as before, to Sprite (2D and UI).
Now, from the Create | UI menu, create an Image. Drag “Background.jpg” from the Project pane into the Image component’s Source Image field. Set the Width and the Height to 2000 pixels, this should be enough to cover the entire canvas.
From the same UI menu, create a Text component. In the inspector, set the Width and the Height of that Text to 300 x 80 pixels. Under the Text property, enter “Select Level”, and then set the Font Size to 50 and Color to white:

Using the transform controls, drag the text to the upper middle area of the screen.
If you can’t see the Text, make sure it is positioned below the Image under Canvas in the Hierarchy view. Order matters; the top most child of Canvas will be rendered first, then the second, and so on. So, make sure your background image isn’t being drawn over your Text.

Now, from the UI menu, create a Button again. Make this button 400 pixels wide and 180 pixels high. Drag “CubeWorld.jpg” into the Image component’s Source Image field from the Project pane. This will make it the button image:

Edit the button Text to say “Cube World” and set the Font Size to 30. Change the Font Colour to be white. Now, in the inspector view, reposition the text to the bottom left corner of the button using the transform controls:


Update the Button’s Color values as in the image below. These values will tint the button image in certain states. Normal is the default, Highlighted is for when the mouse is over the button, Pressed is for when the button is pressed, Disabled is for when the button is not interactable (the Interactable checkbox is unticked):
Unlock access to the largest independent learning library in Tech for FREE!
Get unlimited access to 7500+ expert-authored eBooks and video courses covering every tech area you can think of.
Renews at $19.99/month. Cancel anytime

Now duplicate the first button, but this time, use the “SphereWorld.jpg” image as the Source Image, and set the text to “Sphere World”. Using the transform controls, position the two buttons next to each other under the “Select Level” text on the canvas. It should look like this:

If we run the app now, we’ll see this screen and be able to click on each level button, but nothing will happen. To actually load a level, we need to first create a new script.
Right click in the Project view and select Create | C# Script. Name this script “LevelSelect”.
Create a new GameObject in the scene, rename it “LevelSelectManager”, and drag the LevelSelect script onto that GameObject in the Hierarchy.
Now, open up the script in an IDE and change the code to be as follows:

What this script does is define a script, LevelSelect, which exposes a single function, LoadLevel(). LoadLevel() takes a string, that is, the level name and tells Unity to load that level (a Unity scene) by calling SceneManager.LoadScene().
However, we still need to actually call this function when the buttons are pressed. Back in Unity, go back to the CubeWorld button in the Hierarchy. Under the Button Script in the Inspector, there is an entry for “On Click ()” with a plus sign under it:

Click the plus sign to add the event that will be called when the button is clicked.
Once the event is added, we need to fill out the details that tell it which function to call on what scene GameObject.
Find where it says “None (Object)” under “On Click ()”. Drag the “LevelSelectManager” GameObject from the Hierarchy view into that field. Then click the “No Function” dropdown, which will display a list of component classes matching the components on our “LevelSelectManager” GameObject.
Choose “LevelSelect” (because that’s the script class our function is defined in) and then “LoadLevel (string)” to choose the function we wrote in C# previously. Now we just have to pass the level name string we want to load to that function. To do that, write “CubeWorld” (the name of the scene/level we want to load) in the empty field text box. Once you’re done, the “On Click ()” event should look like this:

Now, repeat the process for the SphereWorld button as above, but instead of entering “CubeWorld” as the string to pass the LoadLevel function, enter “SphereWorld”.
Almost done!
Finally, save the “LevelSelectMenu” scene, and then click File | Build Settings. Make sure that all the three scenes are loaded into the “Scenes In Build” list. If they aren’t, drag the scenes into the list from the Project pane. Make sure that the “LevelSelect” scene is first so that when the app is run, it is the scene that will be loaded up first:

It’s time to build and run your program! You should be greeted by the Level Select Menu, and, depending on which level you select, it’ll load the appropriate game level, either CubeWorld or SphereWorld.
Now you can customize it further, adding more levels, making the level select screen look nicer with better graphical assets and effects, and, of course, adding actual gameplay to your levels.
Have fun!
About the author
Gareth Fouche is a game developer. He can be found on Github @GarethNN.

 United States
 Great Britain
 India
India
 Germany
 France
 Canada
 Russia
 Spain
Spain
 Brazil
 Australia
 Singapore
 Canary Islands
 Hungary
 Ukraine
 Luxembourg
 Estonia
 Lithuania
 South Korea
 Turkey
 Switzerland
 Colombia
 Taiwan
 Chile
Chile
 Norway
 Ecuador
 Indonesia
 New Zealand
 Cyprus
 Denmark
 Finland
 Poland
 Malta
Malta
 Czechia
 Austria
 Sweden
 Italy
Italy
 Egypt
Egypt
 Belgium
 Portugal
 Slovenia
 Ireland
 Romania
 Greece
 Argentina
 Netherlands
 Bulgaria
 Latvia
 South Africa
 Malaysia
 Japan
Japan
 Slovakia
 Philippines
 Mexico
 Thailand


