In this article by Richard Grimmet, the author of the book, Raspberry Pi Robotics Essentials, we'll look at how to detect the Color and motion of an object.
(For more resources related to this topic, see here.)
OpenCV and your webcam can also track colored objects. This will be useful if you want your biped to follow a colored object. OpenCV makes this amazingly simple by providing some high-level libraries that can help us with this task. To accomplish this, you'll edit a file to look something like what is shown in the following screenshot:
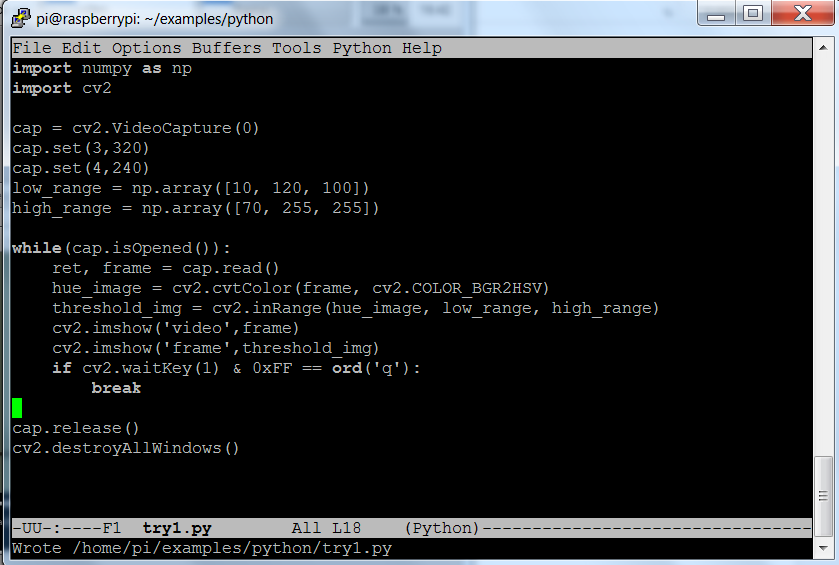
Let's look specifically at the code that makes it possible to isolate the colored ball:
- hue_img = cv.CvtColor(frame, cv.CV_BGR2HSV): This line creates a new image that stores the image as per the values of hue (color), saturation, and value (HSV), instead of the red, green, and blue (RGB) pixel values of the original image. Converting to HSV focuses our processing more on the color, as opposed to the amount of light hitting it.
- threshold_img = cv.InRangeS(hue_img, low_range, high_range): The low_range, high_range parameters determine the color range. In this case, it is an orange ball, so you want to detect the color orange. For a good tutorial on using hue to specify color, refer to http://www.tomjewett.com/colors/hsb.html. Also, http://www.shervinemami.info/colorConversion.html includes a program that you can use to determine your values by selecting a specific color.
Run the program. If you see a single black image, move this window, and you will expose the original image window as well. Now, take your target (in this case, an orange ping-pong ball) and move it into the frame. You should see something like what is shown in the following screenshot:
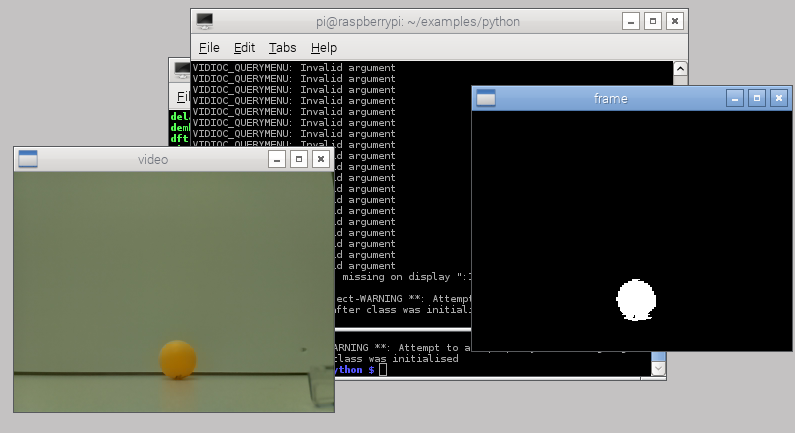
Notice the white pixels in our threshold image showing where the ball is located. You can add more OpenCV code that gives the actual location of the ball. In our original image file of the ball's location, you can actually draw a rectangle around the ball as an indicator. Edit the file to look as follows:
Unlock access to the largest independent learning library in Tech for FREE!
Get unlimited access to 7500+ expert-authored eBooks and video courses covering every tech area you can think of.
Renews at $19.99/month. Cancel anytime
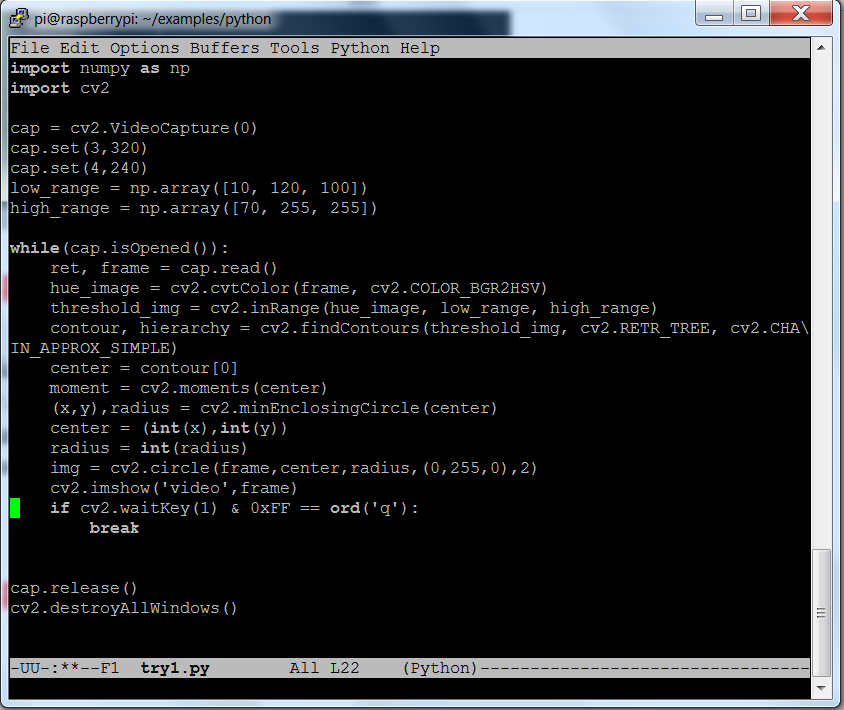
The added lines look like the following:
- hue_image = cv2.cvtColor(frame, cv2.COLOR_BGR2HSV): This line creates a hue image out of the RGB image that was captured. Hue is easier to deal with when trying to capture real world images; for details, refer to http://www.bogotobogo.com/python/OpenCV_Python/python_opencv3_Changing_ColorSpaces_RGB_HSV_HLS.php.
- threshold_img = cv2.inRange(hue_image, low_range, high_range): This creates a new image that contains only those pixels that occur between the low_range and high_range n-tuples.
- contour, hierarchy = cv2.findContours(threshold_img, cv2.RETR_TREE, cv2.CHAIN_APPROX_SIMPLE): This finds the contours, or groups of like pixels, in the threshold_img image.
- center = contour[0]: This identifies the first contour.
- moment = cv2.moments(center): This finds the moment of this group of pixels.
- (x,y),radius = cv2.minEnclosingCircle(center): This gives the x and y locations and the radius of the minimum circle that will enclose this group of pixels.
- center = (int(x),int(y)): Find the center of the x and y locations.
- radius = int(radius): The integer radius of the circle.
- img = cv2.circle(frame,center,radius,(0,255,0),2): Draw a circle on the image.
Now that the code is ready, you can run it. You should see something that looks like the following screenshot:
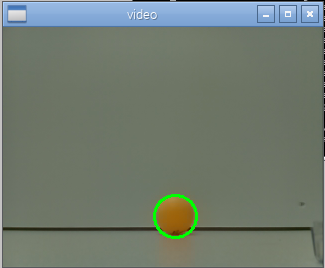
You can now track your object. You can modify the color by changing the low_range and high_range n-tuples. You also have the location of your object, so you can use the location to do path planning for your robot.
Summary
Your biped robot can walk, use sensors to avoid barriers, plans its path, and even see barriers or target.
Resources for Article:
Further resources on this subject:

 United States
 Great Britain
 India
India
 Germany
 France
 Canada
 Russia
 Spain
Spain
 Brazil
 Australia
 Singapore
 Canary Islands
 Hungary
 Ukraine
 Luxembourg
 Estonia
 Lithuania
 South Korea
 Turkey
 Switzerland
 Colombia
 Taiwan
 Chile
Chile
 Norway
 Ecuador
 Indonesia
 New Zealand
 Cyprus
 Denmark
 Finland
 Poland
 Malta
Malta
 Czechia
 Austria
 Sweden
 Italy
Italy
 Egypt
Egypt
 Belgium
 Portugal
 Slovenia
 Ireland
 Romania
 Greece
 Argentina
 Netherlands
 Bulgaria
 Latvia
 South Africa
 Malaysia
 Japan
Japan
 Slovakia
 Philippines
 Mexico
 Thailand


