(For more resources related to this topic, see here.)
Cloudera Hadoop
Hadoop is one of the names we think about when it comes to Big Data. I'm not going into details about it since there is plenty of information out there; moreover, like somebody once said, "If you decided to use Hadoop for your data warehouse, then you probably have a good reason for it". Let's not forget: it is primarily a distributed filesystem, not a relational database.
That said, there are many cases when we may need to use this technology for number crunching, for example, together with MicroStrategy for analysis and reporting.
There are mainly two ways to leverage Hadoop data from MicroStrategy: the first is Hive and the second is Impala. They both work as SQL bridges to the underlying Hadoop structures, converting standard SELECT statements into jobs. The connection is handled by a proprietary 32-bit ODBC driver available for free from the Cloudera website.
In my tests, Impala resulted largely faster than Hive, so I will show you how to use it from our MicroStrategy virtual machine.
Please note that I am using Version 9.3.0 for consistency with the rest of the book. If you're serious about Big Data and Hadoop, I strongly recommend upgrading to 9.3.1 for enhanced performance and easier setup. See MicroStrategy knowledge base document TN43588 : Post-Certification of Cloudera Impala 1.0 with MicroStrategy 9.3.1 .
The ODBC driver is the same for both Hive and Impala, only the driver settings change.
Connecting to a Hadoop database
To show how we can connect to a Hadoop database, I will use two virtual machines: one with MicroStrategy Suite and the second with Cloudera Hadoop distribution, specifically, a virtual appliance that is available for download from their website.
The configuration of the Hadoop cluster is out of scope; moreover, I am not a Hadoop expert. I'll simply give some hints, feel free to use any other configuration/vendor, the procedure and ODBC parameters should be similar.
Getting ready
Start by going to http://at5.us/AppAU1
The Cloudera VM download is almost 3 GB (cloudera-quickstart-vm-4.3.0-vmware.tar.gz) and features the CH4 version. After unpacking the archive, you'll find a cloudera-quickstart-vm-4.3.0-vmware.ovf file that can be opened with VMware, see screen capture:
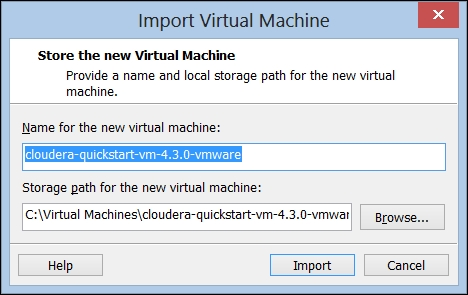
Accept the defaults and click on Import to generate the cloudera-quickstart-vm-4.3.0-vmware virtual machine.
Before starting the Cloudera appliance, change the network card settings from NAT to Bridged since we need to access the database from another VM:
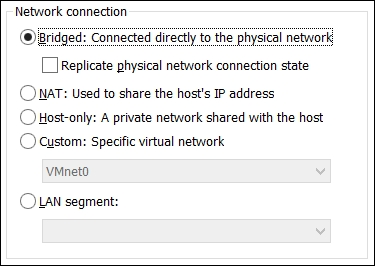
Leave the rest of the parameters, as per the default, and start the machine.
After a while, you'll be presented with a graphical interface of Centos Linux. If the network has started correctly, the machine should have received an IP address from your network DHCP. We need a fixed rather than dynamic address in the Hadoop VM, so:
- Open the System | Preferences | Network Connections menu.
- Select the name of your card (should be something like Auto eth1 ) and click on Edit… .
- Move to the IPv4 Settings tab and change the Method from Automatic (DHCP) to Manual .
- Click on the Add button to create a new address. Ask your network administrator for details here and fill Address , Netmask , and Gateway .
- Click on Apply… and when prompted type the root password cloudera and click on Authenticate . Then click on Close .
- Check if the change was successful by opening a Terminal window (Applications | System Tools | Terminal ) and issue the ifconfig command, the answer should include the address that you typed in step 4.
- From the MicroStrategy Suite virtual machine, test if you can ping the Cloudera VM.
When we first start Hadoop, there are no tables in the database, so we create the samples:
- In the Cloudera virtual machine, from the main page in Firefox open Cloudera Manager , click on I Agree in the Information Assurance Policy dialog.
- Log in with username admin and password admin.
- Look for a line with a service named oozie1 , notice that it is stopped. Click on the Actions button and select Start… .
- Confirm with the Start button in the dialog. A Status window will pop up, wait until the Progress is reported as Finished and close it.
- Now click on the Hue button in the bookmarks toolbar.
- Sign up with username admin and password admin, you are now in the Hue home page.
- Click on the first button in the blue Hue toolbar (tool tip: About Hue ) to go to the quick Start Wizard .
- Click on the Next button to go to Step 2: Examples tab.
- Click on Beeswax (Hive UI) and wait until a message over the toolbar says Examples refreshed .
- Now in the Hue toolbar, click on the seventh button from the left (tool tip: Metastore Manager ), you will see the default database with two tables: sample_07 and sample_08 .
- Enable the checkbox of sample_08 and click on the Browse Data button. After a while the Results tab shows a grid with data. So far so good.
- We now go back to the Cloudera Manager to start the Impala service. Click on the Cloudera Manager bookmark button.
- In the Impala1 row, open the Actions menu and choose Start… , then confirm Start .
- Wait until the Progress says Finished , then click on Close in the command details window.
- Go back to Hue and click on the fourth button on the toolbar (tool tip: Cloudera Impala (TM) Query UI ).
- In the Query Editor text area, type select * from sample_08 and click on Execute to see the table content.
Next, we open the MicroStrategy virtual machine and download the 32-bit Cloudera ODBC Driver for Apache Hive, Version 2.0 from http://at5.us/AppAU2.
Unlock access to the largest independent learning library in Tech for FREE!
Get unlimited access to 7500+ expert-authored eBooks and video courses covering every tech area you can think of.
Renews at $19.99/month. Cancel anytime
Download the ClouderaHiveODBCSetup_v2_00.exe file and save it in C:install.
How to do it...
We install the ODBC driver:
- Run C:installClouderaHiveODBCSetup_v2_00.exe and click on the Next button until you reach Finish at the end of the setup, accepting every default.
- Go to Start | All Programs | Administrative Tools | Data Sources (ODBC) to open the 32-bit ODBC Data Source Administrator (if you're on 64-bit Windows, it's in the SysWOW64 folder).
- Click on System DSN and hit the Add… button.
- Select Cloudera ODBC Driver for Apache Hive and click on Finish .
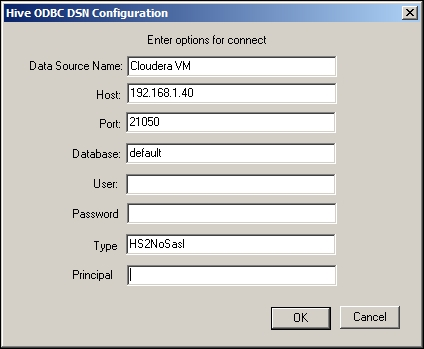
- Fill the Hive ODBC DSN Configuration with these case-sensitive parameters (change the Host IP according to the address used in step 4 of the Getting ready section):
- Data Source Name : Cloudera VM
- Host : 192.168.1.40
- Port : 21050
- Database : default
- Type : HS2NoSasl
- Click on OK and then on OK again to close the ODBC Data Source Administrator.
- Now open the MicroStrategy Desktop application and log in with administrator and the corresponding password.
- Right-click on MicroStrategy Analytics Modules and select Create New Project… .
- Click on the Create project button and name it HADOOP, uncheck Enable Change Journal for this project and click on OK .
- When the wizard finishes creating the project click on Select tables from the Warehouse Catalog and hit the button labeled New… .
- Click on Next and type Cloudera VM in the Name textbox of the Database Instance Definition window.
- In this same window, open the Database type combobox and scroll down until you find Generic DBMS . Click on Next .
- In Local system ODBC data sources , pick Cloudera VM and type admin in both Database login and Password textboxes.
- Click on Next , then on Finish , and then on OK .
- When a Warehouse Catalog Browser error appears, click on Yes .
- In the Warehouse Catalog Options window, click on Edit… on the right below Cloudera VM .
- Select the Advanced tab and enable the radio button labeled Use 2.0 ODBC calls in the ODBC Version group.
- Click on OK . Now select the category Catalog | Read Settings in the left tree and enable the first radio button labeled Use standard ODBC calls to obtain the database catalog .
- Click on OK to close this window. When the Warehouse Catalog window appears, click on the lightning button (tool tip: Read the Warehouse Catalog ) to refresh the list of available tables.
- Pick sample_08 and move it to the right of the shopping cart. Then right-click on it and choose Import Prefix .
- Click on Save and Close and then on OK twice to close the Project Creation Assistant .
- You can now open the project and update the schema.
From here, the procedure to create objects is the same as in any other project:
- Go to the Schema Objects | Attributes folder, and create a new Job attribute with these columns:
- ID :
Table: sample_08
Column: code
- DESC :
Table: sample_08
Column: description
- Go to the Fact folder and create a new Salary fact with salary column. Update the schema.
- Go to the Public Objects | Metrics folder and create a new Salary metric based on the Salary fact with Sum as aggregation function.
- Go to My Personal Objects | My Reports and create a new report with the Job attribute and the Salary metric:
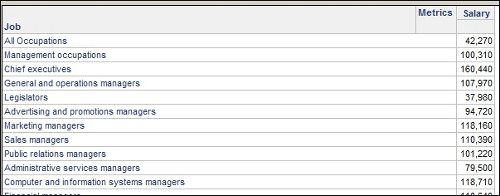
There you go; you just created your first Hadoop report.
How it works...
Executing Hadoop reports is no different from running any other standard DBMS reports. The ODBC driver handles the communication with Cloudera machine and Impala manages the creation of jobs to retrieve data. From MicroStrategy perspective, it is just another SELECT query that returns a dataset.
There's more...
Impala and Hive do not support the whole set of ANSI SQL syntax, so in some cases you may receive an error if a specific feature is not implemented:
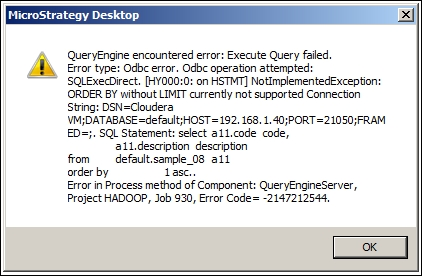
See the Cloudera documentation for details.
HP Vertica
Vertica Analytic Database is grid-based, column-oriented, and designed to manage large, fast-growing volumes of data while providing rapid query performance. It features a storage organization that favors SELECT statements over UPDATE and DELETE plus a high compression that stores columns of homogeneous datatype together.
The Community (free) Edition allows up to three hosts and 1 TB of data, which is fairly sufficient for small to medium BI projects with MicroStrategy. There are several clients available for different operating systems, including 32-bit and 64-bit ODBC drivers for Windows.
 United States
 Great Britain
 India
India
 Germany
 France
 Canada
 Russia
 Spain
Spain
 Brazil
 Australia
 Singapore
 Canary Islands
 Hungary
 Ukraine
 Luxembourg
 Estonia
 Lithuania
 South Korea
 Turkey
 Switzerland
 Colombia
 Taiwan
 Chile
Chile
 Norway
 Ecuador
 Indonesia
 New Zealand
 Cyprus
 Denmark
 Finland
 Poland
 Malta
Malta
 Czechia
 Austria
 Sweden
 Italy
Italy
 Egypt
Egypt
 Belgium
 Portugal
 Slovenia
 Ireland
 Romania
 Greece
 Argentina
 Netherlands
 Bulgaria
 Latvia
 South Africa
 Malaysia
 Japan
Japan
 Slovakia
 Philippines
 Mexico
 Thailand


