(For more resources related to this topic, see here.)
Keyframing cameras
If you create a diverse and interesting 3D scene, the odds are you are going to want your camera to navigate through it and not just sit in one spot. We are going to start off this article by learning how to keyframe our cameras and have them change their position and angles over the course of our timeline. This is a basic technique you'll use constantly in Cinema 4D.
Getting ready
Open the Keyframing_Cameras.c4d file in your C4D Content Pack and use it with this recipe.
How to do it…
- Our scene is a simple setup with a Figure object in the middle of the scene posing for us. Start by placing a Camera in your scene, found in the Create menu under the Camera tab, or inside the Command Palette indicated by the icon of the movie camera. Click on its name in the Object Manager and label it something descriptive called Keyframe Camera
- Select the Cameras menu in the Viewer, and mouse over to the Use Camera option and click on the Keyframe Camera object that you created so that it is checked. The view will not change, but now the Viewer will represent the changes in position and rotation made to your camera, and not the Default Camera. You can also click on the small square box with the plus sign on it in the Object Manager; it's next to the traffic light, and when it turns white it means that the camera is the active camera in the Viewer.
- Set the position and rotation properties of the camera to zero in the Coordinates tab of the Attribute Manager. You can just enter zero values manually or use the Reset PSR command we learned earlier, found in the Character menu under Commands. Hence, we are starting with a camera that has no tilt to it, and it's positioned exactly at our origin. You should have noticed by now that the Viewer has shifted with these new values, because we have changed the position of our camera.
- Take a look at the Animation toolbar and take note of the icons inside the three red circles. These icons can control the keyframing of our cameras (and any objects for that matter) when we change our views and move along in the timeline.
- Move the camera up in the Viewer, so that the camera is framing our subject just above the waist. Now, with the playhead at the very beginning of the timeline, click on the red icon farthest to the left of the three with the image of the key inside it; this is the Record Active Objects command and it will set a keyframe for all our important coordinate properties in the Attribute Manager. Look at how all have a red dot filled in next to their values, meaning that they are keyframed. Now, scrub the playhead forward to frame 60 and then move your Viewer back, so we can see more of our subject and then hit the red keyframe icon once again. If you play your animation in the timeline from the beginning, you'll see that you have created a camera move; the camera moves backwards and reveals more of your subject over time.
How it works…
The Record Active Objects button in the Animation toolbar is a quick way to set the keyframe information for your camera and in whichever frame your playhead is currently positioned at. Setting two keyframes moves our camera from one point to another in our scene over time. You could also set the keyframes manually in the Attribute Manager, and similarly, the set keyframe button works for other objects too, not just cameras.
There's more…
There are cleverer camera setups to be made.
Automatic keyframing…do it at your own risk
The middle button in that red group of three enables automatic keyframing. Some people choose to use this, but it also tends to cause headaches if you forget whether it's active or not. Basically, it will set new keyframe values whenever you change your camera view; you can move to new positions in the timeline and change the view, and the keyframes will automatically be set for you. Try it out and see if you like working with it—just remember to turn it on and off when you want to use it.
Moving a camera along a path
You have the ability to draw a spline that represents the path you want your camera to travel, and then dictate the amount of time it takes to complete the movement. This is what you want to do when you want to travel through your scene and focus on multiple objects or alter the perspective throughout your timeline. This recipe shows how to use the Align to Spline feature to control the movement of your camera.
How to do it...
- In a new project, create a new camera via the icon in the Command Palette. In the Viewer, go and change back to Default Camera and turn off your created camera. Next, you should switch the view of your scene from Perspective to Top under the Cameras menu in the Viewer. You are now looking directly over your scene, without altering the perspective of your created camera.
- Under the Primitives tab in the Command Palette, pick three different primitives and scatter them in three random places in your scene so that your objects create a triangle. You can use the zoom feature if you can't see all your objects. Click-and-drag them to different spots in 3D space using the Move Tool so we can move our camera around each of them in space. The exact position of each is not important, just as long as they are spread out from one another.
- Click on the Splines icon in the Command Palette and select the Bezier option. You can now click to add points and drag your mouse to extend the bezier curves; the further you drag the mouse, the smoother the curve will be. This line will represent your camera's movement, so draw the spline such that it passes in front of all three of your objects. Make sure you don't get too close to your three primitives; else they will not fill the frame tastefully.
- Because we switched to work in the Top view in Default Camera, our points will only move in the X and Z dimensions. You can't move the points higher and lower, so you must switch between camera views in order to adjust the height (Y position) of the points on your spline. Using the Left and Right camera views will allow you to adjust the height, but not the length in the X dimension, and the Front and Back views will allow you to adjust the height and the length, but not the depth. As noted before, try out different camera views using Default Camera so you can see your scene in these useful perspectives. Adjust the Y position of your points in the Left or Right view so the spline now has a few peaks and valleys.
- Now, switch back your view to your created camera and turn off Default Camera. Highlight it in the Object Manager and slide a little over to the Tags menu. Then, under the Cinema 4D Tags submenu, select Align to Spline. A tag like this places a small icon next to the selected object in the Object Manager, where you can select it and open up the tag-specific options.
- Take your spline in the Object Manager and drag it into the Spline Path field in the Attribute Manager. Once inside, the camera snaps into place at one end of your spline. You have now tied the camera's position to the path you drew for it to travel.
- Adjust the values in the percentage slider labeled Position in the Tag properties. You will see that your camera is moving to different points on your spline. The tag works by setting the end points of your spline as 0% for the start and 100% for the end, and in everything between. The camera moves between the start and end points, thereby traveling along the spline when keyframed.
- To complete the movement, set a keyframe at the start of your timeline with the Position value at 0%, move to the end of the timeline and set the value to 100%, and then set a keyframe. Play back your animation to see your camera move along the spline you drew.
How it works...
Instead of keyframing the position and rotation of the actual camera, we can control how our camera moves by manipulating just the shape of the spline. You can set as many keyframes as you need to move your camera through the completion of your path, and simply sliding them along the timeline allows you to speed up or slow down your camera move.
There's more...
Tweak the spline to get your camera move just right. You can keep moving the points along the spline, or you can use the Move Tool to select the entire spline and move it around that way. Get your camera to pass in front of all the objects in your scene and have them fill the frame nicely. You can also adjust the rotation properties in the Coordinates tab for the camera in the Attribute Manager.
Not just for cameras
The Align to Spline tag can be used on any object, in case you want to control the path that an object or a light moves along.
The Tangential checkbox
You are going to leave the Tangential option unchecked in the Align to Spline tab. This will align the camera's movements tangentially along the spline, depending on which axis you pick in the Axis drop-down menu at the bottom. This is more useful when you are aligning objects to a spline, as you may want time to face a specific direction throughout the movement, but it's not very practical for cameras.
If you would compare the last recipe involving moving cameras with the Align to Spline tag to moving an actual physical camera with your hands or on a Steadicam, then this recipe shows you how to place your camera firmly on a tripod and walk away from it.
Once we get a camera positioned where we want, we don't want to have to worry about bumping the scroll wheel on your mouse or accidentally switching camera views and losing your nice scene composition. This can happen by accident and frustrate you in the midst of a deadline, and it can be easily prevented.
How to do it…
- Start by adding a Cube primitive to your scene from the Command Palette. Then, click once on the Camera icon in the Command Palette to add a camera to your scene. Switch to it in the Viewer under the Cameras menu and the Use Camera submenu, making sure that we are no longer on Default Camera.
- Let's say this is the perfect angle and you don't want to lose this shot. Highlight the camera in the Object Manager and then click on Tags, followed by the Cinema 4D Tags and Protection tag. A small orange and black "no sign" appears to the right of your camera in the Object Manager. This shows that the Protection tag is active.
- Nothing happens: your camera is frozen in place and your shot is preserved. Click on the Protection tag in the Object Manager to load it into the Attribute Manager and you'll see plenty of options for the tag, which is all new in release 13. You have the ability to pick which parameters the tag protects. Uncheck the boxes for the X, Y, and Z values under the P group (P for position). Now, try moving your camera. You will be able to move the camera's position, but if you try rotating it, it remains locked.
How it works…
The Protection tag is a useful feature that helps preserve your camera shots by making sure you don't adjust the viewer accidently and ruin your composition. When you are working with multiple cameras, sometimes you can lose your place and forget which one is active and you inadvertently move it and regret the move you made.
There's more…
This feature has been highlighted because many of the recipes in this article feature the tag. I set up many projects to have specific camera angles so you can follow along with the same images in the article, so be aware of the tags and don't get frustrated if you can't change the look in the Viewer.
Protection for all
The Protection tag can be used on objects too; in case you need to make sure they don't get accidentally nudged or moved. You can still edit an object's properties, and not just the position, rotation, or scale.
Undo view
If you do mess up with your camera view, there's always a way to get it back. In the Viewer under the View menu, there's an Undo View command, which will revert your view to how it was before you just moved it. This is a convenient fix, but the Protection tag is the ultimate way to prevent any issues with altering your camera's perspective.
You can always keyframe
If you keyframe the position of your camera, it will automatically jump back to the keyframe values, even if you change the view. Because you have specifically told Cinema 4D when you want your camera with these keyframes, it will always revert to this spot until you set the new keyframes and tell it otherwise. Also, you have to keyframe all the position and rotation values too for this to work, because a change to a value that is not keyframed will not revert to any specific value, so be careful.
Using target cameras
In Cinema 4D, you have the option to have your camera target a specific object in your scene, and it always remains fixed on it regardless of how the camera moves. Because we are designing objects with three dimensions, it makes sense that we learn and develop camera movements that can display our objects from every angle. This recipe demonstrates how we can easily create a camera that can rotate around an object and display the object from any angle we choose throughout the entire movement.
How to do it...
Be sure to check out the first recipe Keyframing cameras, because it builds upon that technique. Then, open the Target_Camera.c4d file from the C4D Content Pack to use with this recipe.
- We'll be recreating the famous shot from the movie, The Matrix, where time slows to a crawl and the camera completely circles around Neo as he dodges some bullets, remaining fixed on him the entire time. Instead of creating a regular camera, hold down the Camera icon in the Command Palette and select the second option for Target Camera. Select your Target Camera by switching to it from Default Camera in the Viewer. By default, Target Camera behaves just like a regular camera, but that will change in a few steps. When you create Target Camera, you actually create three things: a regular camera, a tag that turns it into a target camera, and a Null Object named Camera.Target.1 as a default object for it to focus on. Delete the Camera.Target.1 object from the Object Manager, as we won't be using it.
- Now, we need to create the circular path for our camera to travel around. This is a perfect use for our Align to Spline tag, so highlight your camera in the Object Manager, click on the Tags menu, go under Cinema 4D Tags, and select the Align to Spline tag.
- The camera is going to take a circular path around the subject, so we obviously need a Circle spline to outline this path. Click and hold down on the Splines icon in the Command Palette and select the Circle spline option. The spline is good, except that it has the wrong orientation by default, and we need to adjust the Plane value. Under the Object tab, in the Attribute Manager for the Circle spline, change the Plane value from XY to XZ. This will align the spline with the proper orientation towards our figure. Adjust the Radius to 1200 cm so it is a much larger circle, and our figure will fit into the shot.
- Next, you need to select the Align to Spline tag on your camera in the Object Manager, and then drag the Circle spline into the Spline Path field. Your camera is now aligned to your spline, but it's not really locked in on anything in particular.
- Our camera is aligned to our spline, but we won't be animating the Align to Spline tag. The Position value in the Align to Spline tag only goes from 0% to 100%. This doesn't do us any good if we want to move in the opposite direction or perhaps make more than one rotation. Going from 0% to 100% allows for only one clockwise rotation. We are going to animate the actual Circle spline instead so that we can have control over the direction and amount of loops our camera travels.
- Select your Circle spline and look under the Coordinates tab in the Attribute Manager . Set a keyframe for the R.H value at the beginning of your timeline. 360 degrees represents one full revolution, so move to the very end of your timeline and change the rotation value to 360 and set a keyframe. Play your animation and you will see that the camera circles around one time. But, the problem is our camera isn't focused on our subject.
- Click on the Target tag, which is the little target crosshairs in the Object Manager on your camera. In the Attribute Manager under the Object tab, you'll find the empty Target Object field, where you can simply drag The One from the Object Manager into the field and watch as your camera instantly locks onto the target and follows it throughout the length of the animation. You may now unplug yourself from the Matrix.
How it works...
The target cameras allow you to fix the position and rotation of your camera to an object in your scene. This way, whenever you move the camera, it will remain focused on the object you specified. It can work separately from the Align to Spline tag, but the combination of the two tags helps us create the exact camera move we were looking for.
There's more...
Experiment with changing the coordinates of your Circle spline to get some more interesting camera rotations. Try animating the Y position value of the Circle spline, and you can move between a bird's eye and a worm's eye view of your figure, while focusing on the center of it. Try adjusting the R.P value and you can get an interesting tilt to go with your rotation instead of it being flat.
Pans and tilts
Using a target camera and animating the Null Object is a good way to simulate pans and tilts, instead of animating the actual camera. Just specify a Null Object to be your Target Object, and the camera will stay in one spot and follow the target object if you animate the null position from left to right or from up and down. Think of it as a camera on a tripod, and it's following whatever you are aiming it at.
Adding the target manually
If you create a camera and decide later that you want it to be a target camera, just look for it under the Cinema 4D Tags menu and add it manually; it will work the same way.
Linear keyframes for loops
To get a proper looping animation, you'll need to have keyframes with linear interpolation features. Click on the actual keyframe in the Animation toolbar at the first frame when you have the Circle spline selected in the Object Manager, and change the Interpolation value from Spline to Linear in the Attribute Manager.
Unlock access to the largest independent learning library in Tech for FREE!
Get unlimited access to 7500+ expert-authored eBooks and video courses covering every tech area you can think of.
Renews at $19.99/month. Cancel anytime
Adjusting focal lengths
In Cinema 4D release 13, the camera settings were overhauled and we now have new features that give us better control like we see in actual cameras. The next two recipes deal with these features, though this one shows how to adjust the focal length of your cameras in order to compress or exaggerate depth. Just like in actual photography, picking the right focal length and lens is crucial to getting the right look for your image.
Getting ready
Use the Focal_Lengths.c4d project with this recipe so you can follow along.
How to do it...
- Start by adding a new camera to the scene and switching to it in the Viewer instead of Default Camera Adjust the camera coordinates so that the X and Y position values and all the rotation values are at 0 set the Z position value at -1500 Now, take this camera and duplicate it by clicking-and-holding the Ctrl or command key and dragging the mouse up or down to make a copy on release. Add a Protection tag to each camera so they don't move, and rename one camera to Short Focal Length and the other to Long Focal Length.
- You'll find Focal Length under the Object tab of the camera in the Attribute Manager. The default focal length is pretty average at 36 mm, and you can often leave it at its default and get a good result. But, let's create two different focal lengths for cameras that are in the exact same position and see how drastically it changes the look of your scene in Cinema 4D.
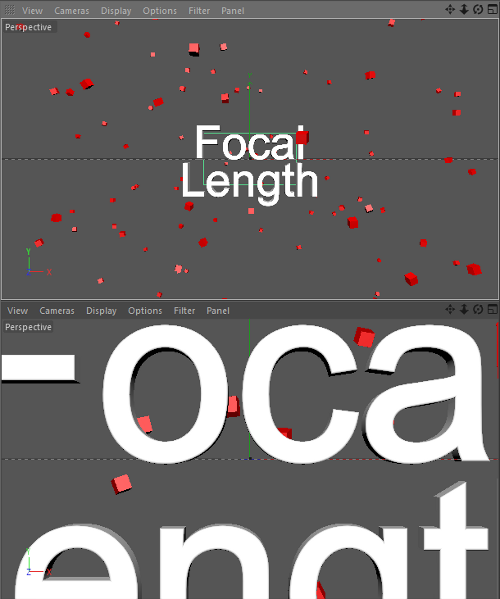
- Under the Object tab in the Attribute Manager for the Short Focal Length camera, click on the Focal Length menu and select Wide Angle, which changes the Focal Length value to 25. Then, switch cameras in the Object Manager, so the Long Focal Length camera is active in the Attribute Manager. Switch the Focal Length setting to Tele, which is a very big value of 135.
- In order to see both cameras at once, change it to 2 Views Stacked inside the Arrangement options, under the Panel menu in the Viewer. Activate the Short Focal Length camera in one window, and then the Long Focal Length one in the other, under the Cameras menu. Make use of Use Camera in each of the two views:

- Keep in mind that these cameras are exactly at the same position, but the images look completely different. The camera with a shorter focal length allows us to see more of the cubes with the text appearing small. Also, the distortion of the cubes that are closer and towards the edges. The camera with a larger focal length has our shot zoomed in way too tight in our text, and it appears that there are far fewer cubes in the scene.
How it works...
This exercise hopefully showed you that it's important to not only adjust the position of your camera, but the focal length as well. A scene with many objects scattered about may require a camera with a shorter focal length, while a larger focal length will allow you to compress and focus on a particular object.
There's more...
Cinema 4D cameras can mimic real cameras, so check out some photography sites for tips on how to compose your scenes and adjust your cameras. The following site from Envato has tons of helpful tips and tutorials for photography and accompanying software:
http://photo.tutsplus.com/
Matching your camera to footage
Let's say you create an object in Cinema 4D, and you want it to appear as if it is a part of another piece of footage or a still photo. So, you want to use 4D to make something 3D, and then have it mixed into something that is 2D. That just about covers every dimension you can have. This recipe shows you how to prepare a camera setup to match the look of a still photograph, so the elements you design in Cinema 4D will appear like they belong in the footage you'll be making a composition of.
Getting ready
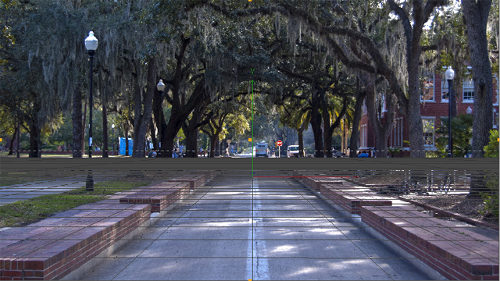
Use the Oak_Alley photograph provided in the C4D Content Pack with this recipe. The image is in 16:9 (aspect ratio) for use in a 1920 x 1080 HD format, so you should change your composition to be in this resolution as well. Go to the Render menu and click on the Render Settings. Under the Output tab, load the preset for HDTV 1080 29.97 under the Film/Video options. Your frame will now have a 16:9 aspect ratio. Whether you use stills or a video, the process laid out in this recipe is the same.
How to do it...
- Start by creating a new camera and switching to it instead of the Default Camera mode. Next, you'll need to create a background object that will serve as a back wall for our scene. Look in the Create menu, and then under Environment you'll see Background. Click on it and add this into your scene.
- The background object requires a material on it, otherwise it's invisible. So double-click on the empty space in the Material Manager and a new material will be created. Double-click on the material, and in the Color channel, you'll need to load the Oak_Alley.jpg image into the Texture field. Click on the small ellipses bar on the left or the bigger bar in the middle; each one will allow you to cycle through your computer and load the image into the Color channel from the C4D Content Pack.
- Now, you have the image loaded into the material. So, drag the material from the Material Manager to the Background object in the Object Manager and release the mouse over it in order to place the material on it. Your Viewer should now be filled with the image, and the background will remain in the same place, regardless of where you move and position the camera.
- The goal now is to match the perspective of your Cinema 4D camera to the perspective in which I took this photograph. We need to move the camera into a spot that lines up the floor grid in the Viewer with the ground in the photo. This is the process of matching camera shots in Cinema 4D to real-life photos and footage. By creating and aligning floors, planes, and ceilings with the perspective and edges in our photo, we can make the camera project our 3D objects as if they are in front of the camera, filming our image:

- In the camera's Coordinates tab, keep the X position at 0, but move the camera back in the Z position to -2000. Now, place a Sphere object in your scene from the Primitives palette. The sphere will be placed at the origin, and moving the camera closer towards it in the Z dimension will make the object appear closer to the camera.
- Next, we need to make adjustments in order to line up the floor plane in our Cinema 4D scene to that of our photograph. These adjustments will be made to our camera's Y position value, as well as to our rotation values. You'll notice a grid that's projected as a floor in the X and Z dimensions. This is ideal for matching our perspective with the ground in our scene. If the grid does not appear in your scene by default, you can activate it in the Viewer window by clicking on the Filter menu and selecting Grid.
- The grid should be placed even with the ground in the photo, so that the lines on the grid are parallel with those in the photo, such as the rows of bricks on the sidewalk. Move the camera up higher in the Y position to a value of 92. Next, you can slightly tweak R.H to a very small value of 0.3, and R.P should have a value of 1. This is a good alignment for our scene, which will vary from photo to photo or video to video, but the process remains the same.
- The last step to get an even more accurate setup is to adjust your camera settings to match the lens to the actual camera lens. I took this photo with the focal length set to 42 mm. Simply go to the Object tab in the Attribute Manager of your camera and change the value of Focal Length from the default 36 to 42. It's a slight change, but will provide more convincing renders if the photo or video was shot with special lenses, such as a wide angle or telephoto lens.
How it works...
Use the grid to line up as if it was the ground or the floor in your photo or video. It can also represent a ceiling if the footage was taken from a lower angle. Add Plane objects and make them perpendicular to your floor if you need to represent walls. Basically, you are trying to mimic the camera that was used in real life to capture your image, so add the faces of the room or environment where you can match them up with the footage you shot. Getting the coordinates and the camera settings as precise as possible will help you build a more convincing scene.
There's more...
This example used a still photograph, which could also be a video shot on a tripod. The point is the camera is not moving and the perspective is not changing. Matching a camera in Cinema 4D to a moving camera is much trickier. You'll need to learn more about 3D camera tracking in order to get your objects to match up with a camera that changes position and angles on your footage. SynthEyes is a software application capable of handling 3D camera tracking, and it can be used in conjunction with Cinema 4D and other programs.
Don't render the background
When you render your scene with your objects matched up to your camera, you don't actually want the background to be rendered with it. You'd much rather composite your render on the top of the original image in a program, such as Photoshop or After Effects. Once you are ready to render, go to the Basic tab of the Background object in the Attribute Manager or just use the traffic light to change Visible in the Render setting to Off, and then render your scene with an alpha channel so you can composite it elsewhere.
The Physical tab
Each camera in Cinema 4D now comes with the new Physical tab in the Attribute Manager in release 13. These features streamline the previously clunky process and make your cameras behave like real cameras in 3D projects. Within the Physical tab, we can control all the features to help create a realistic depth of field, motion blur, and more with our cameras. This recipe shows you how to adjust all the settings in order to get more than ever before out of your cameras in Cinema 4D.
Getting ready
Open the Card_Table.c4d file and use it while you work through this recipe.
How to do it...
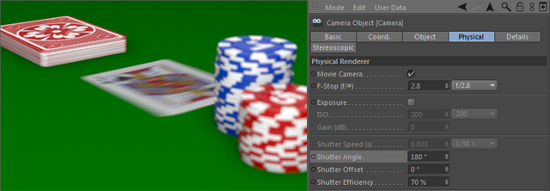
- Check out the setup we have here. It's a camera close-up of a card table, and when you play the animation, a pair of cards slides in front of the camera. The camera is set to the Portrait setting, giving it a focal length of 80 mm for a more shallow focus. Switch your camera over to the Physical tab in the Attribute Manager and you'll notice the options are mostly grayed out. Click on the checkbox for Movie Camera, and then open the Render Settings window from the Command Palette or via the Render menu under Edit Render Settings. You'll see the drop-down menu in the top-left corner, which is used for setting our renderer to Standard.
However, we need to switch that to Physical in order to take advantage of all the new features in our camera. Also, check the boxes for Depth of Field and Motion Blur. Lastly, change the Sampling Quality value from Low to Medium.
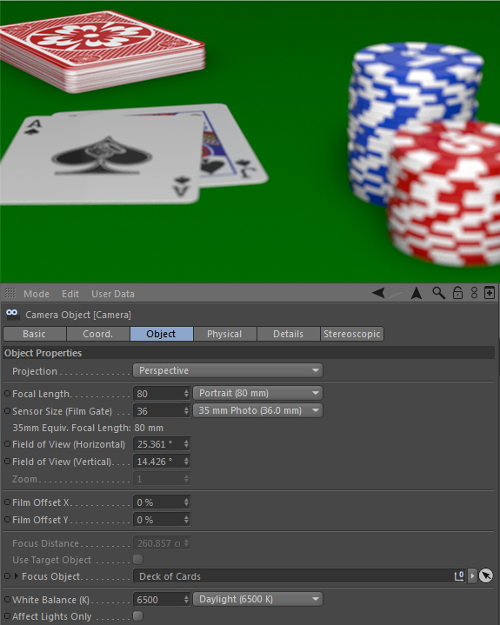
- Let's start by getting our depth of field up and running. The setting we'll want to adjust is F-Stop in our Physical tab. The F-Stop on real cameras adjusts the aperture, or how much light is let into the camera. The smaller the F-Stop is, the smaller the depth of field will be, which will result in a selective focus that can draw attention to certain objects of the scene. Lower the F-Stop value to f/2.8, then switch to the Object tab, and take a look at the ways we can define where our focal plane is.
- The Focus Distance value is a set distance you want to define for the focal plane width, so you can tell the camera at what distance to focus on and also about all the objects that will be out of focus in the front and behind. Or, you can drag-and-drop an object into the Focus Object field, and it will automatically adjust and focus on that object. Drag the Deck of Cards group from the Object Manager and drag it into the Focus Object field. You then do a render preview by hitting Ctrl or command + R. Depending on how fast your computer is, you'll get a rendered sample of your scene in a few seconds. The deck of cards at the back should be the objects in focus, while the dealt cards and the chips should be blurred out:

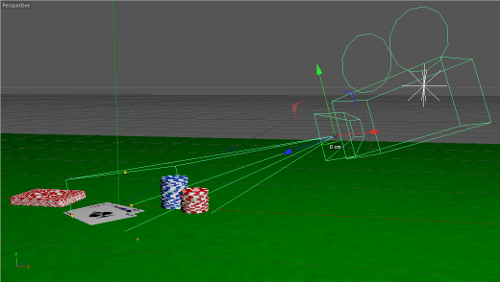
- I'd rather have the dealt cards in focus, with the other objects slightly out of focus. Remove the Deck of Cards group from the Target Object field by clicking on the small arrow on the right-hand side of the field and then clicking on Clear. Switch to the Default Camera mode in the Viewer from inside the Cameras menu under Use Camera. Rotate the active camera around so you can see the cone of your other camera. Make sure the playhead in the Animation toolbar is on a frame towards the end, where the cards are dealt, and are sitting in their final position. Now, let's adjust the Focus Distance value manually to a value of 200. You'll see the end of the plane jump. Move over on top of the two dealt cards. If you switch back to your main camera and do a render preview with Ctrl or command + R, you'll see the two dealt cards and the $1 chips that are with them are in focus, and the deck and $5 chips are out of focus because they lie further away from the focal plane we assigned:

- Now, let's figure out how to apply motion blur to our animation. Move to frame 55 while the Jack of Spades is in motion. Because we checked on the Movie Camera box, our motion blur is controlled via the Shutter Angle setting. Movie cameras have two shutters that rotate and capture images. The shutter angle is the gap between the two shutters, and the larger the angle, the more motion blur gets captured. However, increasing it will also cause the shutter to become overexposed, because more light will be entering, so make sure the Exposure checkbox is deactivated to eliminate this issue. The Shutter Angle value is set to 180 and that will give us a solid motion blur. We don't need to increase it to notice the result. If you do a render preview, it won't matter. This is because the motion blur is not displayed in the Viewer. We'll need to render to Picture Viewer instead, which can be activated by pressing Shift + R . The Picture Viewer will pop the open angle; you'll get a frame with your motion blur on the playing card as it slides across the table:

How it works...
We were able to get realistic camera effects, such as the depth of field and motion blur, by using the Physical settings in our camera and in the Render Settings too. By enabling these features, we were able to get a nice, shallow focus by adjusting the F-Stop value and positioning the focal plane on our two dealt cards. We activated motion blur in Render Settings and had control over it via our Shutter Angle value. Our final image contains both these effects and results in a more interesting-looking image.
There's more...
These new features are great, and are head and shoulders better than the methods used in the previous versions of Cinema 4D to add depth of field and motion blur. But, they will increase your render times for certain, and all these effects can be added in a finishing program such as After Effects.
More effects
There are a few other effects you are able to add via the Physical tab, such as vignetting, chromatic aberration, and lens distortion. These can all be added after you render in After Effects as well.
Rack focus
Set a Null Object to be your Target object, and animate its position within the depth of your camera shot. This will simulate a rack focus, where your focal plane will change during a shot and bring different objects into focus over time.
 United States
 Great Britain
 India
India
 Germany
 France
 Canada
 Russia
 Spain
Spain
 Brazil
 Australia
 Singapore
 Canary Islands
 Hungary
 Ukraine
 Luxembourg
 Estonia
 Lithuania
 South Korea
 Turkey
 Switzerland
 Colombia
 Taiwan
 Chile
Chile
 Norway
 Ecuador
 Indonesia
 New Zealand
 Cyprus
 Denmark
 Finland
 Poland
 Malta
Malta
 Czechia
 Austria
 Sweden
 Italy
Italy
 Egypt
Egypt
 Belgium
 Portugal
 Slovenia
 Ireland
 Romania
 Greece
 Argentina
 Netherlands
 Bulgaria
 Latvia
 South Africa
 Malaysia
 Japan
Japan
 Slovakia
 Philippines
 Mexico
 Thailand

