C++, SFML, Visual Studio, and Starting the first game
Read more
C++, SFML, Visual Studio, and Starting the first game
Packt
900 min read
2016-08-19 00:00:00
0 Likes
0 Comments
In this article by John Horton, author of the book, Beginning C++ Game Programming, we will waste no time in getting you started on your journey to writing great games for the PC, using C++ and the OpenGL powered SFML.We will learn absolutely everything we need, to have the first part of our first game up and running. Here is what we will do now.
(For more resources related to this topic, see here.)
Find out about the games we will build
Learn a bit about C++
Explore SFML and its relationship with C++
Look at the software, Visual Studio
Setup a game development environment
Create a reusable project template which will save a lot of time
Plan and prepare for the first game project Timber!!!
Write the first C++ code and make a runnable game that draws a background
The games
The journey will be mainly smooth as we will learn the fundamentals of the super-fast C++ language, a step at a time and then put the new knowledge to use, adding cool features to the three games we are building.
Timber!!!
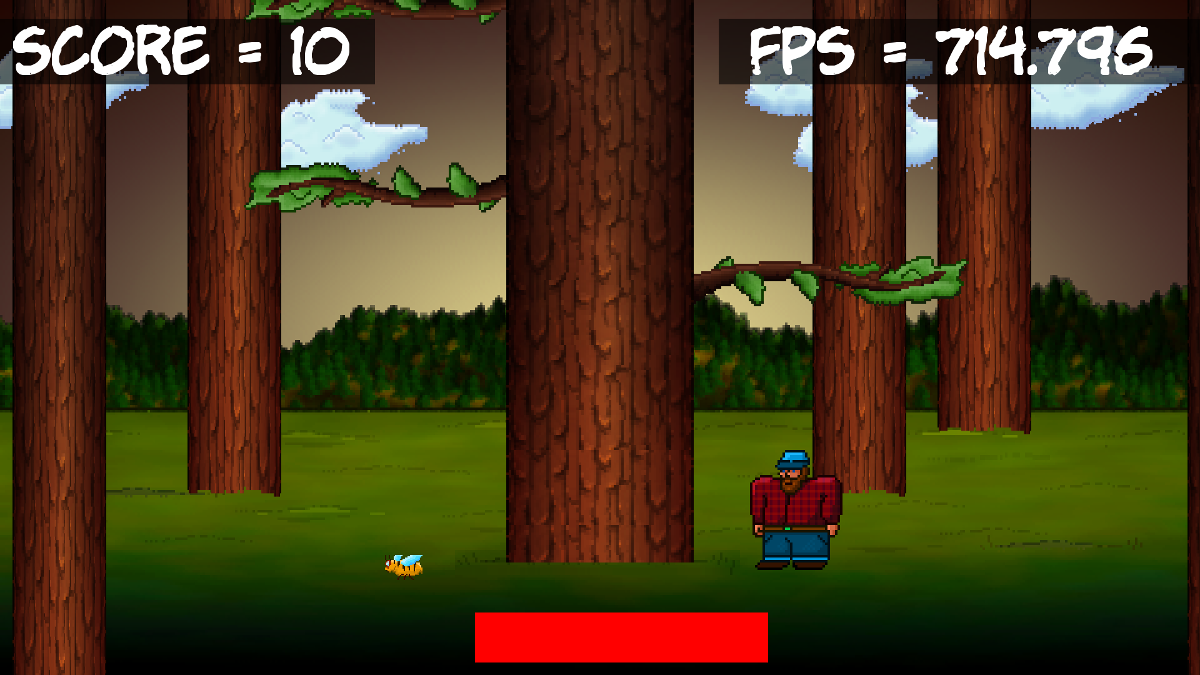
The first game is an addictive, fast-paced clone of the hugely successful Timberman http://store.steampowered.com/app/398710/. Our game, Timber!!!, will allow us to be introduced to all the C++ basics at the same time as building a genuinely playable game. Here is what our version of the game will look like when we are done and we have added a few last-minute enhancements.
The Walking Zed
Next we will build a frantic, zombie survival-shooter, not unlike the Steam hit, Over 9000 Zombies http://store.steampowered.com/app/273500/. The player will have a machine gun, the ability to gather resources and build defenses. All this will take place in a randomly generated, scrolling world. To achieve this we will learn about object oriented programming and how it enables us to have a large code base (lots of code) that is easy to write and maintain. Expect exciting features like hundreds of enemies, rapid fire weaponry and directional sound.
Thomas gets a real friend
The third game will be a stylish and challenging, single player and coop, puzzle platformer. It is based on the very popular game, Thomas was Alone http://store.steampowered.com/app/220780/. Expect to learn cool topics like particle effects, OpenGL Shaders and multiplayer networking.
If you want to play any of the games now, you can do so from the download bundle in the Runnable Games folder. Just double-click on the appropriate .exe file.
Let's get started by introducing C++, Visual Studio and SFML!
C++
One question you might have is, why use C++ at all? C++ is fast, very fast. What makes this so, is the fact that the code that we write is directly translated into machine executable instructions. These instructions together, are what makes the game. The executable game is contained within a .exe file which the player can simply double-click to run.
There are a few steps in the process. First the pre-processor looks to see if any other code needs to be included within our own and adds it if necessary. Next, all the code is compiled into object files by the compiler program. Finally a third program called the linker, joins all the object files into the executable file which is our game.
In addition, C++ is well established at the same time as being extremely up-to-date. C++ is an Object Oriented Programming (OOP) language which means we can write and organize our code in a proven way that makes our games efficient and manageable.
Most of this other code that I refered to, you might be able to guess, is SFML, and we will find out more about SFML in just a minute. The pre-processor, compiler and linker programs I have just mentioned, are all part of the Visual Studio Integrated Development Environment (IDE).
Microsoft Visual Studio
Visual Studio hides away the complexity of the pre-processing, compiling and linking. It wraps it all up into the press of a button. In addition to this, it provides a slick user interface for us to type our code and manage, what will become a large selection of code files and other project assets as well.
While there are advanced versions of Visual Studio that cost hundreds of dollars, we will be able to build all three of our games in the free Express2015forDesktop version.
SFML
Simple Fast Media Library (SFML) is not the only C++ library for games. It is possible to make an argument to use other libraries, but SFML seems to come through in first place, for me, every time. Firstly it is written using object oriented C++.
Perhaps the biggest benefit is that all modern C++ programming uses OOP. Every C++ beginners guide I have ever read. uses and teaches OOP. OOP is the future (and the now) of coding in almost all languages in fact. So why, if your learning C++ from the beginning, would you want to do it any other way?
SFML has a module (code) for just about anything you would ever want to do in a 2d game. SFML works using OpenGL that can also make 3d games. OpenGL is the de-facto free-to-use graphics library for games. When you use SFML, you are automatically using OpenGL.
SFML drastically simplifies:
2d graphics and animation including scrolling game-worlds.
Sound effects and music playback, including high quality directional sound.
Online multiplayer features
The same code can be compiled and linked on all major desktop operating systems, and soon mobile as well!
Extensive research has not uncovered any more suitable way to build 2d games for PC, even for expert developers and especially if you are a beginner and want to learn C++ in a fun gaming environment.
Setting up the development environment
Now you know a bit more about how we will be making games, it is time to set up a development environment so we can get coding.
What about Mac and Linux?
The games that we make can be built to run on Windows, Mac and Linux! The code we use will be identical for each each. However, each version does need to be compiled and linked on the platform for which it is intended and Visual Studio will not be able to help us with Mac and Linux.
Although, I guess, if you are an enthusiastic Mac or Linux user and you are comfortable with your operating system, the vast majority of the challenge you will encounter, will be in the initial setup of the development environment, SFML and the first project.
For Linux, read this for an overview: http://www.sfml-dev.org/tutorials/2.0/start-linux.php
For Linux, read this for step-by-step: http://en.sfml-dev.org/forums/index.php?topic=9808.0
Unlock access to the largest independent learning library in Tech for FREE!
Get unlimited access to 7500+ expert-authored eBooks and video courses covering every tech area you can think of.
Renews at $19.99/month. Cancel anytime
On Mac, read this tutorial as well as the linked out articles: http://www.edparrish.net/common/sfml-osx.html
Installing Visual Studio Express 2015 for Desktop
Installing Visual Studio can be almost as simple as downloading a file and clicking a few buttons. It will help us, however, if we carefully run through exactly how we do this. For this reason I will walk through the installation process a step at a time.
The Microsoft Visual Studio site says, you need 5 GB of hard disk space. From experience, however, I would suggest you need at least 10 GB of free space. In addition, these figures are slightly ambiguous. If you are planning to install on a secondary hard drive, you will still need at least 5 GB on the primary hard drive because no matter where you choose to install Visual Studio, it will need this space too.
To summarize this ambiguous situation: It is essential to have a full 10 GB space on the primary hard disk, if you will be installing Visual Studio to that primary hard disk. On the other hand, make sure you have 5 GB on the primary hard disk as well as 10 GB on the secondary, if you intend to install to a secondary hard disk. Yep, stupid, I know!
The first thing you need is a Microsoft account and the login details. If you have a Hotmail or MSN email address then you already have one. If not, you can sign up for a free one here:https://login.live.com/.
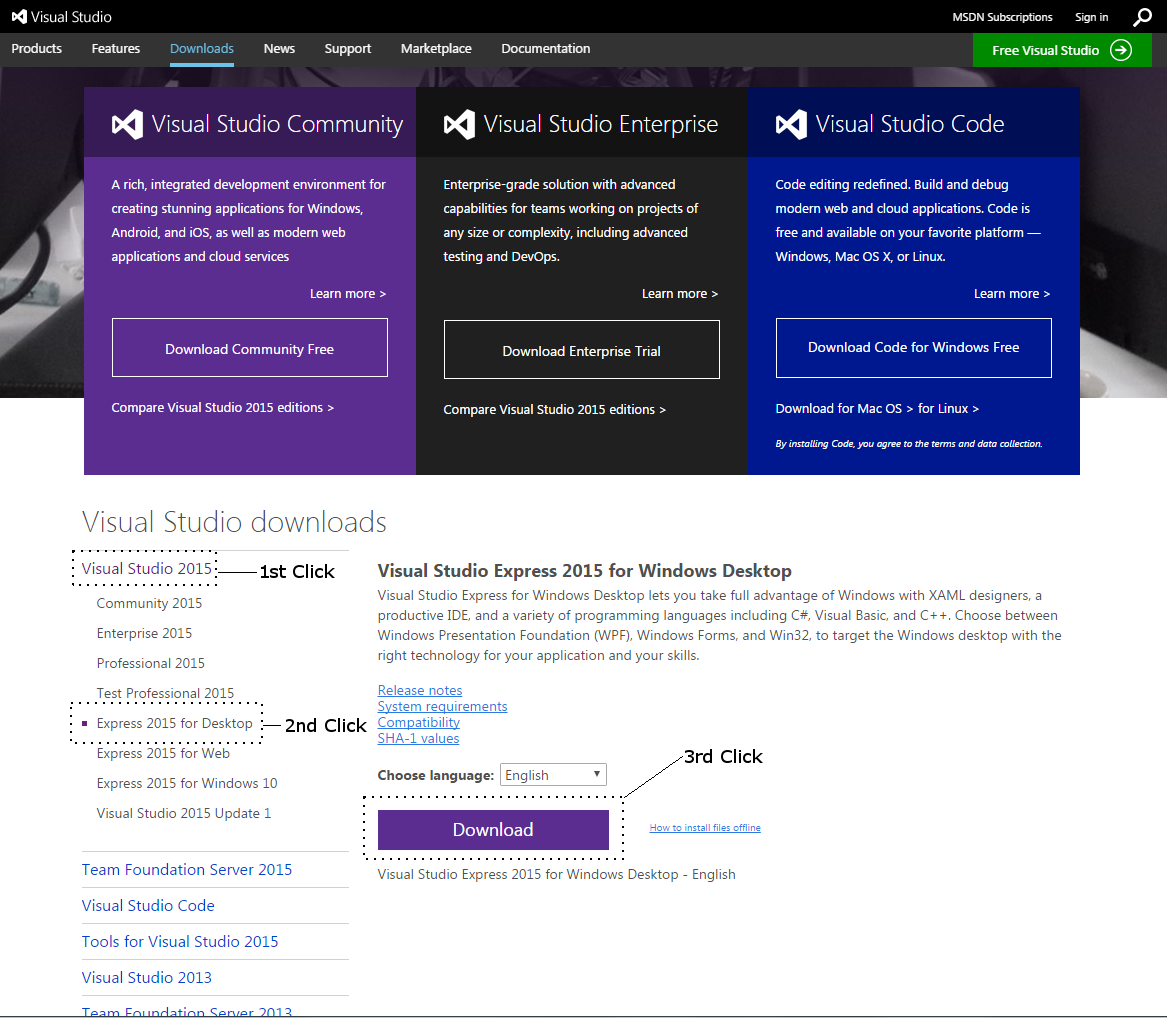
Visit this link: https://www.visualstudio.com/en-us/downloads/download-visual-studio-vs.aspx. Click on Visual Studio 2015, then Express 2015 for desktop then the Download button. This next image shows the three places to click.
Wait for the short download to complete and then run the downloaded file. Now you just need to follow the on-screen instructions. However, make a note of the folder where you choose to install Visual Studio. If you want to do things exactly the same as me, then create a new folder called Visual Studio 2015 on your preferred hard disk and install to this folder. This whole process could take a while depending on the speed of your Internet connection.
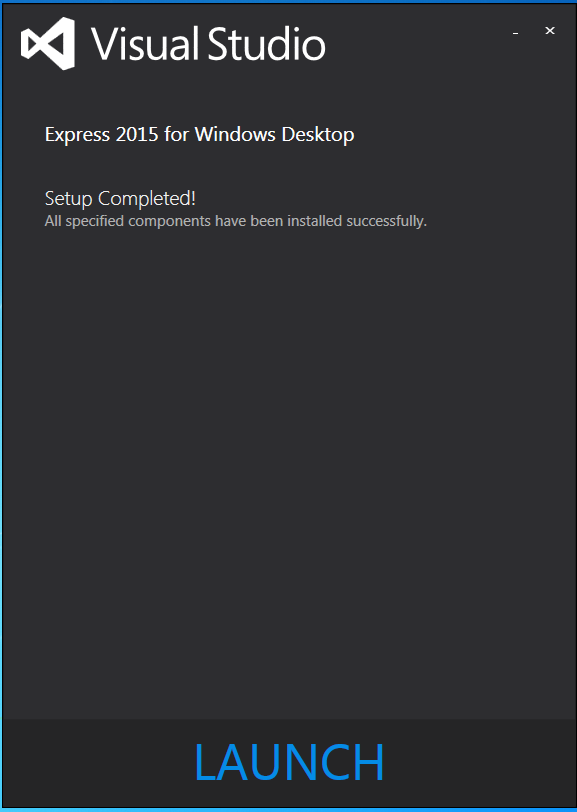
When you see the next screen, click on Launch and enter your Microsoft account login details.
Now we can turn to SFML.
Setting up SFML
This short tutorial will step through downloading the SFML files, that allows us to include the functionality contained in the library as well as the files, called DLL files, that will enable us to link our compiled object code to the SFML compiled object code.
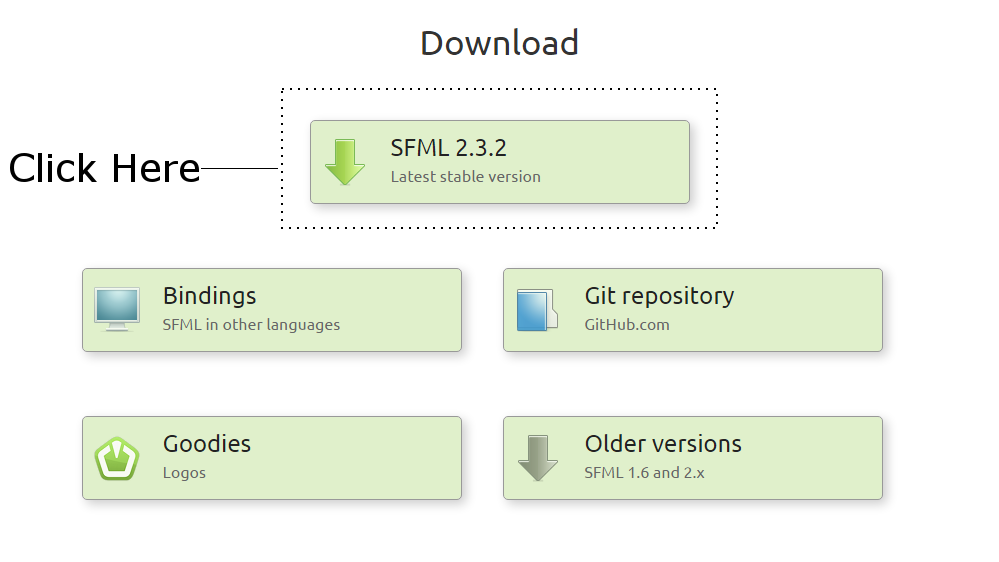
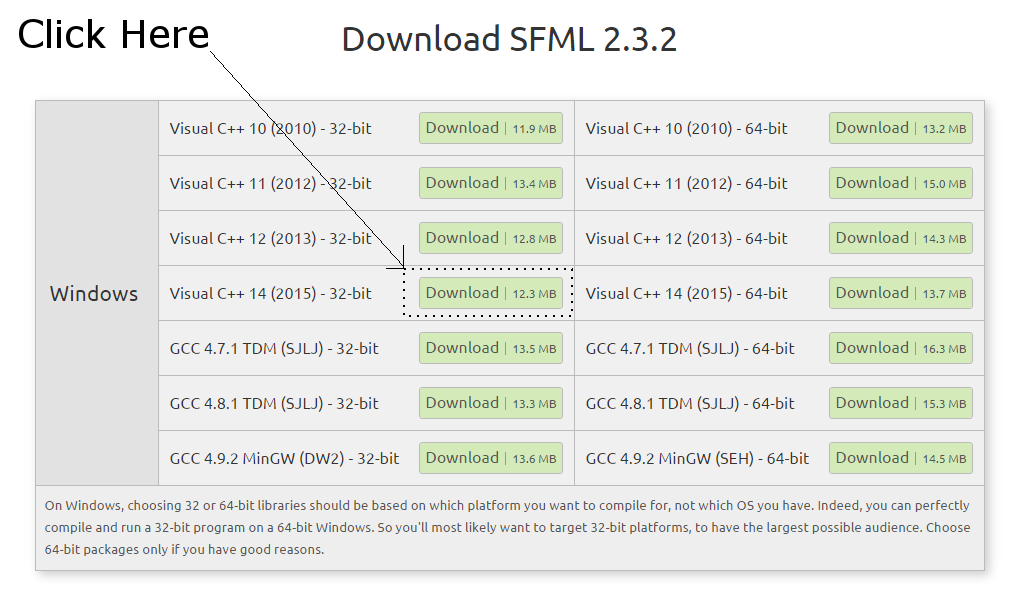
Visit this link on the SFML website: http://www.sfml-dev.org/download.php. Click on the button that says Latest Stable Version as shown next.
By the time you read this guide, the actual latest version will almost certainly have changed. That doesn't matter as long as you do the next step just right. We want to download the 32 bit version for Visual C++ 2014. This might sound counter-intuitive because we have just installed Visual Studio 2015 and you probably(most commonly) have a 64 bit PC. The reason we choose the download that we do, is because Visual C++ 2014 is part of Visual Studio 2015 (Visual Studio does more than C++) and we will be building games in 32 bit so they run on both 32 and 64 bit machines. To be clear click the download indicated below.
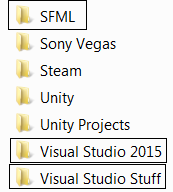
When the download completes, create a folder at the root of the same drive where you installed Visual Studio and name it SFML. Also create another folder at the root of the drive where you installed Visual Studio and call it Visual Studio Stuff. We will store all kinds of Visual Studio related things here so Stuff seems like a good name. Just to be clear, here is what my hard drive looks like after this step
Obviously, the folders you have in between the highlighted three folders in the image will probably be totally different to mine. Now, ready for all the projects we will soon be making, create a new folder inside Visual Studio Stuff. Name the new folder Projects.
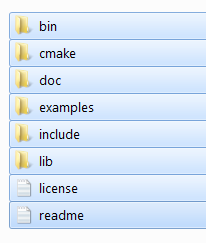
Finally, unzip the SFML download. Do this on your desktop. When unzipping is complete you can delete the zip folder. You will be left with a single folder on your desktop. Its name will reflect the version of SFML that you downloaded. Mine is called SFML-2.3.2-windows-vc14-32-bit. Your file name will likely reflect a more recent version. Double click this folder to see the contents, then double click again into the next folder (mine is called SFML-2.3.2). The image below is what my SFML-2.3.2 folder contents looks like, when the entire contents has been selected. Yours should look the same.
Copy the entire contents of this folder, as seen in the previous image and paste/drag all the contents into the SFML folder you created in step 3. I will refer to this folder simply as your SFML folder.
Now we are ready to start using C++ and SFML in Visual Studio.
Creating a reusable project template
As setting up a project is a fairly fiddly process, we will create a project and then save it as a Visual Studio template. This will save us a quite significant amount of work each time we start a new game. So if you find the next tutorial a little tedious, rest assured that you will never need to do this again.
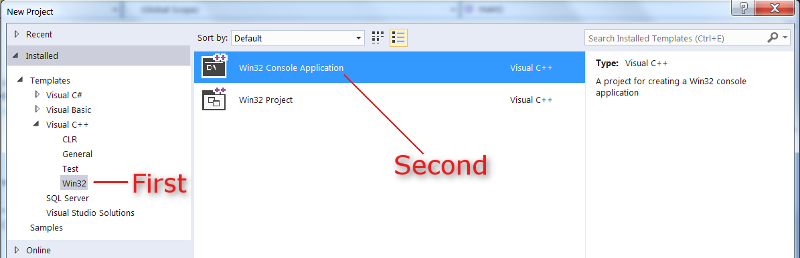
In the New Project window, click the little drop-down arrow next to Visual C++ to reveal more options, then click Win32 and then click Win32Console Application, You can see all these selections in the next screen-shot.
Now, at the bottom of the New Project window type HelloSFML in the Name: field.
Next, browse to the Visual Studio StuffProjects folder that we created in the previous tutorial. This will be the location that all our project files will be kept. All templates are based on an actual project. So we will have a project called HelloSFML but the only thing we will do with it, is make a template from it.
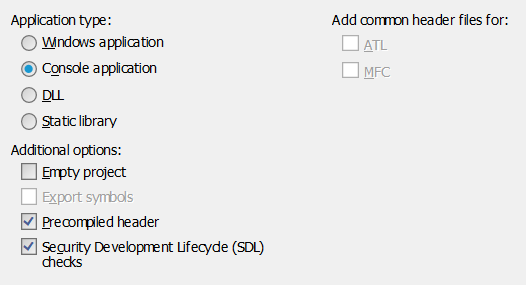
When you have completed the steps above click OK. The next image shows the Application Settings window. Check the box for Console application, and leave the other options as shown below.
Click Finish and Visual Studio will create the new project.
Next we will add some fairly intricate and important project settings. This is the laborious part, but as we will create a template, we will only need to do this once. What we need to do is to tell Visual Studio, or more specifically the code compiler, that is part of Visual Studio, where to find a special type of code file from SFML. The special type of file I am referring to is a header file. Header files are the files that define the format of the SFML code. So when we use the SFML code, the compiler knows how to handle it. Note that the header files are distinct from the main source code files and they are contained in files with the .hpp file extension. All this will become clearer when we eventually start adding our own header files in the second project. In addition, we need to tell Visual Studio where it can find the SFML library files. From the Visual Studio main menu select Project|HelloSFML properties.
In the resulting HelloSFML Property Pages window, take the following steps, which are numbered and can be referred to in the next image.
First, select All Configurations from the Configuration: drop-down.
Second, select C/C++ then General from the left-hand menu.
Third, locate the Additional Include Directories edit box and type the drive letter where your SFML folder is located, followed by SFMLinclude. The full path to type, if you located your SFML folder on your D drive is, as shown in the screen-shot, D:SFMLinclude. Vary your path if you installed SFML to a different drive.
Click Apply to save your configurations so far.
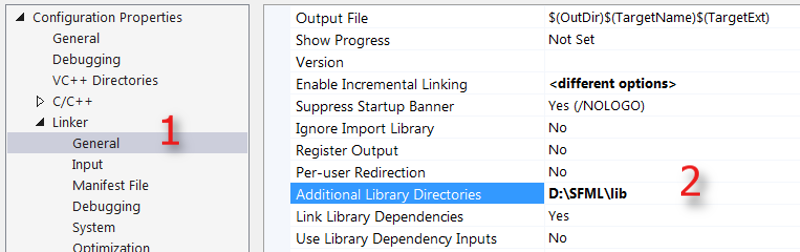
Now, still in the same window, perform these next steps which again refer to the next image. Select Linker then General.
Find the Additional Library Directories edit box and type the drive letter where your SFML folder is, followed by SFMLlib. So the full path to type if you located your SFML folder on your D drive is, as shown in the screen-shot, D:SFMLlib. Vary your path if you installed SFML to a different drive.
Click Apply to save your configurations so far.
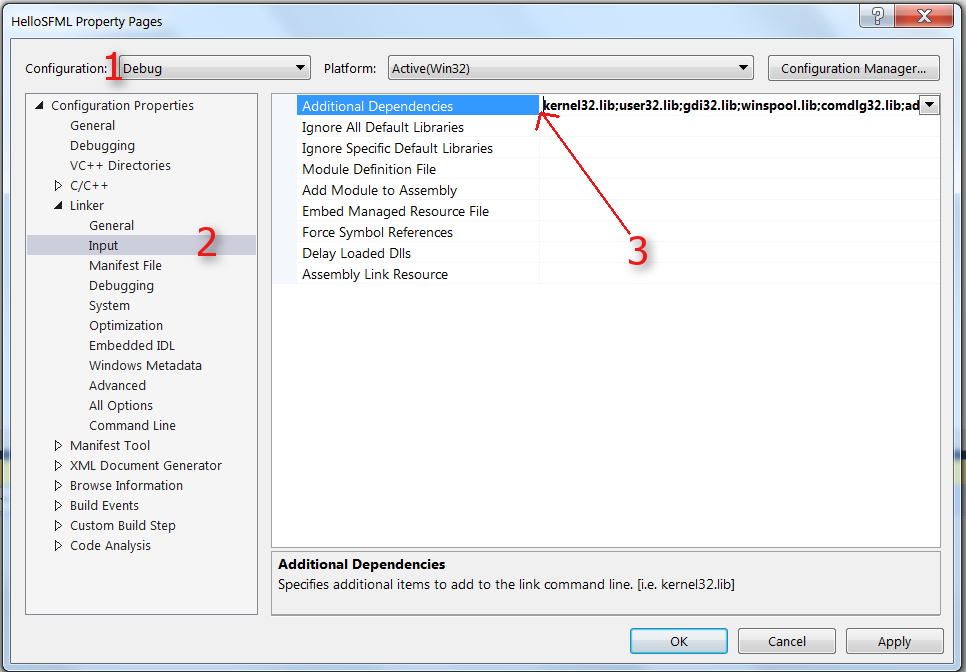
Finally for this stage, still in the same window, perform these steps which again refer to the next image. Switch the Configuration: drop down(1) to Debug as we will be running and testing our games in debug mode.
Select Linker then Input (2).
Find the Additional Dependencies edit box (3) and click into it at the far left hand side. Now copy & paste/type the following at the indicated place.:
Again be REALLY careful to place the cursor exactly and not to overwrite any of the text that is already there.
Click OK.
Let's make the template of our HelloSFML project so we never have to do this slightly mind-numbing task again. Creating a reusable project template is really easy. In Visual Studio select File | Export Template…. Then in the Export Template Wizard window make sure the Project template option is selected and the HelloSFML project is selected for the From which project do you want to create a template option.
Click Next and then Finish.
Phew, that's it! Next time we create a project I'll show you how to do it from this template. Let's build Timber!!!
Summary
In this article we learnt that, it is true that configuring an IDE, to use a C++ library can be a bit awkward and long. Also the concept of classes and objects is well known to be slightly awkward for people new to coding.

 United States
 Great Britain
 India
India
 Germany
 France
 Canada
 Russia
 Spain
Spain
 Brazil
 Australia
 Singapore
 Canary Islands
 Hungary
 Ukraine
 Luxembourg
 Estonia
 Lithuania
 South Korea
 Turkey
 Switzerland
 Colombia
 Taiwan
 Chile
Chile
 Norway
 Ecuador
 Indonesia
 New Zealand
 Cyprus
 Denmark
 Finland
 Poland
 Malta
Malta
 Czechia
 Austria
 Sweden
 Italy
Italy
 Egypt
Egypt
 Belgium
 Portugal
 Slovenia
 Ireland
 Romania
 Greece
 Argentina
 Netherlands
 Bulgaria
 Latvia
 South Africa
 Malaysia
 Japan
Japan
 Slovakia
 Philippines
 Mexico
 Thailand