(For more resources related to this topic, see here.)
Prerequisites
Before you get started with setting up your first ZF2 Project, make sure that you have the following software installed and configured in your development environment:
PHP Command Line Interface
Git : Git is needed to check out source code from various github.com repositories
Composer : Composer is the dependency management tool used for managing PHP dependencies
The following commands will be useful for installing the necessary tools to setup a ZF2 Project:
To install PHP Command Line Interface:
$ sudo apt-get install php5-cli
To install Git:
$ sudo apt-get install git
To install Composer:
$ curl -s https://getcomposer.org/installer | php
ZendSkeletonApplication
ZendSkeletonApplication provides a sample skeleton application that can be used by developers as a starting point to get started with Zend Framework 2.0. The skeleton application makes use of ZF2 MVC, including a new module system.
Time for action – creating a Zend Framework project
To set up a new Zend Framework project, we will need to download the latest version of ZendSkeletonApplication and set up a virtual host to point to the newly created Zend Framework project. The steps are given as follows:
Navigate to a folder location where you want to set up the new Zend Framework project:
$ cd /var/www/
Clone the ZendSkeletonApplication app from GitHub:
In some Linux configurations, necessary permissions may not be available to the current user for writing to /var/www. In such cases, you can use any folder that is writable and make necessary changes to the virtual host configuration.
Install dependencies using Composer:
$ cd CommunicationApp/$ php composer.phar self-update
$ php composer.phar install
The following screenshot shows how Composer downloads and installs the necessary dependencies:
Before adding a virtual host entry we need to set up a hostname entry in our hosts file so that the system points to the local machine whenever the new hostname is used. In Linux this can be done by adding an entry to the /etc/hosts file:
$ sudo vim /etc/hosts
In Windows, this file can be accessed at %SystemRoot%system32driversetchosts.
Add the following line to the hosts file:
127.0.0.1 comm-app.local
The final hosts file should look like the following:
Our next step would be to add a virtual host entry on our web server; this can be done by creating a new virtual host's configuration file:
$ sudo vim /usr/local/zend/etc/sites.d/vhost_comm-app-80.conf
This new virtual host filename could be different for you depending upon the web server that you use; please check out your web server documentation for setting up new virtual hosts.
For example, if you have Apache2 running on Linux, you will need to create the new virtual host file in /etc/apache2/sites-available and enable the site using the command a2ensite comm-app.local.
Add the following configuration to the virtual host file:
<VirtualHost *:80>
ServerName comm-app.local
DocumentRoot /var/www/CommunicationApp/public
SetEnv APPLICATION_ENV "development"
<Directory /var/www/CommunicationApp/public>
DirectoryIndex index.php
AllowOverride All
Order allow,deny
Allow from all
</Directory>
</VirtualHost>
If you are using a different path for checking out the ZendSkeletonApplication project make sure that you include that path for both DocumentRoot and Directory directives.
After configuring the virtual host file, the web server needs to be restarted:
$ sudo service zend-server restart
Once the installation is completed, you should be able to open http://comm-app.local on your web browser. This should take you to the following test page :
Test rewrite rules
In some cases, mod_rewrite may not have been enabled in your web server by default; to check if the URL redirects are working properly, try to navigate to an invalid URL such as http://comm-app.local/12345; if you get an Apache 404 page, then the .htaccess rewrite rules are not working; they will need to be fixed, otherwise if you get a page like the following one, you can be sure of the URL working as expected.
What just happened?
We have successfully created a new ZF2 project by checking out ZendSkeletonApplication from GitHub and have used Composer to download the necessary dependencies including Zend Framework 2.0. We have also created a virtual host configuration that points to the project's public folder and tested the project in a web browser.
Alternate installation options
We have seen just one of the methods of installing ZendSkeletonApplication; there are other ways of doing this.
You can use Composer to directly download the skeleton application and create the project using the following command:
In Zend Framework, a module can be defined as a unit of software that is portable and reusable and can be interconnected to other modules to construct a larger, complex application.
Modules are not new in Zend Framework, but with ZF2, there is a complete overhaul in the way modules are used in Zend Framework. With ZF2, modules can be shared across various systems, and they can be repackaged and distributed with relative ease. One of the other major changes coming into ZF2 is that even the main application is now converted into a module; that is, the application module.
Some of the key advantages of Zend Framework 2.0 modules are listed as follows:
Self-contained, portable, reusable
Dependency management
Lightweight and fast
Support for Phar packaging and Pyrus distribution
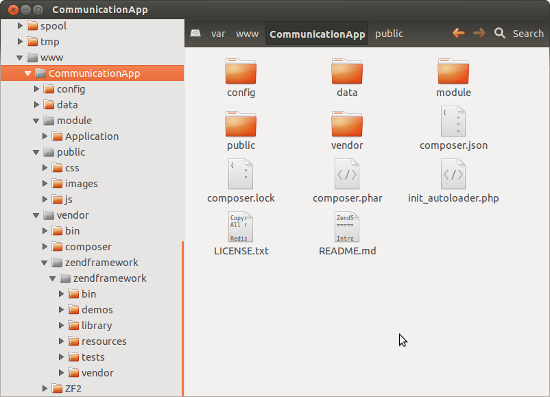
Zend Framework 2.0 – project folder structure
The folder layout of a ZF2 project is shown as follows:
Folder name
Description
config
Used for managing application configuration.
data
Used as a temporary storage location for storing application
data including cache files, session files, logs, and indexes.
module
Used to manage all application code.
module/Application
This is the default application module that is provided with
ZendSkeletonApplication.
public
This is the default application module that is provided with
ZendSkeletonApplication.
vendor
Used to manage common libraries that are used by the
application. Zend Framework is also installed in this folder.
vendor/zendframework
Unlock access to the largest independent learning library in Tech for FREE!
Get unlimited access to 7500+ expert-authored eBooks and video courses covering every tech area you can think of.
Renews at $19.99/month. Cancel anytime
endor/zendframework Zend Framework 2.0 is installed here.
Time for action – creating a module
Our next activity will be about creating a new Users module in Zend Framework 2.0. The Users module will be used for managing users including user registration, authentication, and so on. We will be making use of ZendSkeletonModule provided by Zend, shown as follows:
Navigate to the application's module folder:
$ cd /var/www/CommunicationApp/
$ cd module/
Clone ZendSkeletonModule into a desired module name, in this case it is Users:
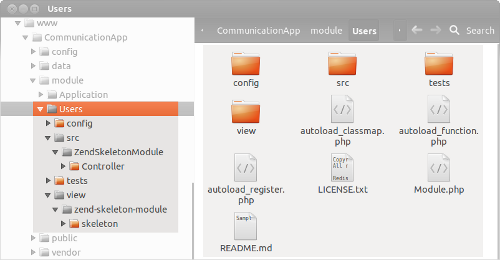
After the checkout is complete, the folder structure should look like the following screenshot:
Edit Module.php ; this file will be located in the Users folder under modules (CommunicationApp/module/Users/module.php) and change the namespace to Users. Replace namespace ZendSkeletonModule; with namespace Users;.
The following folders can be removed because we will not be using them in our project:
* Users/src/ZendSkeletonModule
* Users/view/zend-skeleton-module
What just happened?
We have installed a skeleton module for Zend Framework; this is just an empty module, and we will need to extend this by creating custom controllers and views. In our next activity, we will focus on creating new controllers and views for this module.
Creating a module using ZFTool
ZFTool is a utility for managing Zend Framework applications/projects, and it can also be used for creating new modules; in order to do that, you will need to install ZFTool and use the create module command to create the module using ZFTool:
The fundamental goal of any MVC Framework is to enable easier segregation of three layers of the MVC, namely, model, view, and controller. Before we get to the details of creating modules, let's quickly try to understand how these three layers work in an MVC Framework:
Model : The model is a representation of data; the model also holds the business logic for various application transactions.
View : The view contains the display logic that is used to display the various user interface elements in the web browser.
Controller : The controller controls the application logic in any MVC application; all actions and events are handled at the controller layer. The controller layer serves as a communication interface between the model and the view by controlling the model state and also by representing the changes to the view. The controller also provides an entry point for accessing the application.
In the new ZF2 MVC structure, all the models, views, and controllers are grouped by modules. Each module will have its own set of models, views, and controllers, and will share some components with other modules.
Zend Framework module – folder structure
The folder structure of Zend Framework 2.0 module has three vital components—the configurations, the module logic, and the views. The following table describes how contents in a module are organized:
Folder name
Description
config
Used for managing module configuration
src
Contains all module source code, including all controllers and models
view
Used to store all the views used in the module
Time for action – creating controllers and views
Now that we have created the module, our next step would be having our own controllers and views defined. In this section, we will create two simple views and will write a controller to switch between them:
Navigate to the module location:
$ cd /var/www/CommunicationApp/module/Users
Create the folder for controllers:
$ mkdir -p src/Users/Controller/
Create a new IndexController file, < ModuleName >/src/<ModuleName>/Controller/:
$ cd src/Users/Controller/$ vim IndexController.php
Add the following code to the IndexController file:
<?php
namespace UsersController;
use ZendMvcControllerAbstractActionController;
use ZendViewModelViewModel;
class IndexController extends AbstractActionController
{
public function indexAction()
{
$view = new ViewModel();
return $view;
}
public function registerAction()
{
$view = new ViewModel();
$view->setTemplate('users/index/new-user');
return $view;
}
public function loginAction()
{
$view = new ViewModel();
$view->setTemplate('users/index/login');
return $view;
}
}
The preceding code will do the following actions; if the user visits the home page, the user is shown the default view; if the user arrives with an action register, the user is shown the new-user template; and if the user arrives with an action set to login, then the login template is rendered.
Now that we have created the controller, we will have to create necessary views to render for each of the controller actions.
Create the folder for views:
$ cd /var/www/CommunicationApp/module/Users
$ mkdir -p view/users/index/
Navigate to the views folder, <Module>/view/<module-name>/index:
$ cd view/users/index/
Create the following view files:
index
login
new-user
For creating the view/users/index/index.phtml file, use the following code:
<h1>Welcome to Users Module</h1>
<a href="/users/index/login">Login</a> | <a href = "/users/index/register">New User Registration</a>
For creating the view/users/index/login.phtml file, use the following code:
<h2> Login </h2>
<p> This page will hold the content for the login form </p>
<a href="/users"><< Back to Home</a>
For creating the view/users/index/new-user.phtml file, use the following code:
<h2> New User Registration </h2>
<p> This page will hold the content for the registration form </p>
<a href="/users"><< Back to Home</a>
What just happened?
We have now created a new controller and views for our new Zend Framework module; the module is still not in a shape to be tested. To make the module fully functional we will need to make changes to the module's configuration, and also enable the module in the application's configuration.
Zend Framework module – configuration
Zend Framework 2.0 module configuration is spread across a series of files which can be found in the skeleton module. Some of the configuration files are described as follows:
Module.php: The Zend Framework 2 module manager looks for the Module.php file in the module's root folder. The module manager uses the Module.php file to configure the module and invokes the getAutoloaderConfig() and getConfig() methods.
autoload_classmap.php: The getAutoloaderConfig() method in the skeleton module loads autoload_classmap.php to include any custom overrides other than the classes loaded using the standard autoloader format. Entries can be added or removed to the autoload_classmap.php file to manage these custom overrides.
config/module.config.php: The getConfig() method loads config/module.config.php; this file is used for configuring various module configuration options including routes, controllers, layouts, and various other configurations.
Time for action – modifying module configuration
In this section will make configuration changes to the Users module to enable it to work with the newly created controller and views using the following steps:
Autoloader configuration – The default autoloader configuration provided by the ZendSkeletonModule needs to be disabled; this can be done by editing autoload_classmap.php and replacing it with the following content:
<?php
return array();
Module configuration – The module configuration file can be found in config/module.config.php; this file needs to be updated to reflect the new controllers and views that have been created, as follows:
Controllers – The default controller mapping points to the ZendSkeletonModule; this needs to be replaced with the mapping shown in the following snippet:
Views – The views for the module have to be mapped to the appropriate view location. Make sure that the view uses lowercase names separated by a hyphen (for example, ZendSkeleton will be referred to as zend-skeleton):
Routes – The last module configuration is to define a route for accessing this module from the browser; in this case we are defining the route as /users, which will point to the index action in the Index controller of the Users module:
After making all the configuration changes as detailed in the previous sections, the final configuration file, config/module.config.php, should look like the following:
<?php
return array(
'controllers' => array(
'invokables' => array(
'UsersControllerIndex' => 'UsersControllerIndexController',
),
),
'router' => array(
'routes' => array(
'users' => array(
'type' => 'Literal',
'options' => array(
// Change this to something specific to your module
'route' => '/users',
'defaults' => array(
//Change this value to reflect the namespace in which
// the controllers for your module are found
'__NAMESPACE__' => 'UsersController',
'controller' => 'Index',
'action' => 'index',
),
),
'may_terminate' => true,
'child_routes' => array(
// This route is a sane default when developing a module;
// as you solidify the routes for your module, however,
// you may want to remove it and replace it with more
// specific routes.
'default' => array(
'type' => 'Segment',
'options' => array(
'route' => '/[:controller[/:action]]',
'constraints' => array(
'controller' => '[a-zA-Z][a-zA-Z0-9_-]*',
'action' => '[a-zA-Z][a-zA-Z0-9_-]*',
),
'defaults' => array(
),
),
),
),
),
),
),
'view_manager' => array(
'template_path_stack' => array(
'users' => __DIR__ . '/../view',
),
),
);
Application configuration – Enable the module in the application's configuration—this can be done by modifying the application's config/application.config.php file, and adding Users to the list of enabled modules:
'modules' => array(
'Application',
'Users',
),
To test the module in a web browser, open http://comm-app.local/users/ in your web browser; you should be able to navigate within the module.
The module home page is shown as follows:
The registration page is shown as follows:
What just happened?
We have modified the configuration of ZendSkeletonModule to work with the new controller and views created for the Users module. Now we have a fully-functional module up and running using the new ZF module system.
Have a go hero
Now that we have the knowledge to create and configure own modules, your next task would be to set up a new CurrentTime module. The requirement for this module is to render the current time and date in the following format:
Time: 14:00:00 GMT Date: 12-Oct-2012
Summary
We have now learned about setting up a new Zend Framework project using Zend's skeleton application and module. In our next chapters, we will be focusing on further development on this module and extending it into a fully-fledged application.

 United States
 Great Britain
 India
India
 Germany
 France
 Canada
 Russia
 Spain
Spain
 Brazil
 Australia
 Singapore
 Canary Islands
 Hungary
 Ukraine
 Luxembourg
 Estonia
 Lithuania
 South Korea
 Turkey
 Switzerland
 Colombia
 Taiwan
 Chile
Chile
 Norway
 Ecuador
 Indonesia
 New Zealand
 Cyprus
 Denmark
 Finland
 Poland
 Malta
Malta
 Czechia
 Austria
 Sweden
 Italy
Italy
 Egypt
Egypt
 Belgium
 Portugal
 Slovenia
 Ireland
 Romania
 Greece
 Argentina
 Netherlands
 Bulgaria
 Latvia
 South Africa
 Malaysia
 Japan
Japan
 Slovakia
 Philippines
 Mexico
 Thailand