In this article by Ashish Srivastav the authors of the book ServiceNow Cookbook, we will learn following recipes:
- Starting a new application
- Getting into new modules
(For more resources related to this topic, see here.)
Service-Now provides a great platform to developers. Although it's a java-based application.
Starting a new application
Out of the box, Service-Now provides many applications for facilitating business operations and other activities in an IT environment, but if you find that the customer's requirements are not fitting into the system's applications boundaries then you can think of creating new applications. In these recipes, we will build a small application which will include table, form, business rules, client script, ACL, update sets, deployment, and so on.
Getting ready
To step through this recipe, you must have an active Service-Now instance, valid credentials, and an admin role.
How to do it…
- Open any standard web browser and type the instance address.
- Log in to the Service-Now instance with the credentials.
- On the left-hand side in the search box, type local update and Service-Now will search the module for you:
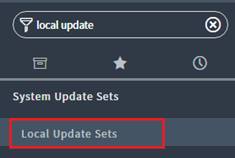
Local update set for a new application
- Now, you need to click on Local Update Sets to create a new update set so that you can capture all your configuration in the update set:

Create new update set
- On clicking, you need to give the name as Book registration application and click on the Submit and Make Current button:

Local update set – book registration application
- Now you will able to see the Book registration application update set next to your profile, which means you are ready to create a new application:

Current update set
- On the left-hand side in the search box, type system definition and click on the Application Menus module:

Application menu to create a new application
- To understand better, you can click on any application menu as shown here, where you can see the application and associated modules. For example, you can clicked on the self-service application as shown here:
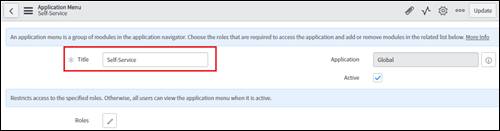
Self-service application
- Now to see the associated modules, you need to scroll down as shown here, and if you want to create a new module then you need to click on the New button:

Self-service application's modules
- Now you should have a better understanding of how applications look within the Service-Now environment. So, to make a new application, you need to click on the New button on the Application Menus page:

Applications repository
- After clicking on the New button, you will able to see the configuration page. To understand better, let's consider this example. For instance, you are creating a Book Registration application for your customer, with the following configuration:
- Title: Book Registration
- Role: Leave blank
- Application: Global
- Active: True
- Category: Custom Applications (You can change it as per your requirement)

Book registration configuration
- Click on the Submit button. After sometime, a new Book Registration application menu will be visible under the application menu:

Book registration
Getting into new modules
A module is a part of an application which contains actually workable items. As a developer, you will always have an option to add a new module to support business requirements.
Getting ready
To step through this recipe, you should have an active Service-Now instance, valid credentials, and an admin role.
How to do it…
- Open any standard web browser and type the instance address.
- Log into the Service-Now instance with the credentials.
- Service-Now gives you many options to create a new module. You can create a new module from the Application Menu module or you can go through the Table & Column module as well.
- If you have chosen to create a new module from the Application Menu module, then in order to create the module, click on the Book Registration application menu and scroll down. To create a new module, click on the New button:

Creating a New Module
- After clicking on the New button, you will able to see a configuration screen, where you need configure the following fields:
- Title: Author Registration
- Application Menu: Book Registration

The Author Registration module registration under the Book Registration menu
- Now in the Link Type section, you will need to configure the new module, rather I would say, you will need to define the base line regarding what your new module will do? Whether the new module will show a form to create a record or it will show a list of reports from a table or it will execute some the reports? That's why this is a critical step:

Link type to create a new module and select a table
Link type gives you many options to decide the behavior of the new module.
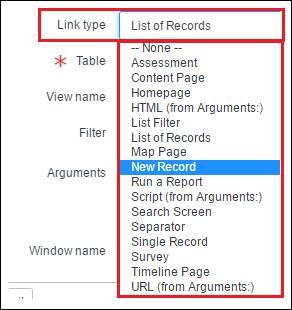
Link type options
Now, let's take a different approach to create a new module:
- On the left-hand side, type column and Service-Now will search the Tables & Columns module for you. Click on the Tables & Columns module:

The Tables & Columns module
- Now you will able to see the configuration page as shown here, where you need to click on the Create Table button. Note that by clicking on Create Table, you can create a new table:
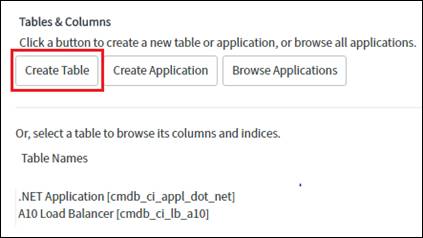
Tables & Columns – Create a new table
- After clicking on the Create Table button, you will able to see the configuration page as given here, where you need to configure the following fields:
- Label: Author Registration (Module name)
- Name: Auto populate
- Extends table: Task (By extends, your module will incorporate all fields of the base table, in this scenario, Task table)

Module Configuration
- Create module: To create a new module through table, check the Create module check box, and to add a module under your application, you will need to select the application name:

Add module in application
- Controls is a critical section as out of the box, Service-Now gives an option to auto create number. For incident, INC is the prefix or for change ticker CHG is the prefix; here you are also allowed to create your prefix for a new module record:
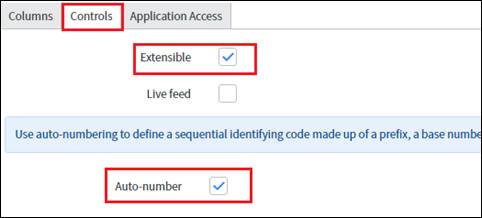
Configure the new module Controls section
- Now you will able to auto number the configuration, as shown here; your new records will start with the AUT prefix:

New module auto numbering
- Click on Submit.
- After submission of the form, Service-Now will create a role automatically for the new module, as shown here. Only the u_author_registration_user role holder will able to view the module. So whenever a request is generated, you will need to go into that particular user's profile from the user administration module, to add a role:

Role created for module
- Your module is created, but there are no fields. So for rapid development, you can directly add a column to the table by clicking on Insert a new row...:

The Insert field in the form
- As an output, you will able to see that a new Author Registrations module is added under the Book Registration application:

Search newly created module
- Now if you click on the Author Registrations module, you will be able to see the following page:

The Author Registration Page
Unlock access to the largest independent learning library in Tech for FREE!
Get unlimited access to 7500+ expert-authored eBooks and video courses covering every tech area you can think of.
Renews at $19.99/month. Cancel anytime
- On clicking the New button, you will be able to see the form as shown here. Note that you have not added any field on the u_author_registration table, but the table extends to the TASK table. That's why you are able to see fields on the form, but they are coming through the TASK table:

Author registration form without new fields
- If you want to add new fields to the form, then you can do so by performing the following steps:
- Right-click on banner.
- Select Configure.
- Click on Form Layout.
- Now in the Create new field section, you can enter the desired field Name and Type, as shown here:
|
Form Fields
|
Field Type
|
|
Author Name
|
String
|
|
Author Primary Email Address
|
String
|
|
Author Secondary Email Address
|
String
|
|
Author Mobile Number
|
String
|
|
Author Permanent Address
|
String
|
|
Author Temporary Address
|
String
|
|
Country
|
India
|
|
USA
|
|
UK
|
|
Australia
|
|
Author Experience
|
String
|
|
Book Type
|
Choice
|
|
Book Title
|
String
|
|
Contract Start Date
|
String
|
|
Contract End Date
|
String
|
Author registration form fields
- Click on Add and Save.
- After saving the form, new fields are added to the Author Registration form:

Author registration form
- To create a new form section in the form view and section, click on the New option and add the name:

Create a new section
- After creating the new Payment Details section, you can add fields under this section:
|
Form Fields
|
Field Type
|
|
Country
|
String
|
|
Preferred Payment Currency
|
Currency
|
|
Bank Name
|
String
|
|
Branch Name
|
String
|
|
IFSC Code
|
String
|
|
Bank Address
|
String
|
Payment Details section fields
- As an output, you will able to see the following screen:

Author registration Payment Details form section
Summary
In this article we have learned how Service-Now provides a great platform to developers and also starting a new application, and getting into new modules.
Resources for Article:
Further resources on this subject:

 United States
 Great Britain
 India
India
 Germany
 France
 Canada
 Russia
 Spain
Spain
 Brazil
 Australia
 Singapore
 Canary Islands
 Hungary
 Ukraine
 Luxembourg
 Estonia
 Lithuania
 South Korea
 Turkey
 Switzerland
 Colombia
 Taiwan
 Chile
Chile
 Norway
 Ecuador
 Indonesia
 New Zealand
 Cyprus
 Denmark
 Finland
 Poland
 Malta
Malta
 Czechia
 Austria
 Sweden
 Italy
Italy
 Egypt
Egypt
 Belgium
 Portugal
 Slovenia
 Ireland
 Romania
 Greece
 Argentina
 Netherlands
 Bulgaria
 Latvia
 South Africa
 Malaysia
 Japan
Japan
 Slovakia
 Philippines
 Mexico
 Thailand


