


In this article, we will use Vue.js with an entirely different stack–Meteor! We will discover this full-stack JavaScript framework and build a real-time dashboard with Meteor to monitor the production of some products. We will cover the following topics:
-
- Installing Meteor and setting up a project
- Storing data into a Meteor collection with a Meteor method
- Subscribing to the collection and using the data in our Vue components
The app will have a main page with some indicators, such as:
It will also have another page with buttons to generate fake measures since we won’t have real sensors available.
Setting up the project
In this first part, we will cover Meteor and get a simple app up and running on this platform.
What is Meteor?
Meteor is a full-stack JavaScript framework for building web applications. The mains elements of the Meteor stack are as follows:
- Web client (can use any frontend library, such as React or Vue); it has a client-side database called Minimongo
- Server based on nodejs; it supports the modern ES2015+ features, including the
- import/export syntax
- Real-time database on the server using MongoDB
- Communication between clients and the server is abstracted; the client-side and server-side databases can be easily synchronized in real-time
- Optional hybrid mobile app (Android and iOS), built in one command
- Integrated developer tools, such as a powerful command-line utility and an easy- to-use build tool
- Meteor-specific packages (but you can also use npm packages)
As you can see, JavaScript is used everywhere. Meteor also encourages you to share code between the client and the server.
Since Meteor manages the entire stack, it offers very powerful systems that are easy to use. For example, the entire stack is fully reactive and real-time–if a client sends an update to the server, all the other clients will receive the new data and their UI will automatically be up to date.
Meteor has its own build system called “IsoBuild” and doesn’t use Webpack. It focuses on ease of use (no configuration), but is, as a result, also less flexible.
Installing Meteor
If you don’t have Meteor on your system, you need to open the Installation Guide on the official Meteor website. Follow the instructions there for your OS to install Meteor.
When you are done, you can check whether Meteor was correctly installed with the following command:
meteor –version
The current version of Meteor should be displayed.
Creating the project
Now that Meteor is installed, let’s set up a new project:
- Let’s create our first Meteor project with the meteor create command:
meteor create --bare <folder> cd <folder>The –bare argument tells Meteor we want an empty project. By default, Meteor will generate some boilerplate files we don’t need, so this keeps us from having to delete them.
- Then, we need two Meteor-specific packages–one for compiling the Vue components, and one for compiling Stylus inside those components. Install them with the meteor add command:
meteor add akryum:vue-component akryum:vue-stylus- We will also install the vue and vue-router package from npm:
meteor npm i -S vue vue-routerNote that we use the meteor npm command instead of just npm. This is to have the same environment as Meteor (nodejs and npm versions).
- To start our Meteor app in development mode, just run the meteor command:
MeteorMeteor should start an HTTP proxy, a MongoDB, and the nodejs server:
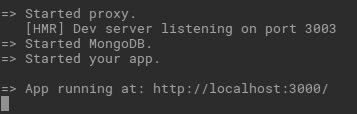
It also shows the URL where the app is available; however, if you open it right now, it will be blank.
Our first Vue Meteor app
In this section, we will display a simple Vue component in our app:
- Create a new index.html file inside the project directory and tell Meteor we want div in the page body with the app id:
<head>

<title>Production Dashboard</title>

</head>

<body>

<div id="app"></div>

     </body>
This is not a real HTML file. It is a special format where we can inject additional elements to the head or body section of the final HTML page. Here, Meteor will add a title into the head section and the <div> into the body section.
- Create a new client folder, new components subfolder, and a new App.vue component with a simple template:
<!-- client/components/App.vue -->

<template>

<div id="#app">

<h1>Meteor</h1>

</div>

</template>- Download (https://github.com/Akryum/packt-vue-project-guide/tree/ master/chapter8-full/client) this stylus file in the client folder and add it to the main App.vue component:
<style lang="stylus" src="../style.styl" />- Create a main.js file in the client folder that starts the Vue application inside the Meteor.startup hook:
import { Meteor } from 'meteor/meteor' import Vue from 'vue'

import App from './components/App.vue'

Meteor.startup(() => { new Vue({

el: '#app',

...App,

})

})
In a Meteor app, it is recommended that you create the Vue app inside the Meteor.startup hook to ensure that all the Meteor systems are ready before starting the frontend.
This code will only be run on the client because it is located in a client folder.
You should now have a simple app displayed in your browser. You can also open the Vue devtools and check whether you have the App component present on the page.
Routing
Let’s add some routing to the app; we will have two pages–the dashboard with indicators and a page with buttons to generate fake data:
- In the client/components folder, create two new components–ProductionGenerator.vue and ProductionDashboard.vue.
- Next to the main.js file, create the router in a router.js file:
import Vue from 'vue'

import VueRouter from 'vue-router'

import ProductionDashboard from './components/ProductionDashboard.vue' import ProductionGenerator from './components/ProductionGenerator.vue'

Vue.use(VueRouter) const routes = [

{ path: '/', name: 'dashboard', component: ProductionDashboard

},

{ path: '/generate', name: 'generate', component: ProductionGenerator },

]

const router = new VueRouter({ mode: 'history',

routes,

})

export default router- Then, import the router in the main.js file and inject it into the app.
- In the App.vue main component, add the navigation menu and the router view:
<nav>

<router-link :to="{ name: 'dashboard' }" exact>Dashboard

</router-link>

<router-link :to="{ name: 'generate' }">Measure</router-link>

</nav>

<router-view />
The basic structure of our app is now done:

Production measures
The first page we will make is the Measures page, where we will have two buttons:
- The first one will generate a fake production measure with current date and random value
- The second one will also generate a measure, but with the error property set to true
All these measures will be stored in a collection called “Measures”.
Meteor collections integration
A Meteor collection is a reactive list of objects, similar to a MongoDB collection (in fact, it uses MongoDB under the hood).
We need to use a Vue plugin to integrate the Meteor collections into our Vue app in order to update it automatically:
- Add the vue-meteor-tracker npm package:
meteor npm i -S vue-meteor-tracker- Then, install the library into Vue:
import VueMeteorTracker from 'vue-meteor-tracker'

Vue.use(VueMeteorTracker)- Restart Meteor with the meteor command.
The app is now aware of the Meteor collection and we can use them in our components, as we will do in a moment.
Setting up data
The next step is setting up the Meteor collection where we will store our measures data
Adding a collection
We will store our measures into a Measures Meteor collection. Create a new lib folder in the project directory. All the code in this folder will be executed first, both on the client and the server. Create a collections.js file, where we will declare our Measures collection:
import { Mongo } from 'meteor/mongo'

export const Measures = new Mongo.Collection('measures')
Adding a Meteor method
A Meteor method is a special function that will be called both on the client and the server. This is very useful for updating collection data and will improve the perceived speed of the app–the client will execute on minimongo without waiting for the server to receive and process it.
This technique is called “Optimistic Update” and is very effective when the network quality is poor.
- Next to the collections.js file in the lib folder, create a new methods.js file. Then, add a measure.add method that inserts a new measure into the Measures collection:
import { Meteor } from 'meteor/meteor' import { Measures } from './collections'

Meteor.methods({ 'measure.add' (measure) {

Measures.insert({

...measure,

date: new Date(),

})

},

})
We can now call this method with the Meteor.call function:
Meteor.call('measure.add', someMeasure)The method will be run on both the client (using the client-side database called minimongo) and on the server. That way, the update will be instant for the client.
Simulating measures
Without further delay, let’s build the simple component that will call this measure.add Meteor method:
- Add two buttons in the template of ProductionGenerator.vue:
<template>

<div class="production-generator">

<h1>Measure production</h1>

<section class="actions">

<button @click="generateMeasure(false)">Generate Measure</button>

<button @click="generateMeasure(true)">Generate Error</button>

</section>

</div>

</template>- Then, in the component script, create the generateMeasure method that generates some dummy data and then call the measure.add Meteor method:
<script>

import { Meteor } from 'meteor/meteor'

export default { methods: {

generateMeasure (error) {

const value = Math.round(Math.random() * 100) const measure = {

value, error,

}

Meteor.call('measure.add', measure)

},

},

}

</script>
The component should look like this:
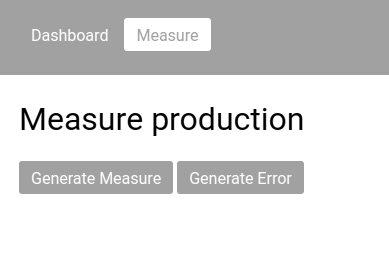
If you click on the buttons, nothing visible should happen.
Inspecting the data
There is an easy way to check whether our code works and to verify that you can add items in the Measures collection. We can connect to the MongoDB database in a single command.
In another terminal, run the following command to connect to the app’s database:
meteor mongoThen, enter this MongoDB query to fetch the documents of the measures collection (the argument used when creating the Measures Meteor collection):
db.measures.find({})If you clicked on the buttons, a list of measure documents should be displayed

This means that our Meteor method worked and objects were inserted in our MongoDB database.
Dashboard and reporting
Now that our first page is done, we can continue with the real-time dashboard.
Progress bars library
To display some pretty indicators, let’s install another Vue library that allows drawing progress bars along SVG paths; that way, we can have semi-circular bars:
- Add the vue-progress-path npm package to the project:
meteor npm i -S vue-progress-pathWe need to tell the Vue compiler for Meteor not to process the files in node_modules where the package is installed.
- Create a new .vueignore file in the project root directory. This file works like a .gitignore: each line is a rule to ignore some paths. If it ends with a slash /, it will ignore only corresponding folders. So, the content of .vueignore should be as follows:
node_modules/- Finally, install the vue-progress-path plugin in the client/main.js file:
import 'vue-progress-path/dist/vue-progress-path.css'

import VueProgress from 'vue-progress-path'

Vue.use(VueProgress, { defaultShape: 'semicircle',

})
Meteor publication
To synchronize data, the client must subscribe to a publication declared on the server. A Meteor publication is a function that returns a Meteor collection query. It can take arguments to filter the data that will be synchronized.
For our app, we will only need a simple measures publication that sends all the documents of the Measures collection:
- This code should only be run on the server. So, create a new server in the project folder and a new publications.js file inside that folder:
import { Meteor } from 'meteor/meteor'

import { Measures } from '../lib/collections'

Meteor.publish('measures', function () { return Measures.find({})

})
This code will only run on the server because it is located in a folder called server.
Creating the Dashboard component
We are ready to build our ProductionDashboard component. Thanks to the vue- meteor-tracker we installed earlier, we have a new component definition option– meteor. This is an object that describes the publications that need to be subscribed to and the collection data that needs to be retrieved for that component.
- Add the following script section with the meteor definition option:
<script>

export default {

meteor: {

// Subscriptions and Collections queries here

},

}

</script>- Inside the meteor option, subscribe to the measures publication with the $subscribe object:
meteor: {

$subscribe: { 'measures': [],

},

},- Retrieve the measures with a query on the Measures Meteor collection inside the meteor option:
meteor: {

// ...

measures () {

return Measures.find({}, { sort: { date: -1 },

})

},

},
The second parameter of the find method is an options object very similar to the MongoDB JavaScript API. Here, we are sorting the documents by their date in descending order, thanks to the sort property of the options object.
- Finally, create the measures data property and initialize it to an empty array. The script of the component should now look like this:
<script>

import { Measures } from '../../lib/collections'

export default { data () {

return {

measures: [],

}

},

meteor: {

$subscribe: { 'measures': [],

},

measures () {

return Measures.find({}, { sort: { date: -1 },

})

},

},

}

</script>
In the browser devtools, you can now check whether the component has retrieved the items from the collection.
Indicators
We will create a separate component for the dashboard indicators, as follows:
- In the components folder, create a new ProductionIndicator.vue component.
- Declare a template that displays a progress bar, a title, and additional info text:
<template>

<div class="production-indicator">

<loading-progress :progress="value" />

<div class="title">{{ title }}</div>

<div class="info">{{ info }}</div>

</div>

</template>- Add the value, title, and info props:
<script>
export default { props: {
value: {
type: Number, required: true,
},
title: String,
info: [String, Number],
},
}
</script>- Back in our ProductionDashboard component, let’s compute the average of the values and the rate of errors:
computed: {
length () {
return this.measures.length
},

average () {
if (!this.length) return 0
let total = this.measures.reduce(
(total, measure) => total += measure.value, 0
)
return total / this.length
},

errorRate () {
if (!this.length) return 0
let total = this.measures.reduce(
(total, measure) => total += measure.error ? 1 : 0, 0
)
return total / this.length
},
},
5. Add two indicators in the templates – one for the average value and one for the error rate:
<template>
<div class="production-dashboard">
<h1>Production Dashboard</h1>
<section class="indicators">
<ProductionIndicator
:value="average / 100" title="Average"
:info="Math.round(average)"
/>
<ProductionIndicator class="danger"
:value="errorRate" title="Errors"
:info="`${Math.round(errorRate * 100)}%`"
/>
</section>
</div>
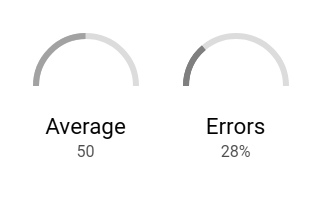
</template>The indicators should look like this:
Listing the measures
Finally, we will display a list of the measures below the indicators:
- Add a simple list of <div> elements for each measure, displaying the date if it has an error and the value:
<section class="list">
<div
v-for="item of measures"
:key="item._id"
>
<div class="date">{{ item.date.toLocaleString() }}</div>
<div class="error">{{ item.error ? 'Error' : '' }}</div>
<div class="value">{{ item.value }}</div>
</div>
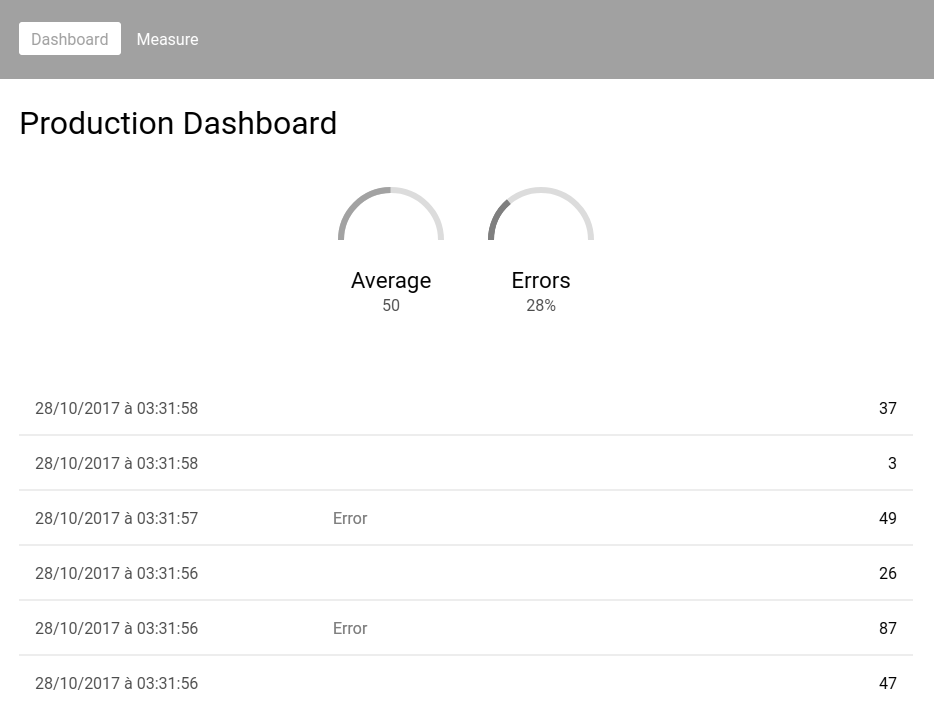
</section>The app should now look as follows, with a navigation toolbar, two indicators, and the measures list:
If you open the app in another window and put your windows side by side, you can see the full-stack reactivity of Meteor in action. Open the dashboard in one window and the generator page in the other window. Then, add fake measures and watch the data update on the other window in real time.
If you want to learn more about Meteor, check out the official website and the Vue integration repository.
To summarize, we created a project using Meteor. We integrated Vue into the app and set up a Meteor reactive collection. Using a Meteor method, we inserted documents into the collection and displayed in real-time the data in a dashboard component.
You read an excerpt from a book written by Guillaume Chau, titled Vue.js 2 Web Development Projects. This book will help you build exciting real world web projects from scratch and become proficient with Vue.js Web Development.
Read More
Building your first Vue.js 2 Web application
Why has Vue.js become so popular?


When I try to run meteor app (after just installing packages) I get following error:
modules-runtime.js?hash=9f9bb5e055614ddf4eb3e743737b7a5b3cfd9d34:241 Uncaught Error: Cannot find module ‘meteor-node-stubs/node_modules/http-browserify/lib/response’
at makeMissingError (modules-runtime.js?hash=9f9bb5e055614ddf4eb3e743737b7a5b3cfd9d34:241)
at require (modules-runtime.js?hash=9f9bb5e055614ddf4eb3e743737b7a5b3cfd9d34:251)
at dev-client.js (dev-client.js:1)
at fileEvaluate (modules-runtime.js?hash=9f9bb5e055614ddf4eb3e743737b7a5b3cfd9d34:353)
at require (modules-runtime.js?hash=9f9bb5e055614ddf4eb3e743737b7a5b3cfd9d34:248)
at akryum_vue-component-dev-client.js?hash=fe11577bc348a5cbc5fa27329f6c02bf33ad5af6:11866
at akryum_vue-component-dev-client.js?hash=fe11577bc348a5cbc5fa27329f6c02bf33ad5af6:11871
Can you help me with this?
Meteor Vue is unstable.
I get this error:
While processing files with akryum:vue-component (for target web.browser):
client/components/App.vue:58: [vue-component] Error while compiling in tag : Cannot find
module ‘babel-plugin-transform-vue-jsx’ from ‘/home/osboxes/vue’
client/components/ProductionDashboard.vue:19: [vue-component] Error while compiling in tag
: Cannot find module ‘babel-plugin-transform-vue-jsx’ from ‘/home/osboxes/vue’
client/components/ProductionGenerator.vue:11: [vue-component] Error while compiling in tag
: Cannot find module ‘babel-plugin-transform-vue-jsx’ from ‘/home/osboxes/vue’
client/components/ProductionIndicator.vue:8: [vue-component] Error while compiling in tag
: Cannot find module ‘babel-plugin-transform-vue-jsx’ from ‘/home/osboxes/vue’
Half of the code samples of this tutorial are broken making it incoherent and impossible to follow.