


Progressive Web Apps describe a collection of technologies, design concepts, and Web APIs. They work in tandem to provide an app-like experience on the mobile web. In this tutorial, we’ll discuss diverse recipes and show what it takes to turn any application into a powerful, fully-optimized progressive web application using Firebase magic.
This article is an excerpt taken from the book,’ Firebase Cookbook‘, written by Houssem Yahiaoui. In this book, you will learn how to create cross-platform mobile apps, integrate Firebase in native platforms, and learn how to monetize your mobile applications using Admob for Android and iOS.
Integrating Node-FCM in NodeJS server
We’ll see how we can fully integrate the FCM (Firebase Cloud Messaging) with any Nodejs application. This process is relatively easy and straightforward, and we will see how it can be done in a matter of minutes.
How to do it…
Let’s ensure that our working environment is ready for our project, so let’s install a couple of dependencies in order to ensure that everything will run smoothly:
- Open your terminal–in case you are using macOS/Linux–or your cmd–if you’re using Windows–and write down the following command:
~> npm install fcm-push --save
By using this command, we are downloading and installing the fcm-push library locally. If this is executed, it will help with managing the process of sending web push notification to our users.
- Now that we have successfully installed the library locally, in order to integrate it with our applications and start using it, we will just need another line of code. Within your local development project, create a new file that will host the functionality and simply implement the following code:
const FCM = require('fcm-push');
Congratulations! We’re typically done. In subsequent recipes, we’ll see how to manage our way through the sending process and how we can successfully send our user’s web push notification.
Implementing service workers
Service workers were, in fact, the missing piece in the web scenes of the past. They are what give us the feel of reactivity to any state that a web application, after integrating, can have from, for example, a notification message, an offline-state (no internet connection) and more. In this recipe, we’ll see how we can integrate service worker into our application.
Service workers files are event-driven, so everything that will happen inside them will be event based. Since it’s JavaScript, we can always hook up listeners to any event. To do that, we will want to give a special logic knowing that if you will use this logic, the event will behave in its default way.
You can read more about service workers and know how you can incorporate them–to achieve numerous awesome features to your application that our book won’t cover–from https://developers.google.com/web/fundamentals/getting-started/primers/service-workers.
How to do it…
Services workers will live in the browser, so including them within your frontend bundle is the most suitable place for them.
- Keeping that in mind, let’s create a file called firebase-messaging-sw.js and manifest.json file. The JavaScript file will be our service worker file and will host all major workload, and the JSON file will simply be a metadata config file.
- After that, ensure that you also create app.js file, where this file will be the starting point for our Authorization and custom UX. We will look into the importance of each file individually later on, but for now, go back to the firebase-messaging-sw.js file and write the following:
//[*] Importing Firebase Needed Dependencies
       importScripts('https://www.gstatic.com/firebasejs/
       3.5.2/firebase-app.js');
       importScripts('https://www.gstatic.com/firebasejs/
       3.5.2/firebase-messaging.js');
// [*] Firebase Configurations
var config = {
apiKey: "",
authDomain: "",
databaseURL: "",
storageBucket: "",
messagingSenderId: ""
};
//[*] Initializing our Firebase Application.
firebase.initializeApp(config);
// [*] Initializing the Firebase Messaging Object.
const messaging = firebase.messaging();
// [*] SW Install State Event.
self.addEventListener('install', function(event) {
console.log("Install Step, let's cache some
files =D");
});
// [*] SW Activate State Event.
self.addEventListener('activate', function(event) {
console.log('Activated!', event);});Within any service worker file, the install event is always fired first. Within this event, we can handle and add custom logic to any event we want. This can range from saving a local copy of our application in the browser cache to practically anything we want.
- Inside your metadata file, which will be the manifest.json files, write the following line:
      {
         "name": "Firebase Cookbook",
         "gcm_sender_id": "103953800507"
      }
How it works…
For this to work, we’re doing the following:
- Importing using importScripts while considering this as the script tag with the src attribute in HTML, the firebase app, and the messaging libraries. Then, we’re introducing our Firebase config object; we’ve already discussed where you can grab that object content in the past chapters.
- Initializing our Firebase app with our config file.
- Creating a new reference from the firebase.messaging library–always remember that everything in Firebase starts with a reference.
- We’re listening to the install and activate events and printing some stdout friendly message to the browser debugger.
Also, within our manifest.json file, we’re adding the following metadata:
- The application name (optional).
- The gcm_sender_id with the given value. Keep in mind that this value will not change for any new project you have or will create in the future.
Implementing sending/receiving registration using Socket.IO
By now, we’ve integrated our FCM server and made our service worker ready to host our awesome custom logic. Like we mentioned, we’re about to send web push notifications to our users to expand and enlarge their experience without application. Lately, web push notification is being considered as an engagement feature that any cool application nowadays, ranging from Facebook and Twitter to numerous e-commerce sites, is making good use of. So in the first approach, let’s see how we can make it happen with Socket.IO.
In order to make the FCM server aware of any client–basically, a browser–Browser OEM has what we call a registration_id. This token is a unique token for every browser that will represent our clients by their browsers and needs to be sent to the FCM server.
How to do it…
- Now, go back to your NodeJS project that was created in the first recipe. Let’s download the node.js socket.io dependency:
~> npm install express socket.io --save
- Socket.io is also event-based and lets us create our custom event for everything we have, plus some native one for connections. Also, we’ve installed ExpressJS for configuration sake in order to create a socket.io server.
- Now after doing that, we need to configure our socket.io server using express. In this case, do as shown in the following code:
const express = require('express');
      const app = express();
      app.io = require('socket.io')();
// [*] Configuring our static files.
app.use(express.static('public/'));

// [*] Configuring Routes.
app.get('/', (req, res) => {
res.sendFile(__dirname + '/public/index.html');
});

// [*] Configuring our Socket Connection.
app.io.on('connection', socket => {
console.log('Huston ! we have a new connection
...');
})
So let’s discuss the preceding code, where we are simply doing the following:
- Importing express and creating a new express app.
- Using the power of object on the fly, we’ve included the socket.io package over a new sub-object over the express application. This integration makes our express application now support the usage of socket.io over the Application.
- We’re indicating that we want to use the public folder as our static files folder, which will host our HTML/CSS/Javascript/IMG resources.
- We’re listening to the connection, which will be fired once we have a new upcoming client.
- Once a new connection is up, we’re printing a friendly message over our console.
- Let’s configure our frontend. Head directly to your index.html files located in the public folder, and add the following line at the head of your page:
<script src="/socket.io/socket.io.js"></script>
- The socket.io.js file will be served in application launch time, so don’t worry much if you don’t have one locally. Then, at the bottom of our index.html file before the closing of our <body> tag, add the following:
      <script>
         var socket = io.connect('localhost:3000');
      </script>
In the preceding script, we’re connecting our frontend to our socket.io backend. Supposedly, our server is in port 3000; this way, we ensured that our two applications are running in sync.
- Head to your app.js files–created in the earlier recipes; create and import it if you didn’t do so already–and introduce the following:
//[*] Importing Firebase Needed Dependencies
      importScripts('https://www.gstatic.com/firebasejs/
        3.5.2/firebase-app.js');
      importScripts('https://www.gstatic.com/firebasejs/
       3.5.2/firebase-messaging.js');
// [*] Firebase Configurations
var config = {
apiKey: "",
authDomain: "",
databaseURL: "",
storageBucket: "",
messagingSenderId: ""
};
//[*] Initializing our Firebase Application.
firebase.initializeApp(config);
// [*] Initializing the Firebase Messaging Object.
const messaging = firebase.messaging();Everything is great; don’t forget to import the app.js file within your index.html file. We will now see how we can grab our registration_id token next:
- As I explained earlier, the registration token is unique per browser. However, in order to get it, you should know that this token is considered a privacy issue. To ensure that they do not fall into the wrong hands, it’s not available everywhere and to get it, you need to ask for the Browser User Permission. Since you can use it in any particular application, let’s see how we can do that.
- Now, within your app.js files that we created early on, let’s add the following lines of code underneath the Firebase messaging reference:
       messaging.requestPermission()
          .then(() => {
              console.log("We have permission !");
              return messaging.getToken();
          })
          .then((token) => {
              console.log(token);
              socket.emit("new_user", token);
          })
          .catch(function(err) {
           console.log("Huston we have a problem !",err);
          });
We’ve sent out token using the awesome feature of socket.io. In order to get it now, let’s simply listen to the same event and hope that we will get some data over our NodeJS backend. We will now proceed to learn about receiving registration token:
- Back to the app.js file, inside our connection event, let’s add the following code:
      socket.on('new_user', (endpoint) => {
        console.log(endpoint);
        //TODO : Add endpoint aka.registration_token, to
         secure place.
       });
- Our socket.io logic will look pretty much as shown in the following code block:
      // [*] Configuring our Socket Connection.
      app.io.on('connection', socket => {
         console.log('Huston ! we have a new connection
           ...');
         socket.on('new_user', (endpoint) => {
            console.log(endpoint);
         //TODO : Add endpoint aka.registration_token, to
            secure place.
         });
      });
Now, we have our bidirectional connection set. Let’s grab that regitration_token and save it somewhere safe for further use.
How it works…
In the first part of the recipe, we did the following:
- Importing using importScripts considering it a script tag with src attribute in HTML, the firebase app, and messaging libraries. Then, we’re introducing our Firebase Config object. We’ve already discussed where you can grab that object content in the previous chapters.
- Initializing our Firebase app with our config file.
- Creating a new reference from firebase.messaging library–always remember that everything in Firebase starts with a reference.
Let’s discuss what we did previously in the section where we talked about getting the registration_token value:
- We’re using the Firebase messaging reference that we created earlier and executing the requestPermission() function, which returns a promise.
- Next–assuming that you’re following along with this recipe–you will do the following over your page. After launching the development server, you will get a request from your page (Figure 1):

- Now, let’s get back to the code. If we allow the notification, the promise resolver will be executed and then we will return the registration_token value from themessaging.getToken().
- Then, we’re sending that token over a socket and emitting that with an even name of new_user.
Remember the socket.io event’s name because we’ll incorporate that into our further recipes.
Implementing sending/receiving registration using post requests
In a different approach from the one used in Socket.io, let’s explore the other way around using post requests. This means that we’ll use a REST API that will handle all that for us. At the same time, it will handle saving the registration_token value in a secure place as well. So let’s see how we can configure that.
How to do it…
- First, let’s start writing our REST API. We will do that by creating an express post endpoint. This endpoint will be porting our data to the server, but before that, let’s install some dependencies using the following line:
~> npm install express body-parser --save
Let’s discuss what we just did:
- We’re using npm to download ExpressJS locally to our development directory.
- Also, we’re downloading body-parser. This is an ExpressJS middleware that will host all post requests data underneath the body subobject. This module is quite a common package in the NodeJS community, and you will find it pretty much everywhere.
- Now, let’s configure our application. Head to the app.js file and add the following code lines there:
const express = require('express');
      const app = express();
      const bodyParser = require('body-parser');
// [*] Configuring Body Parser.
app.use(bodyParser.json());

// [*] Configuring Routes.
app.post('/regtoken', (req, res) => {
let reg_token =req.body.regtoken;
console.log(reg_token);
//TODO : Create magic while saving this token in
secure place.
});
In the preceding code, we’re doing the following:
- Importing our dependencies including ExpressJS and BodyParser.
- In the second step, we’re registering the body parser middleware. You can read more about body parser and how to properly configure it to suit your needs from https://github.com/expressjs/body-parser.
- Next, we’re creating an express endpoint or a route. This route will host our custom logic to manage the retrieval of the registration token sent from our users.
- Now, let’s see how we can send the registration token to form our user’s side. In this step, you’re free to use any HTTP client you seek. However, in order to keep things stable, we’ll use the browser native fetch APIs.
- Since we’ve managed to fully configure our routes, it can host the functionality we want. Let’s see how we can get the registration_token value and send it to our server using post request and the native browser HTTP client named fetch:
      messaging.requestPermission()
       .then(() => {
           console.log("We have permission !");
           return messaging.getToken();
       })
       .then((token) => {
          console.log(token);
          //[*] Sending the token
          fetch("http://localhost:3000/regtoken", {
             method: "POST"
          }).then((resp) => {
             //[*] Handle Server Response.
          })
          .catch(function(err) {
            //[*] Handle Server Error.
          })
       })
      .catch(function(err) {
          console.log("Huston we have a problem !", err);
       });
How it works…
Let’s discuss what we just wrote in the preceding code:
- We’re using the Firebase messaging reference that we created earlier and executing the requestPermission() function that returns a promise.
- Next, supposing that you’re following along with this recipe, after launching the development server you will get the following authorization request from your page:

- Moving back to the code, if we allow the notification, the promise resolver will be executed and then we will return the registration_token value from the messaging.getToken().
- Next, we’re using the Fetch API given it a URL as a first parameter and a method name that is post and handling the response and error.
Since we saw the different approaches to exchange data between the client and the server, in the next recipe, we will see how we can receive web push notification messages from the server.
Receiving web push notification messages
We can definitely say that things are on a good path. We managed to configure our message to the server in the past recipes. Now, let’s work on getting the message back from the server in a web push message. This is a proven way to gain more leads and regain old users. It is a sure way to re-engage your users, and success stories do not lie. Facebook, Twitter, and e-commerce websites are the living truth on how a web push message can make a difference in your ecosystem and your application in general.
How to do it…
Let’s see how we can unleash the power of push messages. The API is simple and the way to do has never been easier, so let’s how we can do that!
- Let’s write down the following code over our firebase-messaging-sw.js file:
// [*] Special object let us handle our Background Push
      Notifications
messaging.setBackgroundMessageHandler(function(payload)
{ return
self.registration.showNotification(payload.data.title,
body: payload.data.body);
});
Let’s explain the preceding code:
- We’re using the already created messaging object created using the Firebase messaging library, and we’re calling. the setBackgroundMessageHandler() function. This will mean that we will catch all the messages that we will keep receiving in the background.
- We’re using the service worker object represented in the self-object, and we’re calling the showNotification() function and passing it some parameters. The first parameter is the title, and we’re grabbing it from the server; we’ll see how we can get it in just a second. The second parameter is the body of the message.
- Now, we’ve prepared our frontend to received messages. Let’s send them from the server, and we will see how we can do that using the following code:
      var fcm = new FCM('<FCM_CODE>');
      var message = {
         to: data.endpoint, // required fill with device
           token or topics
         notification: {
            title: data.payload.title,
            body: data.payload.body
         }
       };
          fcm.send(message)
        .then(function(response) {
       console.log("Successfully sent with response: ",
          response);
        })
        .catch(function(err) {
           console.log("Something has gone wrong!");
           console.error(err);
         })
      });
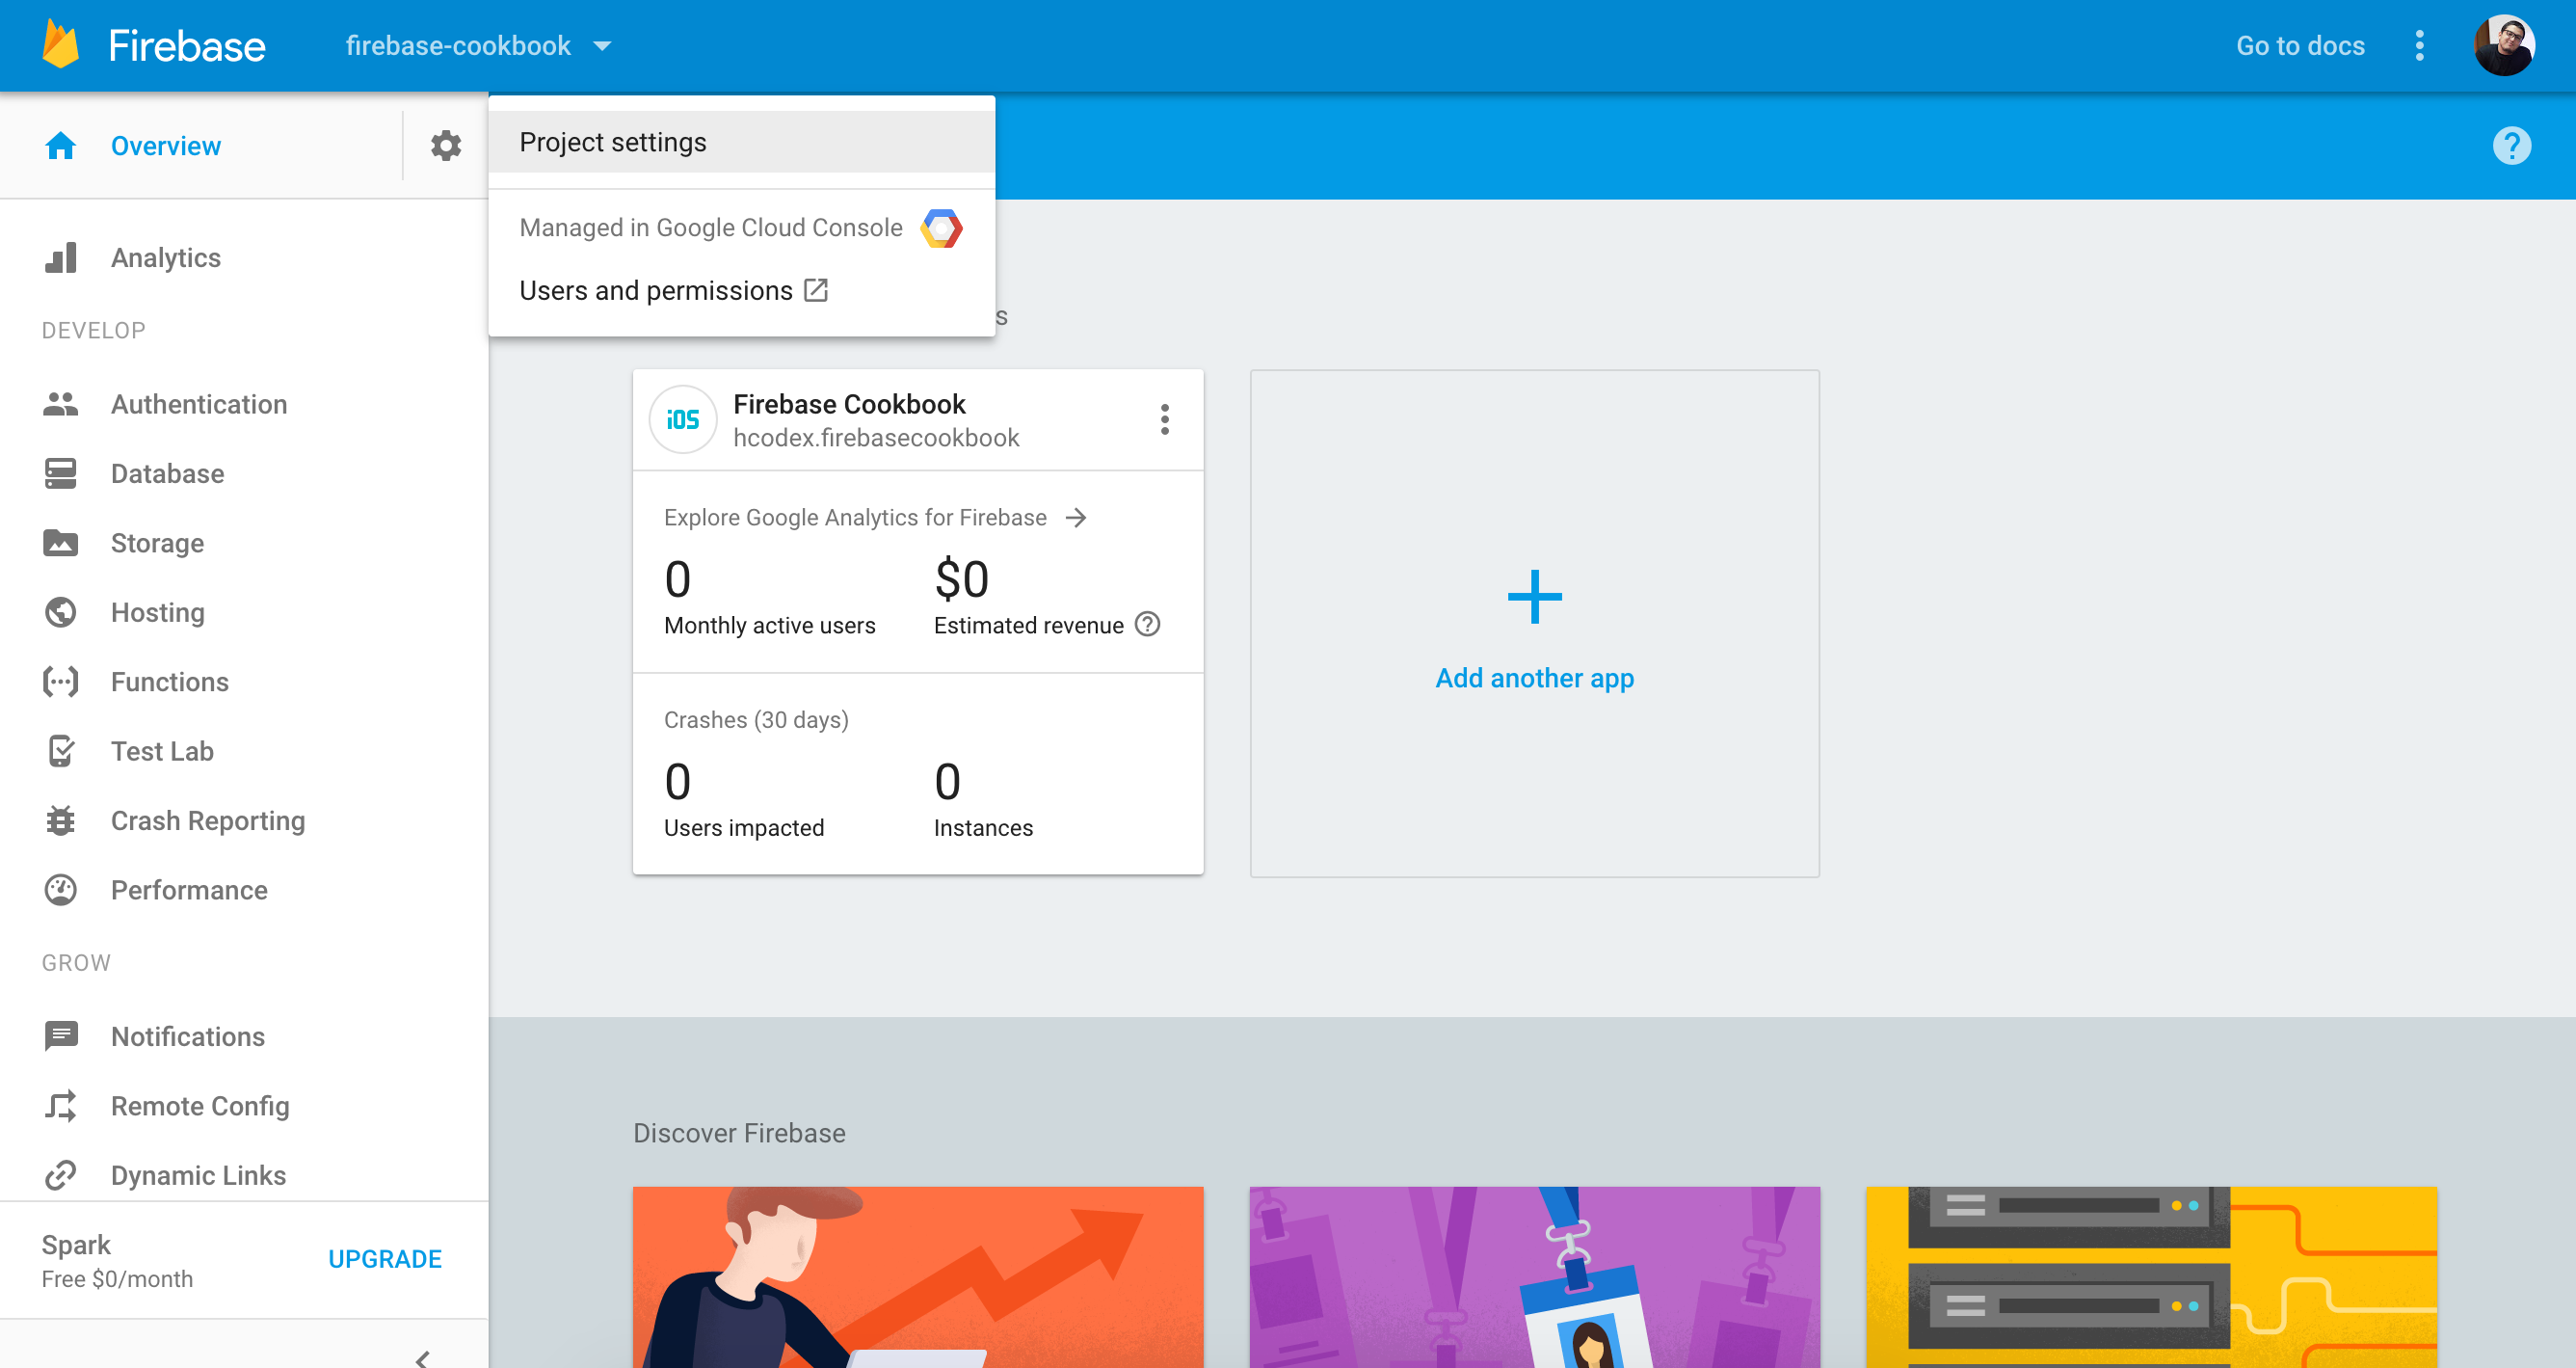
- The most important part is FCM_CODE. You can grab it in the Firebase console by going to the Firebase Project Console and clicking on the Overview tab (Figure 3):
- Then, go to the CLOUD MESSAGING tab and copy and paste the Server Key in the section (Figure 4):

How it works…
Now, let’s discuss the code that what we just wrote:
- The preceding code can be put everywhere, which means that you can send push notifications in every part of your application.
- We’re composing our notification message by putting the registration token and the information we want to send.
- We’re using the fcm.send() method in order to send our notification to the wanted users.
Congratulations! We’re done; now go and test your awesome new functionality!
Implementing custom notification messages
In the previous recipes, we saw how we can send a normal notification. Let’s add some controllers and also learn how to add some pictures to it so that we can prettify it a bit.
How to do it…
- Now write the following code and add it to our earlier code over the messaging.setBackgroundMessageHandler() function. So, the end result will look something like this:
// [*] Special object let us handle our Background
           Push Notifications
messaging.setBackgroundMessageHandler(function(payload)
{
const notificationOptions = {
body: payload.data.msg,
icon: "images/icon.jpg",
actions: [
{
action : 'like',
title: 'Like',
image: '<link-to-like-img>'
},
{
action : 'dislike',
title: 'Dislike',
image: '<link-to-like-img>'
}
]
}
self.addEventListener('notificationclick',
function(event) {
var messageId = event.notification.data;
event.notification.close();
if (event.action === 'like') {
console.log("Going to like something !");
} else if (event.action === 'dislike') {
console.log("Going to dislike something !");
} else {
console.log("wh00t !");
}
}, false);
return
self.registration.showNotification(
payload.data.title,notificationOptions);
});How it works…
Let’s discuss what we’ve done so far:
- We added the notificationOptions object that hosts some of the required metadata, such as the body of the message and the image. Also, in this case, we’re adding actions, which means we’ll add custom buttons to our notification message. These will range from title to image, the most important part is the action name.
- Next, we listened on notificationclick, which will be fired each time one of the actions will be selected. Remember the action field we added early on; it’ll be the differentiation point between all actions we might add.
- Then, we returned the notification and showed it using the showNotification() function.
We saw how to build powerful progressive applications using Firebase. If you’ve enjoyed reading this tutorial, do check out, ‘Firebase Cookbook‘, for creating serverless applications with Firebase Cloud Functions or turning your traditional applications into progressive apps with Service workers.
Read Next:
What is a progressive web app?
Windows launches progressive web apps… that don’t yet work on mobile


