(For more resources on Blender, see here.)
Interface
One of the most important parts of any software is the interface, and with Blender, it is no different. But the Blender interface is unique, because it's all based on OpenGL graphics built in real-time that can be redesigned any way we want. Because of that, we can say that Blender has a default interface that can be customized any way we want. It's even possible to zoom all the items in menus and buttons.
Let's take a look at the interface:
(move cursor over image to enlarge)
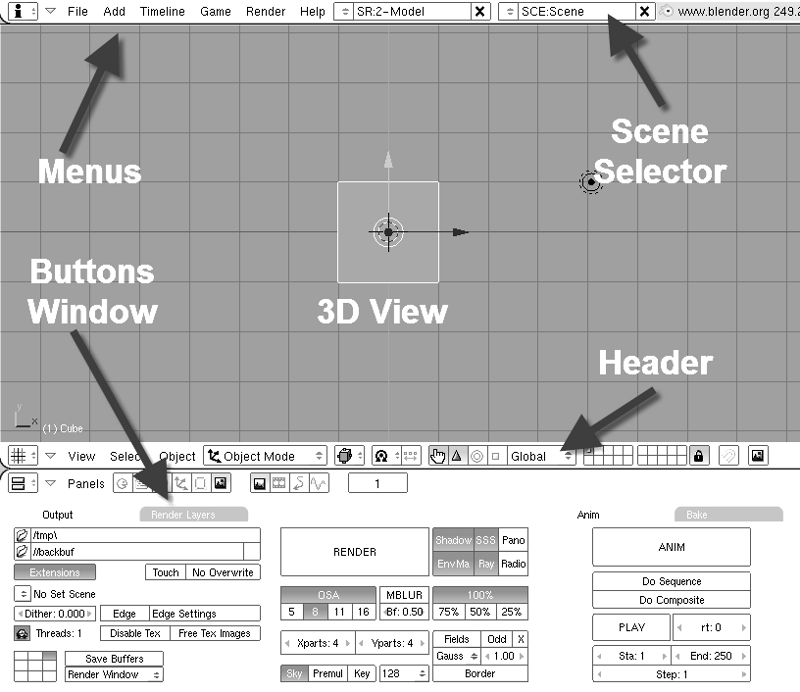
The default interface of Blender is divided into:
- 3D View: This is the section of the interface where you visualize all your objects and manipulate them. If you are in the modeling process, this window should always be visible.
- Buttons Window: Here we will find almost all the tools and menus, with options to set up features like modifiers, materials, textures, and lights. We can change the options available in this window with several small icons that change the buttons with specific tasks like materials, shading, editing, and others. Those buttons will reflect the active panel in Blender, for example, when we choose materials (F5 key). The Buttons window will then only show options related to materials.
- Header: All windows in Blender have a header, even if it's not visible at the time we create the window. The content of the header can change, depending on the window type. For example, in the header for the 3D View, we find options related to visualization, object manipulation, and selection.
- Menus: These menus work just like in any other application, with options to save files, import, and export models. Depending on the window type selected, the contents of the menu may differ.
- Scene Selector: We can create various scenes in Blender, and this selector allows us to choose and create these scenes. Because we will be modeling and dealing with scenery, the Scene selector will be an important tool for us.
These parts make up the default interface of Blender, but we can change all aspects of the interface. There are even some modified screens, adapted to some common tasks with Blender, for us to choose. To access these modified screen sets, we must click on the selector located to the left of Scene Selector:
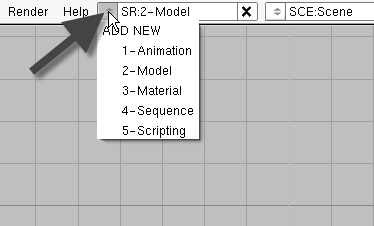
There are screen sets prepared to work with Animation, Model, Material, Sequence, and Scripting. Each of these sets has a different interface organization, optimized for its specific task. A nice way to switch between these sets is with a keyboard shortcut, which is Ctrl plus left arrow or right arrow. Try this shortcut, and you will switch between sets very quickly.
If you make any changes in the interface of Blender and want to overwrite the default interface, just press Ctrl + U, and your current interface will become the new default. In this way, every time Blender is started, your new interface will be shown. The same option can be reached in the File menu with the option named Save Default Settings. To restore the standard default interface, just use the option Load Factory Settings in the File menu.
Windows and menus
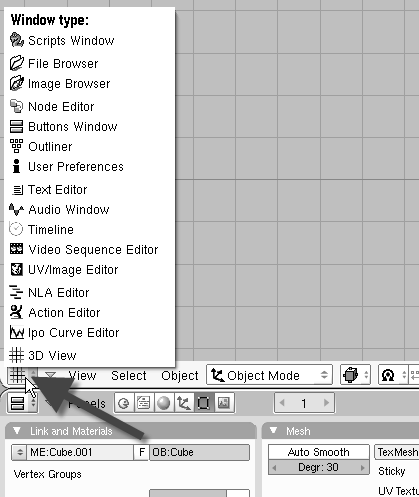
Blender has a lot of different windows that can do a lot of nice things. Two of the most common windows are the 3D View and the Buttons Window, but there are a lot more. With the Window type selector, we can choose among several types, such as File Browser, Text Editor, Timeline, and others. The Window type selector is always located in the left corner of each window, as shown in the following screenshot:
Unlock access to the largest independent learning library in Tech for FREE!
Get unlimited access to 7500+ expert-authored eBooks and video courses covering every tech area you can think of.
Renews at $19.99/month. Cancel anytime
Let's see what the function of each window is:
- Scripts Window: This window groups some nice scripts written in Python to add some extra tools and functionalities to Blender. It works much like plugins in other 3D Packages. There are scripts to help in a lot of different tasks like modeling, animation, and importing models. Some of these scripts are very helpful to architectural modeling such as Geom Tool and Bridge Faces. For instance, we can create a city space with only a few mouse clicks using a script named Discombobulator. In most cases, the scripts will appear in the right place in the Blender menus. Use this window only if you want to browse all scripts available in your Blender Scripts folder. To run a script, just select any script from the Scripts menu.
- File Browser: With this window, we can browse the files of a specific folder. This window appears automatically when we save or open a file.
- Image Browser: Here we can view the image files in a specific folder. This window is very useful to search for image files like .jpg, .png, and others.
- Node Editor and Compositing Nodes: With this window, it's possible to build node sets and create complex materials and textures.
- Buttons Window: We already have talked about this window, but it's nice to remember that after the 3D View, this is one of the most important windows, because here we can set options for almost any tool or functionality in Blender. This is the window responsible for several tools and functions in Blender, such as lights, materials, textures, and object properties.
- Outliner: This window shows us a list of the objects in your scene, and lists the relations among them. Here we can see if an object is related to some other object in a hierarchical way. In this window, we can easily hide and select objects, which may be useful for complex scenes.
- User Preferences: As the name suggests, here we can change Blender configurations, such as file paths, themes, Auto Save, and other options.
- Text Editor: This window allows us to write and open text files to make comments and place notes. We can open and run Python scripts here also.
- Audio Window: Here we can open and compose audio files in sequences. It works much like the Video Sequence Editor, but for audio files.
- Timeline: That's the place where we create animation. This window gives us nice tools to add key frames and build animations.
- Video Sequence Editor: Here we can build and composite images and video files. It's a very nice window that can replace a video editor in some ways. We can easily create a complex animation with a lot of shots and sequence them together with this window. And, we can use the Node Editor to create complex compositions and effects.
- UV/Image Editor: With this window, we can edit and set up images and textures. There is even a paint application, with which we can edit and make adjustments in textures and maps. This is a very important window for us, because a lot of the texture work we will be using will involve the use of UV Textures that require a lot of adjustments in the UV/Image Editor.
- NLA Editor: Here we can visualize and set up non-linear animations. This window is related more to animations and key frame visualization. A non-linear animation means that we can create small blocks of motions, which can be arranged any way we like, including copying and positioning those blocks into sequences. In Blender, these blocks are named strips. Because it's a non-linear editor, we can erase and rearrange the blocks without a break in the animation. For a linear animation system, any changes at the beginning of the animation would demand a full reconstruction of the animation from the artist.
- Action Editor: This window has nice options to set up actions related to character animation.
- Ipo Curve Editor: In this window, we can create and set up animations in a more visual way with curves. It's possible to add, edit, and delete key frames. Even for animations that don't require much work with characters and object deformations, like the ones we will be creating, it still requires a lot of work in the setup of curves to create good animation.
Now we know what each of those windows do. Some of them will be very important for your visualization tasks, such as the Buttons and Scripts Window.
Multiple windows
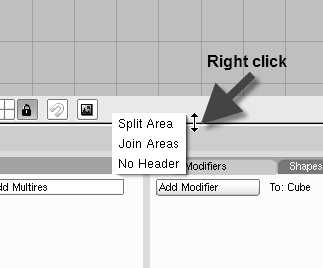
A great feature in Blender is the ability to split the interface and use various window types at the same moment. The way to do this is very simple. We must right-click on the borders of an existing window to access a small menu with the options to split the window. We can split a window in two ways, which are vertical division and horizontal division.
When you place the mouse cursor at the border of a window, the cursor will change into a double arrow. Just right-click and choose Split Area from the menu as shown in the next screenshot, and a division will be created:
There are two kinds of divisions that we can create, which are vertical and horizontal divisions:
- Vertical: Click on the upper or lower border of a window to create a vertical division
- Horizontal: Click on the right or left border of a window to create a horizontal division
After choosing Split Area, just place your mouse cursor where you wish the division to be created, and left-click with your mouse.
Merge windows
It's possible to merge two different windows too, with the same menu. There is an option named Join Areas, which will appear when we click with our right mouse button on the border of a window. After doing that, a big arrow will show which window will be destroyed and the arrow base shows the window that will take the place of the one destroyed:
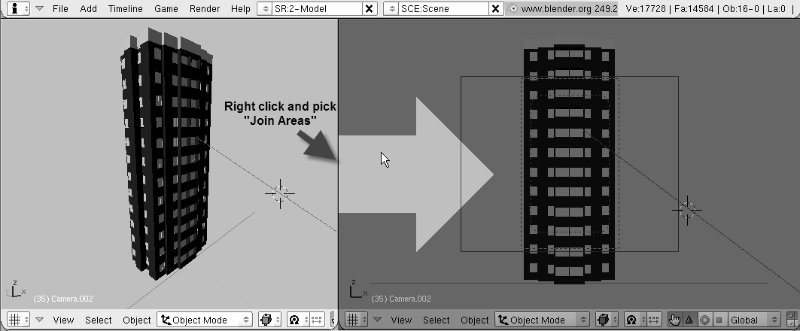
When you have chosen which windows should be joined, just left-click with your mouse to confirm it. We must always join windows that share the entire border with each other. Windows that only share a part of their borders can't be joined together, and we must find another way to join those windows.

 United States
 Great Britain
 India
India
 Germany
 France
 Canada
 Russia
 Spain
Spain
 Brazil
 Australia
 Singapore
 Canary Islands
 Hungary
 Ukraine
 Luxembourg
 Estonia
 Lithuania
 South Korea
 Turkey
 Switzerland
 Colombia
 Taiwan
 Chile
Chile
 Norway
 Ecuador
 Indonesia
 New Zealand
 Cyprus
 Denmark
 Finland
 Poland
 Malta
Malta
 Czechia
 Austria
 Sweden
 Italy
Italy
 Egypt
Egypt
 Belgium
 Portugal
 Slovenia
 Ireland
 Romania
 Greece
 Argentina
 Netherlands
 Bulgaria
 Latvia
 South Africa
 Malaysia
 Japan
Japan
 Slovakia
 Philippines
 Mexico
 Thailand


