
Challenging and fun projects that will push your Blender skills to the limit
Our purpose is to create a very detailed view of the earth from space. By detailed, we mean that it includes land, oceans, and clouds, and not only the color and specular reflection, but also the roughness they seem to have, when seen from space.
For this project, we are going to perform some work with textures and get them properly set up for our needs (and also for Blender's way of working).
What Does It Do?
We will create a nice image of the earth resembling the beautiful pictures that are taken from orbiting of the earth, showing the sun rising over the rim of the planet. For this, we will need to work carefully with some textures, set up a basic scene, and create a fairly complex setup of nodes for compositing the final result.
In our final image, we will get very nice effects, such as the volumetric effect of the atmosphere that we can see round its rim, the strong highlight of the sun when rising over the rim of the earth, and the very calm, bluish look of the dark part of the earth when lit by the moon.
Why Is It Awesome?
With this project, we are going to understand how important it is to have good textures to work with. Having the right textures for the job saves lots of time when producing a high-quality rendered image.
Not only are we going to work with some very good textures that are freely available on the Internet, but we are also going to perform some hand tweaking to get them tuned exactly as we need them. This way we can also learn how much time can be saved by just doing some preprocessing on the textures to create finalized maps that will be fed directly to the material, without having to resort to complex tricks that would only cause us headaches.
One of the nicest aspects of this project is that we are going to see how far we take a very simple scene by using the compositor in Blender. We are definitely going to learn some useful tricks for compositing.
Your Hotshot Objectives
This project will be tackled in five parts:
- Preprocessing the textures
- Object setup
- Lighting setup
- Compositing preparation
- Compositing
Mission Checklist
The very key for the success of our project is getting the right set of quality images at a sufficiently high resolution. Let's go to www.archive.org and search for www.oera.net/How2.htm on the 'wayback machine'. Choose the snapshot from the Apr 18, 2008 link. Click on the image titled Texture maps of the Earth and Planets. Once there, let's download these images:
- Earth texture natural colors
- Earth clouds
- Earth elevation/bump
- Earth water/land mask
Remember to save the high-resolution version of the images, and put them in the tex folder, inside the project's main folder.
We will also need to use Gimp to perform the preprocessing of the textures, so let's make sure to have it installed. We'll be working with version 2.6.
Preprocessing the Textures
The textures we downloaded are quite good, both in resolution and in the way they clearly separate each aspect of the shading of the earth. There is a catch though—using the clouds, elevation, and water/land textures as they are will cause us a lot of headache inside Blender. So let's perform some better basic preprocessing to get finalized and separated maps for each channel of the shader that will be created.
Engage Thrusters
For each one of the textures that we're going to work on, let's make sure to get the previous one closed to avoid mixing the wrong textures.
Clouds Map
- Drag the EarthClouds_2500x1250.jpg image from the tex folder into the empty window of Gimp to get it loaded.
- Now locate the Layers window and right-click on the thumbnail of the Background layer, and select the entry labeled Add Layer Mask... from the menu. In the dialog box, select the Grayscale copy of layer option. Once the mask is added to the layer, the black part of the texture should look transparent.
If we take a look at the image after adding the mask, we'll notice the clouds seem to have too much transparency. To solve this, we will perform some adjustment directly on the mask of the layer.
- Go to the Layers window and click on the thumbnail of the mask (the one to the right-hand side) to make it active (its border should become white). Then go to the main window (the one containing the image) and go to Colors | Curves.... In the Adjust Color Curves dialog, add two control points and get the curve shown in the next screenshot:
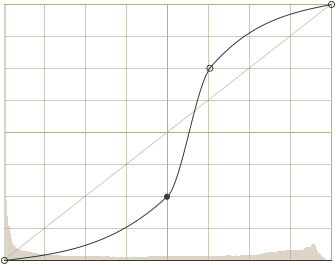
The purpose of this curve is to get the light gray pixels of the mask to become lighter and the dark ones to get darker; the strong slope between the two control points will cause the border of the mask to be sharper.
- Make sure that the Value channel is selected and click on OK.
Now let's take a look at the image and see how strong the contrast of the image is and how well defined the clouds are now.
Unlock access to the largest independent learning library in Tech for FREE!
Get unlimited access to 7500+ expert-authored eBooks and video courses covering every tech area you can think of.
Renews at $19.99/month. Cancel anytime
- Finally, let's go to Image| Mode| RGB to set the internal data format for the image to a safe format (thus avoiding the risk of having Blender confused by it). Now we only need to go to File| Save A Copy... and save it as EarthClouds.png in the tex folder of the project. In the dialogs asking for confirmation, make sure to tell Gimp to apply the layer mask (click on Export in the first dialog). For the settings of the PNG file, we can use the default values. Let's close the current image in Gimp and get the main window empty in order to start working on the next texture.
Specular Map
- Let's start by dragging the image named EarthMask_2500x1250.jpg onto the main window of Gimp to get it open. Then drag the image EarthClouds_2500x1250.jpg over the previous one to get it added as a separate layer in Gimp.
- Now, we need to make sure that the images are correctly aligned. To do this, let's go to View| Zoom| 4:1 (400%), to be able to move the layer with pixel precision easily. Now go to the bottom right-hand side corner of the window and click-and-drag over the four-arrows icon until the part of the image shown in the viewport is one of the corners. After looking at the right place, let's go to the Toolbox and activate the Move tool. Finally, we just need to drag the clouds layer so that its corner exactly matches the corner of the water/land image. Then let's switch to another zoom level by going to View| Zoom| 1:4 (25%).
- Now let's go to the Layers window, select the EarthClouds layer, and set its blending mode to Multiply (Mode drop-down, above the layers list).
- Now we just need to go to the main window and go to Colors| Invert.
- Finally, let's switch the image to RGB mode by going to Image| Mode| RGB and we are done with the processing. Remember to save the image as EarthSpecMap.jpg in the tex folder of the project and close it in Gimp.
The purpose of creating this specular map is to correctly mix the specularity of the ocean (full) with one of the clouds that is above the ocean (null). This way, we get a correct specularity, both in the ocean and in the clouds. If we just used the water or land mask to control specularity, then the clouds above the ocean would have specular reflection, which is wrong.
Bump Map
The bump map controls the roughness of the material; this one is very important as it adds a lot of detail to the final render without having to create actual geometry to represent it.
- First, drag the EarthElevation_2500x1250.jpg to the main window of Gimp to get it open. Then let's drag the EarthClouds_2500x1250.jpg image over the previous one, so that it gets loaded as a layer above the first one.
- Now zoom in by going to View| Zoom| 4:1 (400%). Drag the image so that you are able to see one of its corners and use the move tool to get the clouds layer exactly matching the elevation layer. Then switch back to a wider view by going to View| Zoom| 1:4 (25%).
- Now it's time to add a mask to the clouds layer. Right-click on the clouds layer and select the Add Layer Mask... entry from the menu. Then select the Grayscale copy of layer option in the dialog box and click Add.
What we have thus far is a map that defines how intense the roughness of the surface in each point will be. But there's is a problem: The clouds are as bright as or even brighter than the Andes and the Himalayas, which means the render process will distort them quite a lot. Since we know that the intensity of the roughness on the clouds must be less, let's perform another step to get the map corrected accordingly.
- Let's select the left thumbnail of the clouds layer (color channel of the layer), then go to the main window and open the color levels using the Levels tool by going to Colors| Levels.... In the Output Levels part of the dialog box, let's change the value 255 (on the right-hand side) to 66 and then click on OK. Now we have a map that clearly gives a stronger value to the highest mounts on earth than to the clouds, which is exactly what we needed.
- Finally, we just need to change the image mode to RGB (Image| Mode| RGB) and save it as EarthBumpMap.jpg in the tex folder of the project.
Notice that we are mixing the bump maps of the clouds and the mountains. The reason for this is that working with separate bump maps will get us into a very tricky situation when working inside Blender; definitely, working with a single bump map is way easier than trying to mix two or more. Now we can close Gimp, since we will work exclusively within Blender from now on.
Objective Complete - Mini Debriefing
This part of the project was just a preparation of the textures. We must create these new textures for three reasons:
- To get the clouds' texture having a proper alpha channel; this will save us trouble when working with it in Blender.
- To control the spec map properly, in the regions where there are clouds, as the clouds must not have specular reflection.
- To create a single, unified bump map for the whole planet. This will save us lots of trouble when controlling the Normal channel of the material in Blender.
Notice that we are using the term "bump map" to refer to a texture that will be used to control the "normal" channel of the material. The reason to not call it "normal map" is because a normal map is a special kind of texture that isn't coded in grayscale, like our current texture.

 United States
 Great Britain
 India
India
 Germany
 France
 Canada
 Russia
 Spain
Spain
 Brazil
 Australia
 Singapore
 Canary Islands
 Hungary
 Ukraine
 Luxembourg
 Estonia
 Lithuania
 South Korea
 Turkey
 Switzerland
 Colombia
 Taiwan
 Chile
Chile
 Norway
 Ecuador
 Indonesia
 New Zealand
 Cyprus
 Denmark
 Finland
 Poland
 Malta
Malta
 Czechia
 Austria
 Sweden
 Italy
Italy
 Egypt
Egypt
 Belgium
 Portugal
 Slovenia
 Ireland
 Romania
 Greece
 Argentina
 Netherlands
 Bulgaria
 Latvia
 South Africa
 Malaysia
 Japan
Japan
 Slovakia
 Philippines
 Mexico
 Thailand


