This article by Simon M.C. Cheng, author of the book Proxmox High Availability, will show you some basic concepts of Proxmox VE before actually using it, including the technology used, basic administration, and some options available during set up.
The following topics are going to be covered in this chapter:
- An explanation of server virtualization used by Proxmox VE
- An introduction of basic administrative tools available in Proxmox VE
- An explanation of different virtualization modes and storage options
(For more resources related to this topic, see here.)
Introduction to server virtualization
Have you ever heard about cloud computing? It is a hot topic in the IT industry and claims that you can allocate nearly unlimited computer resources in a pay-as-you-go basis. Are you not curious to know on how they are able to provide such a service? The underlying technology that allows them to be able to provide such a service is hardware virtualization. Depending on the kind of processor used, there are three different types of virtualizations available: full virtualization, para-virtualization, and hardware assisted virtualization.
- Full virtualization: In this the VMM is placed under Ring 0 while the virtualized guest OS is installed under Ring 1. However, some system calls can only be executed under Ring 0. Therefore, a process called binary translation is used to translate such system calls, and thus, the performance is degraded. In this mode, the guest OS does not know it is being virtualized, so it does not require kernel modification. Here is a simple structure for this type of virtualization:

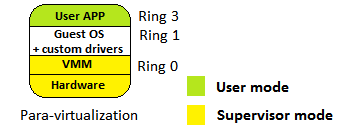
- Para-virtualization: It is very similar to full virtualization, but custom drivers are installed on the guest OS in order to access CPU resources without downgrading to Ring 1. So, the performance of the guest OS is near to that of the physical machine because the translation process is not needed, but the guest OS requires a modified kernel. Thus, the guest cannot run operating system different from the host operation system. The following shows the structure of this virtualization:
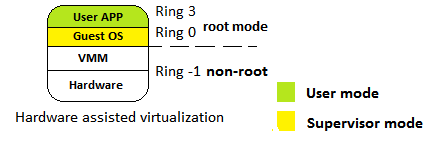
- Hardware assisted virtualization: CPU manufacturers introduce a new functionality for a virtualized platform, Intel VT-x and AMD-V. The ring level 0 to 3 is categorized into non-root modes, and a new level, -1, is introduced as the root mode. The guest OS is now installed to Ring 0, which means it can access hardware directly. Because it does not need a custom API to make system calls under Ring 0, no kernel modification is needed. The following diagram shows you the structure of the virtualization mode:
Comparing server virtualization software
We have discussed why we need to learn server virtualization and how virtualization works, so are you curious on how many major virtualization software are in the market? What are the differences between them? Let's take a deep look at it:
- Proxmox VE: As mentioned earlier, Proxmox VE is an open source hypervisor based on GNU/Linux (Debian based) with a RHEL-based kernel and published under GNU AGPL v3. It differs from the alternatives virtualization software as Proxmox provides a central web-based management without further installation. The underlying technologies used are Open Virtuozzo (OpenVZ) and Kernel-based Virtual Machine (KVM), which will be described in Version 1.6. Subscription plans are available for accessing enterprise repository, software updates, and user support.
- XenServer: It is a native hypervisor based on GNU/Linux developed by the Xen Project and published under GNU AGPL v2 as open source. For XenServer, a concept of domain is used for all virtual machines, and the most privileged domain (for example, have direct access to hardware)—dom0, is used by the hypervisor to manage other domU virtual machines. It supports para-virtualization, which allows a user to run virtualized guests on a CPU without support for virtualization; for example, no Intel VT-x or AMD-V is needed. Amazon Web Service (AWS) is a production sample of using XenServer.
- VMware ESX/ESXi: This is a bare-metal hypervisor developed by VMware based on a customized kernel called vmkernel, which is a microkernel developed by VMware.
The difference between ESX and ESXi is that ESXi is a free version of ESX with some resource limitations. ESX has a hardware compatibility list that includes many drivers for network cards and SCSI cards. An extra hardware driver can be added to the base installation media if needed. On top of the para-virtualization and hardware-assisted virtualization, ESX provides full virtualization as another option.
There are two management tools available: vSphere client and vCenter server. VSphere client is enough for normal administration operation on one ESX while vCenter server allows the user to manage multiple ESXs, including the configuration of advanced features such as high availability and live migration.
- Hyper-V server: This is a proprietary virtualization platform produced by Microsoft Corporation running under Windows platform starting from Windows Server 2008. If you are mainly using a Windows platform as your virtualized guest, it is recommended that you use Hyper-V, especially if you have enabled an Active Directory domain services.
Hyper-V provides better migration options to users; it not only provides live migration, but also provides unlimited guest movements between hosts. The benefit of the features of an Active Directory domain is that Hyper-V provides replica on virtual machines, which allows a user to copy a specific VM from the source site to the target site asynchronously via a WAN or a secure VPN.
Virtualization options explained in Proxmox VE
There are two types of virtualization available in Proxmox: OpenVZ and KVM.
OpenVZ is an operating-system-level virtualization based on the GNU/Linux kernel and the host operation system. Theoretically, OpenVZ is not a type of virtualization but more like the jail concept in Linux. Since a patched Linux kernel is needed, only Linux guests can be created. All guests are called containers that share the same kernel and architecture as long as the host OS, while each container reserves a separate user space.
Kernel-based Virtual Machine (KVM) is basically a hardware-assisted virtualization with the modified Linux kernel built with KVM module. KVM itself does not perform any emulation or virtualization. Instead, it simply exposes the /dev/kvm interface. QEMU is chosen as a software-based emulator to simulate hardware for the virtualized environment.
Virtual disk options under Proxmox VE
During the virtual machine creation, the following virtual disk options are available:
- RAW: This is a raw file format. The disk space is allocated during the creation and will use up the specified size. When compared with QCOW2, it gives a better overall performance.
- QCOW2: This is an enhanced version of QCOW, which offers a provisioning ability for disk storage used by QEMU. QCOW2 offers a capability to create multiple virtual machine snapshots compared to the older version. The following features are supported:
- Thin-provisioning: During the disk creation, a file smaller than the specified size is created, and the specified size will be configured as the maximum size of the disk image. The file size will grow according to the usage inside the guest system; this is called thin-provisioning.
- Snapshot: QCOW2 allows the user to create snapshots of the current system. With the use of the copy-on-write technology and a read-only base image, differential backup can be achieved.
- VMDK: This file format for a disk image is used by VMware. The virtual disk file can be imported back to VMware Player, ESX, and ESXi. It also provides a thin-provisioning function such as QCOW2.
What is availability?
What means availability? Let's take a look on the formula of calculating the availability; we need to divide the subtraction of Downtime duration (DD) from Expected uptime (EU) with Expected uptime (EU), then multiply it with 100. Availability is expressed as a percentage of uptime with a year. Here is the formula:

- Downtime duration (DU): Refers to the number of hours which the system is unavailable.
- Expected uptime (EU): Refers to the expected system availability, normally we expect the system is 365 x 24 x 7 hours available.
Negative effects on system downtime
What are the problems brought from downtime? Let's have a look:
- Lose of customer trust: This is a huge impact if your application is an online buying platform. When the user tries to pay for the products or services they have selected, the system responses with an error page or even worse a white screen. If you were the customer, would you still trust this platform as a reliable one? I think the answer is no. Customers tend to share bad experience to friends and thus company reputation is damaged.
- System recovery: At the background side, lots of system recovery and troubleshooting tasks must be made. Sometimes we have to wait for the support from vendor and there might not have essential service parts for older system. If that's the case, the repairing time would be longer than normal while you still have to pay for the rack rental fee in the data center.
- Reduce the productivity of internal staff: If the affected server contains an internal system, the daily operation of a group of staff is affected. For example, when it is a CRM system, sales staff cannot load customer information to process. When it is a financial system, the accountant cannot send and receive money from banks and customers.
Introduction on DRBD
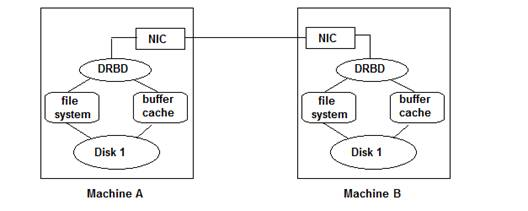
DRBD is a short form for Distributed Replicated Block Device, it is intended to use under high availability environment. DRBD provides high availability by mirroring existing system to another machine including the disk storage, network card status and services running under existing system. So if the existing system is out of service, we can instantly switch to the backup system to avoid service interruption.
Besides high availability, there are a few more functions provided by Proxmox cluster mode but the most important one is live migration. Unlike normal migration, in Proxmox cluster, migration can be processed without shutting down the virtual machine. Such approach is called live migration which greatly reduces the downtime of each virtual machine.
The Proxmox Cluster file system (pmxcfs)
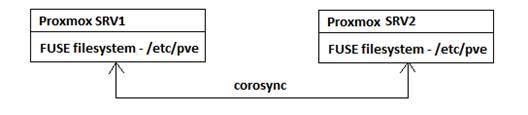
Are you curious on how to manage multiple configuration files in Proxmox cluster mode? Proxmox Cluster file system (pmxcfs) is a built-in function which Proxmox cluster provided to synchronize configuration files between cluster member nodes. It is an essential component for Proxmox cluster as a version control on configuration files including cluster configuration, the virtual machine configuration, etc. It is basically a database-driven file system to store configuration files for all host servers and replicate in real time on all host nodes using corosync. The underlying file system is created by FUSE, with maximum size of 30 MB now. Here are the concepts for this file system:
- FUSE: It is a short form for Filesystem in Userspace which allows users to define their own device under their own userspace. With the use of FUSE, we don't have to worry the system will be crashed if we have mis-configured a file system because FUSE is not linked to system kernel.
- Corosync: It is a short form for Corosync Cluster Engine, a group communication system allowing clients to communicate with each other.
The following diagram shows the structure for the Proxmox Cluster file system:
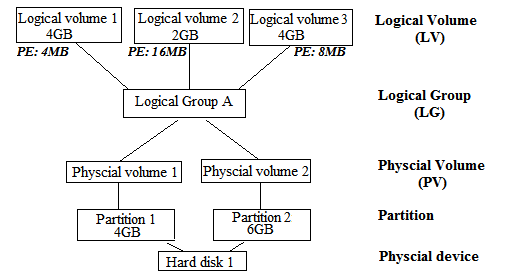
An explanation on Logical Volume Manager (LVM)
Unlike building a local RAID1 device by using mdadm command, we need to form LVM volume with dedicated local disk in multiple servers. LVM is used to simplify the disk management process of large hard disks. By adding an abstruction layer, users are able to add/replace their hard disks without downtime in combining with hot swapping. Besides, users are able to add/remove/resize their LVM volumes or even create a RAID volume easily. The structure of LVM is shown as follows:
The Gluster file system
GlusterFS is a distributed filesystem running in server-client architecture. It makes used of native Gluster protocol but also be seen as a NFS share or even work as an object-storage (Amazon S3-like networked key-value storage) with GlusterFS UFO.
Gluster over LVM with iSCSI provides auto healing function. With auto healing, Gluster client would still be able to read/write files even if one Gluster server has failed which is similar to what RAID 1 offered. Let's check out how Gluster file system handles server failure:
Initially, we need to haveat least two storage servers installed with Gluster server package in order to enjoy the functionality of auto healing. On the client side, we have configured to use Replicate mode and mount the file system to /glusterfs.
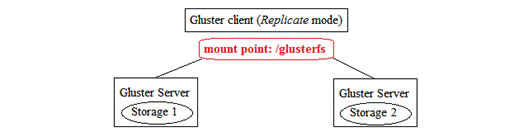
The file content will be stored in both storages in this mode as follows:

If Storage 1 is failed, Gluster client will redirect the request to Storage 2.
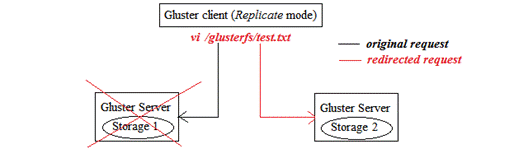
When Storage 1 becomes available, the updated content will be synchronized from Storage 2. Therefore, client will not notice there is a server failure. This is shown in the following diagram:

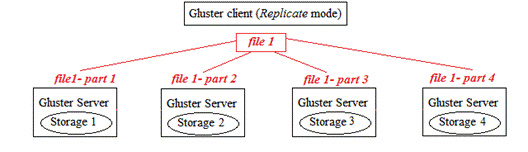
Thus, Gluster file system can provide high availability if we are using replication mode. For performance, we can distribute the file to more servers as follow:
The Ceph filesystem
Ceph is also a distributed filesystem providing petabyte-level storage but is more focused on eliminating a single point of failure. To ensure high availability, replicas are created on other storage nodes. Ceph is developed based on the concepts of RADOS (reliable autonomic distributed object store) with different accessing methods provided:
|
Accessing method
|
Support Platforms
|
Usage
|
|
Library packages
|
C, C++, JAVA, Python, Ruby, PHP
|
Programming
|
|
RADOS gateway
|
Amazon S3, Swift
Unlock access to the largest independent learning library in Tech for FREE!
Get unlimited access to 7500+ expert-authored eBooks and video courses covering every tech area you can think of.
Renews at $19.99/month. Cancel anytime
|
Cloud platform
|
|
RBD
|
KVM
|
Virtualization
|
|
CEPH file system
|
Linux kernel, FUSE
|
File system
|
Here is a simple diagram demonstrating the structure of CEPH file system:

What is fencing device?
Fencing device, as name stated, is a virtual fence to prevent the communications between two nodes. It is used to separate the failed node from accessing shared resources. If there are two nodes accessing the shared resources at the same time, collision occurs which might corrupt the shared data which is the data inside virtual machines.
Available fencing device options
It is very important to protect our data without any corruption, what types of fencing devices are available and how can they build their fences during node failure? There are two approaches as listed below:
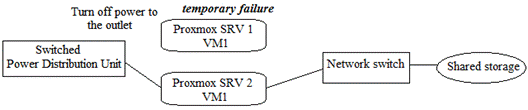
- Power fencing: Both nodes are added to fencing device for monitoring. If there is any suspicious failure on production node for a period of time, fencing device simply turns off the power of outlet which the affected server is connected to while the backup node will take over the position to provide services. For the failed node, power switch will send notification to system admin and manual recovery is required but no service interruption on the client side.
- Network fencing: Server nodes are connected to network switch instead of power switch. There are two types of network fencing:
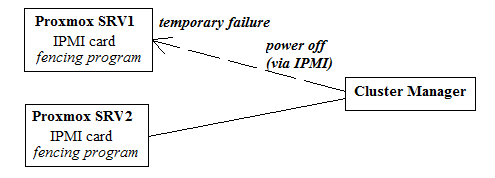
- IPMI: It requires a separate IMPI card or onboard IPMI port to function. During the running operating system, periodically query checks can be performed to ensure the accessibility of the monitored server. If the query check failed for many times, IPMI message will be sent to this failed node to turn it off. Here is how it operates:
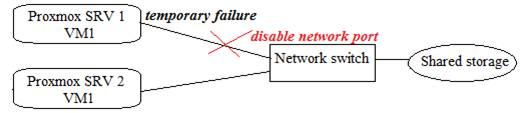
- SNMP: When there is suspicious failure on server node in a period of time, the network port between network switch and the failed server is disabled which prevents failed server to access shared storage. When operator requires turning the server back to service, manual configuration is required. Here is a diagram on how it operates:
The concept for quorum device
Since the voting system is a democratic system, which means there is one vote for each node. So if we only have two nodes, no one could win the race which causes the racing problem. As a result, we need to add a 3rd node joining this system (i.e. the quorum in our case). Here is a sample on why the racing problem appears and how we can fix it: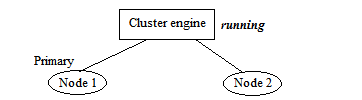
Assumes we have a cluster system with only two nodes, the above diagram show the initial state for the cluster. We have marked Node 1 as the Primary node.

Here, Node 1 is disconnected and therefore Node 2 would like to take over its position to become primary node. But it cannot be successful because two votes are needed for role switching operation. Therefore the cluster will become non-operational until Node 1 is recovered as follows: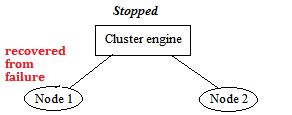
When Node 1 is recovered from failure, it tries to join back the cluster but failed because the cluster has stopped working. To solve the problem, an extra node is recommended to join the cluster in order to create a high availability environment. Here is an example when a node failed and Node 2 would like to be the primary node: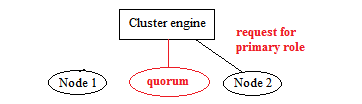
The concept on bonding device
For the network interface, a bonding device (Bond0 and Bond1) will be created in Proxmox. Bonding device is also called NIC teaming which is a native Linux kernel feature allowing user to double network speed performance or perform network redundancy. There are two options for network redundancy, 802.1ad and Active-backup. They have different response patterns when handling multiple sessions: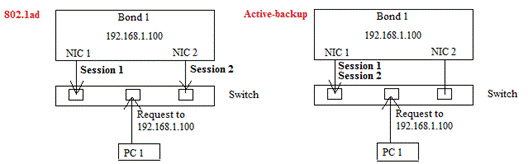
These network redundancy options are explained in the following points:
- In 802.1ad, both network interfaces are active therefore sessions can be processed by different network card which is an active-active model.
- On the other hand, only one interface is in active state in Active-backup mode. The backup interface will become active only if the active one fails.
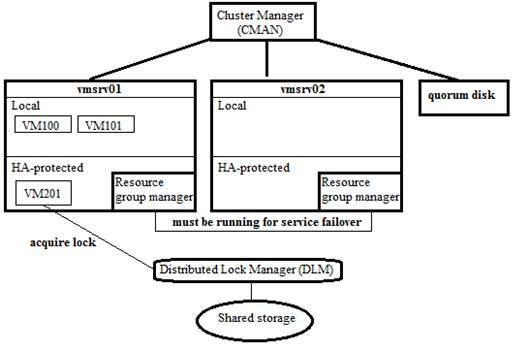
The concepts of cluster manager
The following points explain the concepts of cluster manager:
- Resource Group Manager (RGManager) combines with cluster manager (CMAN) and distributed lock manager (DLM) processes to manage and provide failover capabilities for collections of resources called services, resource groups, or resource trees. It is the essential process for high availability on services. If this service is turned off, HA function is disabled.
- Cluster Manager (CMAN) is the main process of the cluster architecture. CMAN manages the state of quorum and the status of different cluster members. In order to check the status of all cluster members, monitoring messages are sent periodically on all cluster nodes. If there is any status change on the cluster member, it will be distributed to all other cluster nodes.
- It is also responsible for the quorum management. When more than half node members are active, a cluster is said to be healthy. If the number of active member nodes is decreased to less than half, all cluster-related activity is blocked:
- Any change to cluster.conf file is not allowed
- Unable to start resource manager which disables HA function
- Any operation on VM creation is blocked
NOTE: The operations of the existing virtual machines without high availability are not affected.
- Distributed Lock Manager (DLM) is used by resource group manager by applying different lock modes to resource to prevent multiple accesses. For details, please refer: http://en.wikipedia.org/wiki/Distributed_lock_manager
- I have prepared a simple diagram showing the relationship between them:
Backup virtual machine data in Proxmox
After we have made a copy of the container configurations, we are going to back the actual data inside the virtual machine. There are two different methods—manual backup with vzdump command for both KVM and openVZ guests and backup via GUI management console.
Backup with vzdump for virtual machines
There are three different backup approaches in the vzdump command:
- Stop mode: Stop the VM during backup which takes long backup time.
- Suspend mode: Use rsync command to copy data to a temporary location (defined in--tmpdir), then performs second rsync operation while suspending the container. When the second rsync operation completes, the suspended VM is resumed.
- Snapshot mode: This mode makes use of LVM2 snapshot function. It requires extra space within the LVM volume.
Backup with web management console
Except from manually backup the container under command-line interface, we can also make it under web management interface too. Here are the steps to perform backup with GUI:
Log in to the web management console with root account information.
Browse the left panel to locate the virtual machine to be backed up.
Choose the Backup tab in the right panel and you will only see the latest backup files you have created in the previous steps:

Then we can simply click on the Backup button to initialize the backup dialog: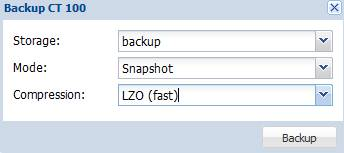
Notice that Proxmox uses TAR package as the compression method and make used of Snapshot mode by default. Therefore, make sure you have enough free space in your Volume Group which stores the data of virtual machines before using default values. By default, the volume group used is pve which is mounted at /var/lib/vz and you cannot place your dump file the same volume group.
From the dialog, we can choose if the backup output file is compressed or not. To conserve disk space, here we choose GZIP as the compression method and choose snapshot to enjoy the zero downtime backup process as follow: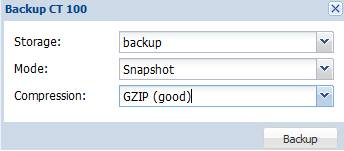
Building up our own OS template
There are two types of templates: one is OpenVZ template and another one is VM template.
- OpenVZ template: is only used for building up OpenVZ containers but not for KVM machine which limits the choice on operating system that it must be Linux platform.
- VM template: is introduced with Proxmox 3.x series, used to deploy KVM virtual machine which therefore escapes from the limitation on operating system.
Here are the steps to download an OpenVZ template:
- Log in to the web interface of Proxmox, and find local storage from the panel on the left-hand side.
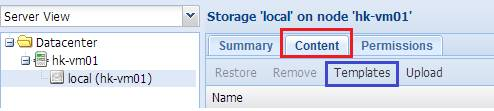
- Click on the Content tab and choose Templates as shown in the following screenshot:
- Next, we need to find a suitable template to download; for example, we can download a system with Drupal installed, as shown in the following screenshot:
- Then we click on the Download button. When the download completes, the template file is listed on the templates page, as shown in the following screenshot:

Troubleshooting on system access problems
Basically, it should not be difficult for you to install a Proxmox server from scratch. But after I have performed a few installations on different platforms, I noticed there are few scenarios which might cause you into trouble. Here are the problems I have found.
Undefined video mode number
Symptom: In some motherboards, you would receive the Undefined video mode number warning after you have pressed Enter to begin installation. It simply tells you that you cannot run the fancy installation wizard as below:
Root cause: The main problem is the display chipset. When your motherboard is using display chipset which is not VESA2.0 compatible, this error message appears. To learn more about the VESA2.0, please find the following links:
Solution: Then, you will be asked to press either <ENTER>, <SPACE> or wait for 30 seconds to continue. If you have pressed <ENTER>, the possible video modes available on your system will be shown: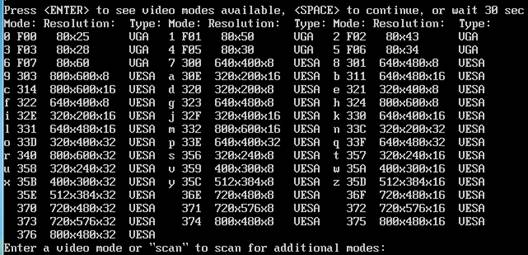
You can pick up a display mode number based on the list mentioned above. Normally, you can choose display mode 314 with 800 x 600 resolutions and 16-bit color depth or you can choose display mode 311 which provides you with 640 x 480 resolutions and 16-bit color depth. Then you should be able to continue the installation process.
Prevention: I found that this problem normally happened in Nvidia display cards. If it is possible, you can try to replace it with Intel or ATI display cards during your installation.
Summary
In this article, we explained the concept of virtualization and compared Proxmox with other virtualization software.
Resources for Article:
Further resources on this subject:

 United States
 Great Britain
 India
India
 Germany
 France
 Canada
 Russia
 Spain
Spain
 Brazil
 Australia
 Singapore
 Canary Islands
 Hungary
 Ukraine
 Luxembourg
 Estonia
 Lithuania
 South Korea
 Turkey
 Switzerland
 Colombia
 Taiwan
 Chile
Chile
 Norway
 Ecuador
 Indonesia
 New Zealand
 Cyprus
 Denmark
 Finland
 Poland
 Malta
Malta
 Czechia
 Austria
 Sweden
 Italy
Italy
 Egypt
Egypt
 Belgium
 Portugal
 Slovenia
 Ireland
 Romania
 Greece
 Argentina
 Netherlands
 Bulgaria
 Latvia
 South Africa
 Malaysia
 Japan
Japan
 Slovakia
 Philippines
 Mexico
 Thailand


