


Amazon Web Services, also known as AWS, is a go-to destination for developers to host their server-side apps. AWS isn’t exactly beginner-friendly, however. So if you’re a mobile developer who doesn’t have much knowledge in the backend field, AWS, with its countless weirdly-named services, may look like a complex beast.
Well, Amazon has decided to rectify that. In late 2015, they rolled out the AWS Mobile Hub, a new dashboard for managing Amazon services on a mobile platform. The most important part about it is that it’s easy to use.
AWS Mobile Hub features the following services:
- User authentication via Amazon Cognito
- Data, file, and resource storage using Amazon S3 and Cloudfront
- Backend code with Amazon Lambda
- Push notification using Amazon SNS
- Analytics using Amazon Analytics
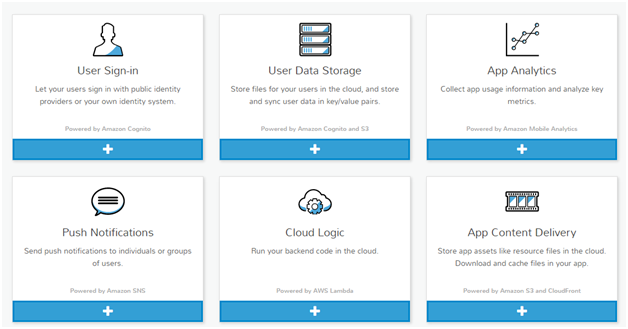
After seeing this list of services, you may still think it’s complicated and that you only need one or two services from that list. The good news is that the hub allows you to cherry-pick the service you want instead of forcing you to use all of them. So, if your mobile app only needs to access some files on the Internet, then you can choose to only use the resource storage functionality and skip the other features.
So, is AWS Mobile Hub basically a more focused version of the AWS dashboard? Well, it’s more than just that. The hub is able to configure the Amazon services that you’re going to use, so they’re automatically tailored to your app. The hub will then generate Android and iOS codes for connecting to the services you just set up, so that you can quickly copy them to your app and use the services right away.
Do note that most of the stuff that was done automatically by the hub can also be achieved by integrating the AWS SDK and configuring each service manually. Fortunately, you can easily add Amazon services that aren’t included in the hub. So, if you want to also use the Amazon DynamoDB service on your app, all you have to do is call the relevant DynamoDB functions from the AWS SDK and you’re good to go.
All right, enough talking. Let’s give the AWS Mobile Hub a whirl! We’re going to use the hub for the Android platform, so make sure you satisfy the following requirements:
- Android Studio v1.2 or above
- Android 4.4 (API 19) SDK
- Android SDK Build-tools 23.0.1
Let’s start by opening the AWS Mobile Hub to create a new mobile project (you will be asked to log in to your Amazon account if you haven’t done so). After entering the project name, you are presented with the hub dashboard, where you can choose the service you want to add to your app. Let’s start by adding the User Sign-in functionality.
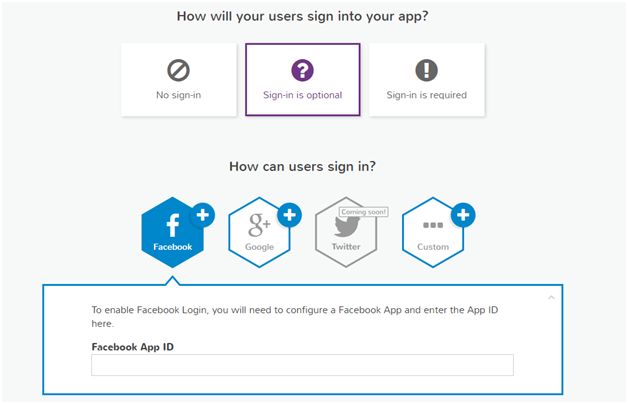
There are a couple of steps that must be completed to configure the authentication service. First you need to figure out whether your app can be used without logging in or not (for example, users can use Imgur without logging in, but they have to log in to use Facebook). If a user doesn’t need to be logged in, choose “Sign-in is optional”; otherwise, choose that sign-in is required.
The next step is to add the actual authentication method. You can use your own authentication method, but that requires setting up a server, so let’s go with a 3rd party authentication instead. When choosing a 3rd party authentication, create a corresponding app on the 3rd party website and then copy the required information to the Mobile Hub dashboard. When that’s done, save the changes you made and return to the service picker.
Except for the Cloud Logic service, the configurations for the other services are quite straightforward, so let’s add User Data Storage and App Content Delivery services. If you want to integrate Cloud Logic, you will be directed to the Amazon Lambda dashboard, where you will need to write a function with JavaScript that will be run on the server. So let’s leave it to another time for now.
All right, you should be all set up now, so let’s proceed with building the base Android app. Click on the build button on the menu to the left and then choose Android. The Hub will then configure all the services you chose earlier and provide you with an Android project that has been integrated with all of the necessary SDK, including the SDK for the 3rd party authentication. It’s pretty nice, isn’t it?
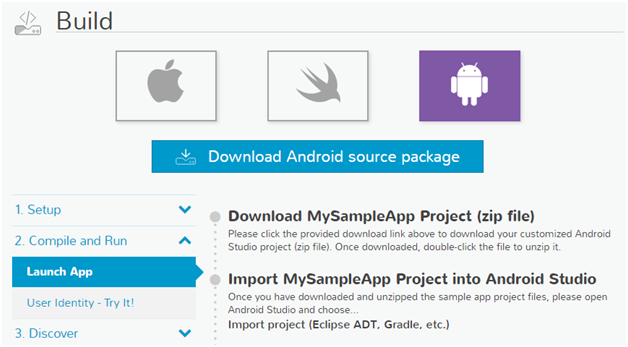
Download the Android project and unzip it, and make note of the “MySampleApp” folder inside it. Fire up Android Studio and import (File > New > Import Project…) that folder. Wait for the project to finish syncing, and once it’s done, try running it in your Android device to see if AWS was integrated successfully or not.
And that’s it. All of the code needed to connect to the Amazon services you have set up earlier can be found in the MySampleApp project. Now you can simply copy that to your actual project or use the project as a base to build the app you want. Check out the build section of the dashboard for a more detailed explanation of the generated codes.
About the author
Raka Mahesa is a game developer at Chocoarts (http://chocoarts.com/) who is interested in digital technology in general. Outside of work hours, he likes to work on his own projects, with Corridoom VR (https://play.google.com/store/apps/details?id=com.rakamahesa.corridoom) being his latest released game. Raka also regularly tweets as @legacy99.