(For more resources related to this topic, see here.)
What is branching
Branching in Git is a function that is used to launch a separate, similar copy of the present workspace for different usage requirements. In other words branching means diverging from whatever you have been doing to a new lane where you can continue working on something else without disturbing your main line of work.
Let's understand it better with the help of the following example
Suppose you are maintaining a checklist of some process for a department in your company, and having been impressed with how well it's structured, your superior requests you to share the checklist with another department after making some small changes specific to the department. How will you handle this situation?
An obvious way without a version control system is to save another copy of your file and make changes to the new one to fit the other department's needs. With a version control system and your current level of knowledge, perhaps you'd clone the repository and make changes to the cloned one, right?
Looking forward, there might be requirements/situations where you want to incorporate the changes that you have made to one of the copies with another one. For example, if you have discovered a typo in one copy, it's likely to be there in the other copy because both share the same source. Another thought – as your department evolves, you might realize that the customized version of the checklist that you created for the other department fits your department better than what you used to have earlier, so you want to integrate all changes made for the other department into your checklist and have a unified one.
This is the basic concept of a branch – a line of development which exists independent of another line both sharing a common history/source, which when needed can be integrated. Yes, a branch always begins life as a copy of something and from there begins a life of its own.
Almost all VCS have some form of support for such diverged workflows. But it's Git's speed and ease of execution that beats them all. This is the main reason why people refer to branching in Git as its killer feature.
Why do you need a branch
To understand the why part, let's think about another situation where you are working in a team where different people contribute to different pieces existing in your project.
Your entire team recently launched phase one of your project and is working towards phase two. Unfortunately, a bug that was not identified by the quality control department in the earlier phases of testing the product pops up after the release of phase one (yeah, been there, faced that!).
All of a sudden your priority shifts to fixing the bug first, thereby dropping whatever you've been doing for phase two and quickly doing a hot fix for the identified bug in phase one. But switching context derails your line of work; a thought like that might prove very costly sometimes. To handle these kind of situations you have the branching concept (refer to the next section for visuals), which allows you to work on multiple things without stepping on each other's toes.
There might be multiple branches inside a repository but there's only one active branch, which is also called current branch.
By default, since the inception of the repository, the branch named master is the active one and is the only branch unless and until changed explicitly.
Naming conventions
There are a bunch of naming conventions that Git enforces on its branch names; here's a list of frequently made mistakes:
A branch name cannot contain the following:
A space or a white space character
Special characters such as colon (:), question mark (?), tilde (~), caret (^), asterisk (*), and open bracket ([)
Forward slash (/) can be used to denote a hierarchical name, but the branch name cannot end with a slash
For example, my/name is allowed but myname/ is not allowed, and myname\ will wait for inputs to be concatenated
Strings followed by a forward slash cannot begin with a dot (.) For example, my/.name is not valid
Names cannot contain two continuous dots (..) anywhere
When do you need a branch
With Git, There are no hard and fast rules on when you can/need to create a branch. You can have your own technical, managerial, or even organizational reasons to do so. Following are a few to give you an idea:
A branch in development of software applications is often used for self learning/ experimental purposes where the developer needs to try a piece of logic on the code without disturbing the actual released version of the application
Situations like having a separate branch of source code for each customer who requires a separate set of improvements to your present package
And the classic one – few people in the team might be working on the bug fixes of the released version, whereas the others might be working on the next phase/release
For few workflows, you can even have separate branches for people providing their inputs, which are finally integrated to produce a release candidate
Following are flow diagrams for few workflows to help us understand the utilization of branching:
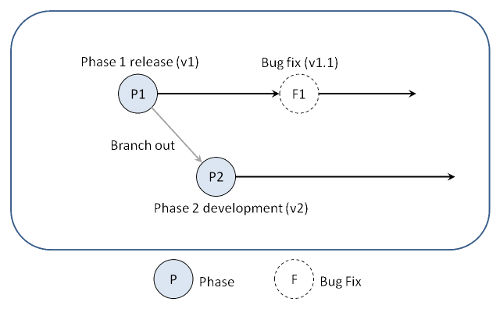
Branching for a bug fix can have a structure as shown the following diagram:
This explains that when you are working on P2 and find a bug in P1, you need not drop your work, but switch to P1, fix it, and return back to P2.
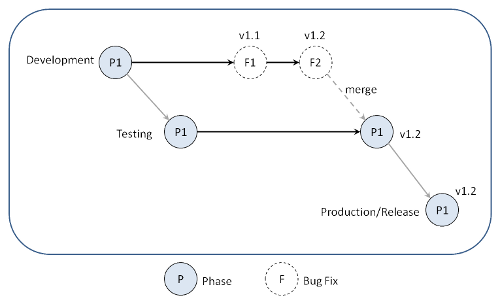
Branching for each promotion is as shown in the following diagram:
This explains how the same set of files can be managed across different phases/ promotions. Here, P1 from development has been sent to the testing team (a branch called testing will be given to the testing team) and the bugs found are reported and fixed in the development branch (v1.1 and v1.2) and merged with the testing branch. This is then branched as production or release, which end users can access.
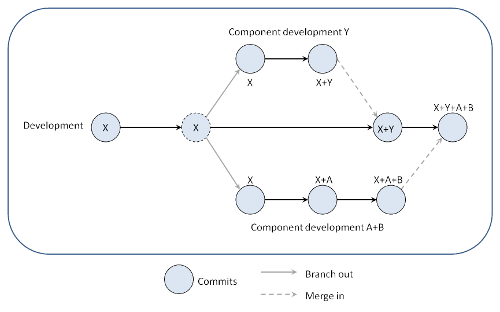
Branching for each component development is as shown in the following diagram:
Here every development task/component build is a new independent branch, which when completed is merged into the main development branch.
Practice makes perfect: branching with Git
I'm sure you have got a good idea about what, why, and when you can use branches when dealing with a Git repository. Let's fortify the understanding by creating a few use cases.
Scenario
Suppose you are the training organizer in your organization and are responsible for conducting trainings as and when needed. You are preparing a list of people who you think might need business communication skills training based on their previous records.
As a first step, you need to send an e-mail to the nominations and check their availability on the specified date, and then get approval from their respective managers to allot the resource. Having experience in doing this, you are aware that the names picked by you from the records for training can have changes even at the last minute based on situations within the team. So you want to send out the initial list for each team and then proceed with your work while the list gets finalized.
Time for action – creating branches in GUI mode
Whenever you want to create a new branch using Git Gui, execute the following steps:
Open Git Gui for the specified repository.
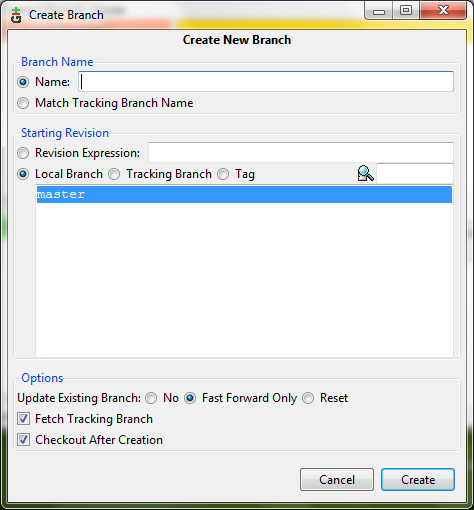
Select the Create option from the Branch menu (or use the shortcut keys Ctrl + N), which will give you a dialog box as follows:
In the Name field, enter a branch name, leave the remaining fields as default for now, and then click on the Create button.
What just happened?
We have learned to create a branch using Git Gui. Now let's go through the process mentioned for the CLI mode and perform relevant actions in Git Gui.
Time for action – creating branches in CLI mode
Create a directory called BCT in your desktop. BCT is the acronym for Business Communication Training.
Unlock access to the largest independent learning library in Tech for FREE!
Get unlimited access to 7500+ expert-authored eBooks and video courses covering every tech area you can think of.
Renews at $19.99/month. Cancel anytime
Let's create a text file inside the BCT directory and name it participants.
Now open the participants.txt file and paste the following lines in it:
Finance team
Charles
Lisa
John
Stacy
Alexander
Save and close the file.
Initiate it as a Git repository, add all the files, and make a commit as follows:
git init
git add .
git commit –m 'Initial list for finance team'
Now, e-mail those people followed by an e-mail to their managers and wait for the finalized list.
While they take their time to respond, you should go ahead and work on the next list, say for the marketing department. Create a new branch called marketing using the following syntax:
git checkout –b marketing
Now open the participants.txt file and start entering the names for the marketing department below the finance team list, as follows:
Marketing team
Collins
Linda
Patricia
Morgan
Before you finish finding the fifth member of the marketing team, you receive a finalized list from the finance department manager stating he can afford only three people for the training as the remaining (Alexander and Stacy) need to take care of other critical tasks. Now you need to alter the finance list and fill in the last member of the marketing department.
Before going back to the finance list and altering it, let's add the changes made for the marketing department and commit it.
git add .
git commit –m 'Unfinished list of marketing team'
git checkout master
Open the file and delete the names Alexander and Stacy, save, close, add the changes, and commit with the commit message Final list from Finance team.
git add .
git commit –m "Final list from Finance team"
git checkout marketing
Open the file and add the fifth name, Amanda, for the marketing team, save, add, and commit.
ggit add .
git commit –m "Initial list of marketing team"
Say the same names entered for marketing have been confirmed; now we need to merge these two lists, which can be done by the following command.
git merge master
You will get a merge conflict as shown in the following screenshot:
Open the participants.txt ?le and resolve the merge then add the changes, and finally commit them.
What just happened?
Without any loss of thought or data, we have successfully adopted the changes on the first list, which came in while working on the second list, with the concept of branching – without one interfering with another
As discussed, a branch begins its life as a copy of something else and then has a life of its own.
Here, by performing git checkout –b branch_name we have created a new branch from the existing position.
Technically, the so-called existing position is termed as the position of HEAD and this type of lightweight branches, which we create locally, are called topic branches. Another type of branch would be the remote branch or remote-tracking branch, which tracks somebody else's work from some other repository. We already got exposed to this while learning the concept of cloning.
The command git checkout –b branch_name is equivalent to executing the following two commands:
git branch branch_name: Creates a new branch of the given name at the given position, but stays in the current branch
git checkout branch_name: Switches you to the specified branch from the current/active branch
When a branch is created using Git Gui, the checkout process is automatically taken care of, which results in it being in the created branch.
The command git merge branch_name merges the current/active branch with the specified branch to incorporate the content. Note that even after the merge the branch will exist until it's deleted with the command git branch –d branch_name.
In cases where you have created and played with a branch whose content you don't want to merge with any other branch and want to simply delete the entire branch, use –D instead of –d in the command mentioned earlier.
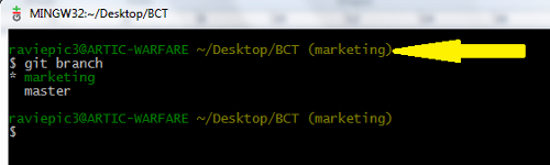
To view a list of branches available in the system, use the command git branch as shown in the following screenshot:
As shown in the screenshot, the branches available in our BCT repository right now are marketing and master, with master being the default branch when you create a repository. The branch with a star in front of it is the active branch. To ease the process of identifying the active branch, Git displays the active branch in brackets (branch_name) as indicated with an arrow.
By performing this exercise we have learned to create, add content, and merge branches when needed. Now, to visually see how the history has shaped up, open gitk (by typing gitk in the command-line interface or by selecting Visualize All Branch History from the Repository menu of Git Gui) and view the top left corner. It will show a history like in the following screenshot:
Homework
Try to build a repository alongside the idea explained with the last flow diagram given in the When do you need a branch section. Have one main line branch called development and five component development branches, which should be merged in after the customizations are made to its source.

 United States
 Great Britain
 India
India
 Germany
 France
 Canada
 Russia
 Spain
Spain
 Brazil
 Australia
 Singapore
 Canary Islands
 Hungary
 Ukraine
 Luxembourg
 Estonia
 Lithuania
 South Korea
 Turkey
 Switzerland
 Colombia
 Taiwan
 Chile
Chile
 Norway
 Ecuador
 Indonesia
 New Zealand
 Cyprus
 Denmark
 Finland
 Poland
 Malta
Malta
 Czechia
 Austria
 Sweden
 Italy
Italy
 Egypt
Egypt
 Belgium
 Portugal
 Slovenia
 Ireland
 Romania
 Greece
 Argentina
 Netherlands
 Bulgaria
 Latvia
 South Africa
 Malaysia
 Japan
Japan
 Slovakia
 Philippines
 Mexico
 Thailand