


In this article by Hussein Nasser, author of the book ArcGIS By Example we will discuss the following topics:
- Geodatabase editing
- Preparing the data and project
- Creating excavation features
- Viewing and editing excavation information
(For more resources related to this topic, see here.)
Geodatabase editing
YharanamCo is a construction contractor experienced in executing efficient and economical excavations for utility and telecom companies. When YharanamCo’s board of directors heard of ArcGIS technology, they wanted to use their expertise with the power of ArcGIS to come up with a solution that helps them cut costs even more. Soil type is not the only factor in the excavation, there are many factors including the green factor where you need to preserve the trees and green area while excavating for visual appeal. Using ArcGIS, YharanamCo can determine the soil type and green factor and calculate the cost of an excavation.
The excavation planning manager is the application you will be writing on top of ArcGIS. This application will help YharanamCo to create multiple designs and scenarios for a given excavation. This way they can compare the cost for each one and consider how many trees they could save by going through another excavation route. YharanamCo has provided us with the geodatabase of a soil and trees data for one of their new projects for our development.
So far we learned how to view and query the geodatabase and we were able to achieve that by opening what we called a workspace. However, changing the underlying data requires establishing an editing session. All edits that are performed during an edit sessions are queued, and the moment the session is saved, these edits are committed to the geodatabase. Geodatabase editing supports atomic transactions, which are referred to as operations in the geodatabase.
Atomic transaction is a list of database operations that either all occur together or none. This is to ensure consistency and integrity.
After this short introduction to geodatabase editing, we will prepare our data and project.
Preparing the data and project
Before we dive into the coding part, we need to do some preparation for our new project and our data.
Preparing the Yharnam geodatabase and map
The YharnamCo team has provided us with the geodatabase and map document, so we will simply copy the necessary files to your drive. Follow these steps to start your preparation of the data and map:
- Copy the entire yharnam folder in the supporting to C:\ArcGISByExample\.
- Run yharnam.mxd under C:\ArcGISByExample\yharnam\Data\yharnam.mxd. This should point to the geodatabase, which is located under C:\ArcGISByExample\yharnam\Data\yharnam.gdb, as illustrated in the following screenshot:

- Note there are three types of trees: Type1, Type2, and Type3. Also note there are two types of soil: rocky and sand.
- Close ArcMap and choose not to save any changes.
Preparing the Yharnam project
We will now start our project. First we need to create our Yharnam Visual Studio extending ArcObjects project. To do so, follow these steps:
- From the Start menu, run Visual Studio Express 2013 as administrator.
- Go to the File menu and then click on New Project.
- Expand the Templates node | Visual Basic | ArcGIS, and then click on Extending ArcObjects. You will see the list of projects displayed on the right.
- Select the Class Library (ArcMap) project.
- In the Name field, type Yharnam, and in the location, browse to C:\ArcGISByExample\yharnam\Code. If the Code folder is not there, create it.
- Click on OK.
- In the ArcGIS Project Wizard, you will be asked to select the references libraries you will need in your project. I always recommend selecting all referencing, and then at the end of your project, remove the unused ones. So, go ahead and right-click on Desktop ArcMap and click on Select All, as shown in the following screenshot:

- Click on Finish to create the project. This will take a while to add all references to your project.
- Once your project is created, you will see that one class called Class1 is added, which we won’t need, so right-click on it and choose Delete. Then, click on OK to confirm.
- Go to File and click on Save All.
- Exit the Visual Studio application.
You have finished preparing your Visual Studio with extending ArcObjects support. Move to the next section to write some code.
Adding the new excavation tool
The new excavation tool will be used to draw a polygon on the map, which represents the geometry of the excavation. Then, this will create a corresponding excavation feature using this geometry:
- If necessary, open Visual Studio Express in administrator mode; we need to do this since our project is actually writing to the registry this time, so it needs administrator permissions. To do that, right-click on Visual Studio and click on Run as administrator.
- Go to File, then click on Open Project, browse to the Yharnam project from C:\ArcGISByExample\yharnam\Code, and click on Open.
- Click on the Yharnam project from Solution Explorer to activate it.
- From the Project menu, click on Add Class.
- Expand the ArcGIS node and then click on the Extending ArcObjects node.
- Select Base Tool and name it tlNewExcavation.vb.
- Click on Add to open ArcGIS New Item Wizard Options.
- From ArcGIS New Item Wizard Options, select Desktop ArcMap tool since we will be programming against ArcMap. Click on OK.
- Take note of the Yharnam.tlNewExcavation Progid as we will be using this in the next section to add the tool to the toolbar.
- If necessary, double-click on tlNewExcavation.vb to edit it.
- In the New method, update the properties of the command as follows. This will update the name and caption and other properties of the command. There is a piece of code that loads the command icon. Leave that unchanged:
Public Sub New()
MyBase.New()

' TODO: Define values for the public properties
' TODO: Define values for the public properties
MyBase.m_category = "Yharnam" 'localizable text
MyBase.m_caption = "New Excavation"   'localizable text
MyBase.m_message = "New Excavation"   'localizable text
MyBase.m_toolTip = "New Excavation" 'localizable text
MyBase.m_name = "Yharnam_NewExcavation"

        Try
           'TODO: change resource name if necessary
           Dim bitmapResourceName As String = Me.GetType().Name +             ".bmp"
MyBase.m_bitmap = New Bitmap(Me.GetType(), bitmapResourceName)
MyBase.m_cursor = New System.Windows.Forms.Cursor(Me.GetType(), Me.GetType().Name + ".cur")
       Catch ex As Exception
System.Diagnostics.Trace.WriteLine(ex.Message, "Invalid Bitmap")
       End Try
   End Sub
Adding the excavation editor tool
The excavation editor is a tool that will let us click an excavation feature on the map and display the excavation information such as depth, area, and so on. It will also allow us to edit some of the information.
We will now add a tool to our project. To do that, follow these steps:
- If necessary, open Visual Studio Express in administrator mode; we need to do this since our project is actually writing to the registry this time, so it needs administrator permissions. To do that, right-click on Visual Studio and click on Run as administrator.
- Go to File, then click on Open Project, browse to the Yharnam project from C:\ArcGISByExample\yharnam\Code, and click on Open.
- Click on the Yharnam project from Solution Explorer to activate it.
- From the Project menu, click on Add Class.
- Expand the ArcGIS node and then click on the Extending ArcObjects node.
- Select Base Tool and name it tlExcavationEditor.vb.
- Click on Add to open ArcGIS New Item Wizard Options.
- From ArcGIS New Item Wizard Options, select Desktop ArcMap Tool since we will be programming against ArcMap. Click on OK.
- Take note of the Yharnam.tlExcavationEditor Progid as we will be using this in the next section to add the tool to the toolbar.
- If necessary, double-click on tlExcavationEditor.vb to edit it.
- In the New method, update the properties of the command as follows. This will update the name and caption and other properties of the command:
MyBase.m_category = "Yharnam" 'localizable text MyBase.m_caption = "Excavation Editor" 'localizable text MyBase.m_message = "Excavation Editor" 'localizable text MyBase.m_toolTip = "Excavation Editor" 'localizable text MyBase.m_name = "Yharnam_ExcavationEditor" - In order to display the excavation information, we will need a form. To add the Yharnam Excavation Editor form, point to Project and then click on Add Windows Form.
- Name the form frmExcavationEditor.vb and click on Add.
- Use the form designer to add and set the controls shown in the following table:
Control
Name
Properties
Label
lblDesignID
Text: Design ID
Label
lblExcavationOID
Text: Excavation ObjectID
Label
lblExcavationArea
Text: Excavation Area
Label
lblExcavationDepth
Text: Excavation Depth
Label
lblTreeCount
Text: Number of Trees
Label
lblTotalCost
Text: Total Excavation Cost
Text
txtDesignID
Read-Only: True
Text
txtExcavationOID
Read-Only: True
Text
txtExcavationArea
Read-Only: True
Text
txtExcavationDepth
Read-Only: False
Text
txtTreeCount
Read-Only: True
Text
txtTotalCost
Read-Only: True
Button
btnSave
Text: Save
- Your form should look like the following screenshot:

- One last change before we build our solution: we need to change the default icons of our tools. To do that, double-click on tlExcavationEditor.bmp to open the picture editor and replace the picture with yharnam.bmp, which can be found under C:\ArcGISByExample\yharnam\icons\excavation_editor.bmp, and save tlExcavationEditor.bmp.
- Change tlNewExcavation.bmp to C:\ArcGISByExample\yharnam\icons\new_excavation.bmp.
- Save your project and move to the next step to assign the command to the toolbar.
Adding the excavation manager toolbar
Now that we have our two tools, we will add a toolbar to group them together. Follow these steps to add the Yharnam Excavation Planning Manager Toolbar to your project:
- If necessary, open Visual Studio Express in administrator mode; we need to do this since our project is actually writing to the registry this time, so it needs administrator permissions. To do that, right-click on Visual Studio and click on Run as administrator.
- Go to File, then click on Open Project, browse to the Yharnam project from C:\ArcGISByExample\yharnam\Code, and click on Open.
- Click on the Yharnam project from Solution Explorer to activate it.
- From the Project menu, click on Add Class.
- Expand the ArcGIS node and then click on the Extending ArcObjects node.
- Select Base Toolbar and name it tbYharnam.vb.
- Click on Add to open ArcGIS New Item Wizard Options.
- From ArcGIS New Item Wizard Options, select Desktop ArcMap since we will be programming against ArcMap. Click on OK.
- The property Caption is what is displayed when the toolbar loads. It currently defaults to MY VB.Net Toolbar, so change it to Yharnam Excavation Planning Manager Toolbar as follows:
Public Overrides ReadOnly Property Caption() As String Get 'TODO: Replace bar caption Return "YharnamExcavation Planning Manager" End Get End Property - Your toolbar is currently empty, which means it doesn’t have buttons or tools. Go to the New method and add your tools prog ID, as shown in the following code:
Public Sub New() AddItem("Yharnam.tlNewExcavation") AddItem("Yharnam.tlExcavationEditor") End Sub - Now it is time to test our new toolbar. Go to Build and then click on Build Solution; make sure ArcMap is not running. If you get an error, make sure you have run the Visual Studio as administrator.
For a list of all ArcMap commands, you can refer to http://bit.ly/b04748_arcmapids. Check the commands with namespace esriArcMapUI.
- Run yharnam.mxd in C:\ArcGISByExample\yharnam\Data\yharnam.mxd.
- From ArcMap, go to the Customize menu, then to Toolbars, and then select Yharnam Excavation Planning Manager Toolbar, which we just created. You should see the toolbar pop up on ArcMap with the two added commands, as shown in the following screenshot:

- Close ArcMap and choose not to save any changes.
In the next section, we will do the real work of editing.
Creating excavation features
Features are nothing but records in a table. However, these special records cannot be created without a geometry shape attribute. To create a feature, we need first to learn how to draw and create geometries. We will be using the rubber band ArcObjects interface to create a polygon geometry. We can use it to create other types of geometries as well, but since our excavations are polygons, we will use the polygon rubber band.
Using the rubber band to draw geometries on the map
In this exercise, we will use the rubber band object to create a polygon geometry by clicking on multiple points on the map. We will import libraries as we need them. Follow these steps:
- If necessary, open Visual Studio Express in administrator mode; we need to do this since our project is actually writing to the registry this time, so it needs administrator permissions. To do that, right-click on Visual Studio and click on Run as administrator.
- Go to File, then click on Open Project, browse to the Yharnam project from C:\ArcGISByExample\yharnam\Code, and click on Open.
- Double-click on tlNewExcavation.vb and write the following code in onMouseDown that is when we click on the map:
Public Overrides Sub OnMouseDown(ByVal Button As Integer, ByVal Shift As Integer, ByVal X As Integer, ByVal Y As Integer) Dim pRubberBand As IRubberBand = New RubberPolygonClass End Sub - You will get an error under rubber band and that is because the library that this class is located in is not imported. Simply hover over the error and import the library; in this case, it is Esri.ArcGIS.Display, as illustrated in the following screenshot:

- We now have to call the TrackNew method on the pRubberband object that will allow us to draw. This requires two pieces of parameters. First, the screen on which you are drawing and the symbol you are drawing with, which have the color, size, and so on. By now we are familiar with how we can get these objects. The symbol needs to be of type FillShapeSymbol since we are dealing with polygons. We will go with a simple black symbol for starters. Write the following code:
Public Overrides Sub OnMouseDown(ByVal Button As Integer, ByVal Shift As Integer, ByVal X As Integer, ByVal Y As Integer) Dim pDocument As IMxDocument = m_application.Document Dim pRubberBand As IRubberBand = New RubberPolygonClass Dim pFillSymbol As ISimpleFillSymbol = New SimpleFillSymbol Dim pPolygon as IGeometry=pRubberBand.TrackNew(pDocument.ActiveView.ScreenDisplay, pFillSymbol) End Sub - Build your solution. If it fails, make sure you have run the solution as administrator.
- Run yharnam.mxd.
- Click on the New Excavation tool to activate it, and then click on three different locations on the map. You will see that a polygon is forming as you click; double-click to finish drawing, as illustrated in the following screenshot:

- The polygon disappears when you finish drawing and the reason is that we didn’t actually persist the polygon into a feature or a graphic. As a start, we will draw the polygon on the screen and we will also change the color of the polygon to red. Write the following code to do so:
Public Overrides Sub OnMouseDown(ByVal Button As Integer, ByVal Shift As Integer, ByVal X As Integer, ByVal Y As Integer) Dim pDocument As IMxDocument = m_application.Document Dim pRubberBand As IRubberBand = New RubberPolygonClass Dim pFillSymbol As ISimpleFillSymbol = New SimpleFillSymbol Dim pColor As IColor = New RgbColor pColor.RGB = RGB(255, 0, 0) pFillSymbol.Color = pColor Dim pPolygon As IGeometry = pRubberBand.TrackNew(pDocument.ActiveView.ScreenDisplay, pFillSymbol) Dim pDisplay As IScreenDisplay = pDocument.ActiveView.ScreenDisplay pDisplay.StartDrawing(pDisplay.hDC, ESRI.ArcGIS.Display.esriScreenCache.esriNoScreenCache) pDisplay.SetSymbol(pFillSymbol) pDisplay.DrawPolygon(pPolygon) pDisplay.FinishDrawing() End Sub - Build your solution and run yharnam.mxd.
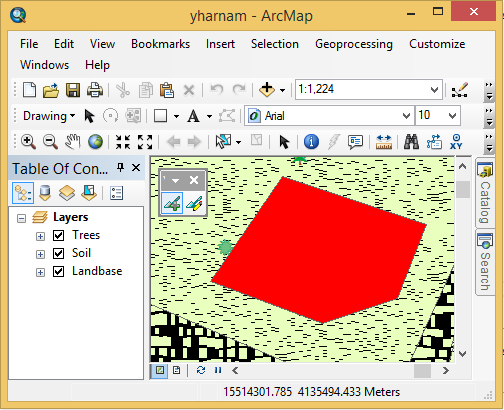
- Activate the New Excavation tool and draw an excavation; you should see a red polygon is displayed on the screen after you finish drawing, as shown in the following screenshot:
- Close ArcMap and choose not to save the changes.
Converting geometries into features
Now that we have learned how to draw a polygon, we will convert that polygon into an excavation feature. Follow these steps to do so:
- If necessary, open Visual Studio Express in administrator mode; we need to do this since our project is actually writing to the registry this time, so it needs administrator permissions. To do that, right-click on Visual Studio and click on Run as administrator.
- Go to File, then click on Open Project, browse to the Yharnam project from C:\ArcGISByExample\yharnam\Code, and click on Open.
- Double-click on tlNewExcavation.vb to edit the code.
- Remove the code that draws the polygon on the map. Your new code should look like the following:
Public Overrides Sub OnMouseDown(ByVal Button As Integer, ByVal Shift As Integer, ByVal X As Integer, ByVal Y As Integer) Dim pDocument As IMxDocument = m_application.Document Dim pRubberBand As IRubberBand = New RubberPolygonClass Dim pFillSymbol As ISimpleFillSymbol = New SimpleFillSymbol Dim pPolygon As IGeometry = pRubberBand.TrackNew(pDocument.ActiveView.ScreenDisplay, pFillSymbol) End Sub - First we need to open the Yharnam geodatabase located on C:\ArcGISByExample\yharnam\Data\Yharnam.gdb by establishing a workspace connection and then we will open the Excavation feature class. Write the following two functions in tlNewExcavation.vb, getYharnamWorkspace, and getExcavationFeatureclass:
Public Function getYharnamWorkspace() As IWorkspace Dim pWorkspaceFactory As IWorkspaceFactory = New FileGDBWorkspaceFactory Return pWorkspaceFactory.OpenFromFile("C:\ArcGISByExample\yharnam\Data\Yharnam.gdb", m_application.hWnd) End Function Public Function getExcavationFeatureClass(pWorkspace As IWorkspace) As IFeatureClass Dim pFWorkspace As IFeatureWorkspace = pWorkspace Return pFWorkspace.OpenFeatureClass("Excavation") End Function - To create the feature, we need first to start an editing session and a transaction, and wrap and code between the start and the end of the session. To use editing, we utilize the IWorkspaceEdit interface. Write the following code in the onMouseDown method:
Public Overrides Sub OnMouseDown(ByVal Button As Integer, ByVal Shift As Integer, ByVal X As Integer, ByVal Y As Integer) Dim pDocument As IMxDocument = m_application.Document Dim pRubberBand As IRubberBand = New RubberPolygonClass
Dim pFillSymbol As ISimpleFillSymbol = New SimpleFillSymbol Dim pPolygon As IGeometry = pRubberBand.TrackNew(pDocument.ActiveView.ScreenDisplay, pFillSymbol) Dim pWorkspaceEdit As IWorkspaceEdit = getYharnamWorkspace() pWorkspaceEdit.StartEditing(True) pWorkspaceEdit.StartEditOperation() pWorkspaceEdit.StopEditOperation() pWorkspaceEdit.StopEditing(True) End Sub - Now we will use the CreateFeature method in order to create a new feature and then populate it with the attributes. The only attribute that we care about now is the geometry or the shape. The shape is actually the polygon we just drew. Write the following code to create the feature:
Dim pWorkspaceEdit As IWorkspaceEdit = getYharnamWorkspace() pWorkspaceEdit.StartEditing(True) pWorkspaceEdit.StartEditOperation() Dim pExcavationFeatureClass As IFeatureClass = getExcavationFeatureClass(pWorkspaceEdit) Dim pFeature As IFeature = pExcavationFeatureClass.CreateFeature() pFeature.Shape = pPolygon pFeature.Store() pWorkspaceEdit.StopEditOperation() pWorkspaceEdit.StopEditing(True) - Build and run yharnam.mxd.
- Click on the New Excavation tool and draw a polygon on the map. Refresh the map. You will see that a new excavation feature is added to the map, as shown in the following screenshot:

- Close ArcMap and choose not to save any changes. Reopen yharnam.mxd and you will see that the features you created are still there because they are stored in the geodatabase.
- Close ArcMap and choose not to save any changes.
We have learned how to create features. Now we will learn how to edit excavations as well.
View and edit the excavation information
We have created some excavation features on the map; however, these are merely polygons and we need to extract useful information from them, and display and edit these excavations. For that, we will use the Excavation Editor tool to click on an excavation and display the Excavation Editor form with the excavation information. Then we will give the ability to edit this information. Follow these steps:
- If necessary, open Visual Studio Express in administrator mode; we need to do this since our project is actually writing to the registry this time, so it needs administrator permissions. To do that, right-click on Visual Studio and click on Run as administrator.
- Go to File, then click on Open Project, browse to the Yharnam project from C:\ArcGISByExample\yharnam\Code, and click on Open.
- Right-click on frmExcavationEditor.vb and click on View Code to view the class code.
- Add the ArcMapApplication property as shown in the following code so that we can set it from the tool, we will need this at a later stage:
Private _application As IApplication Public Property ArcMapApplication() As IApplication Get Return _application End Get Set(ByVal value As IApplication) _application = value End Set End Property - Add another method called PopulateExcavation that takes a feature. This method will populate the form fields with the information we get from the excavation feature. We will pass the feature from the Excavation Editor tool at a later stage:
Public Sub PopulateExcavation(pFeature As IFeature) End Sub - According to the following screenshot of the Excavation feature class from ArcCatalog, we can populate three fields from the excavation attributes, these are the design ID, the depth of excavation, and the object ID of the feature:

- Write the following code to populate the design ID, the depth, and the object ID. Note that we used the isDBNull function to check if there is any value stored in those fields. Note that we don’t have to do that check for the OBJECTID field since it should never be null:
Public Sub PopulateExcavation(pFeature As IFeature) Dim designID As Long = 0 Dim dDepth As Double = 0 If IsDBNull(pFeature.Value(pFeature.Fields.FindField("DESIGNID"))) = False Then designID = pFeature.Value(pFeature.Fields.FindField("DESIGNID")) End If If IsDBNull(pFeature.Value(pFeature.Fields.FindField("DEPTH"))) = False Then dDepth = pFeature.Value(pFeature.Fields.FindField("DEPTH")) End If txtDesignID.Text = designID txtExcavationDepth.Text = dDepth txtExcavationOID.Text= pFeature.OID End Sub - What left is the excavation area, which is a bit tricky. To do that, we need to get it from the Shape property of the feature by casting it to the IAreaarcobjects interface and use the area property as follows:
….. txtExcavationOID.Text = pFeature.OID Dim pArea As IArea = pFeature.Shape txtExcavationArea.Text = pArea.Area End Sub - Now our viewing capability is ready, we need to execute it. Double-click on tlExcavationEditor.vb in order to open the code.
- We will need the getYharnamWorkspace and getExcavationFeatureClass methods that are in tlNewExcavation.vb. Copy them in tlExcavationEditor.vb.
- In the onMouseDown event, write the following code to get the feature from the mouse location. This will convert the x, y mouse coordinate into a map point and then does a spatial query to find the excavation under this point. After that, we will basically call our excavation editor form and send it the feature to do the work as follows:
Public Overrides Sub OnMouseDown(ByVal Button As Integer, ByVal Shift As Integer, ByVal X As Integer, ByVal Y As Integer) 'TODO: Add tlExcavationEditor.OnMouseDown implementation Dim pMxdoc As IMxDocument = m_application.Document Dim pPoint As IPoint = pMxdoc.ActiveView.ScreenDisplay.DisplayTransformation.ToMapPoint(X, Y) Dim pSFilter As ISpatialFilter = New SpatialFilter pSFilter.Geometry = pPoint Dim pFeatureClass As IFeatureClass = getExcavationFeatureClass(getYharnamWorkspace()) Dim pFCursor As IFeatureCursor = pFeatureClass.Search(pSFilter, False) Dim pFeature As IFeature = pFCursor.NextFeature If pFeatureIs Nothing Then Return Dim pExcavationEditor As New frmExcavationEditor pExcavationEditor.ArcMapApplication = m_application pExcavationEditor.PopulateExcavation(pFeature) pExcavationEditor.Show() End Sub - Build and run yharnam.mxd.
- Click on the Excavation Editor tool and click on one of the excavations you drew before. You should see that the Excavation Editor form pops up with the excavation information; no design ID or depth is currently set, as you can see in the following screenshot:

- Close ArcMap and choose not to save any changes.
- We will do the final trick to edit the excavation; there is not much to edit here, only the depth. To do that, copy the getYharnamWorkspace and getExcavationFeatureClass methods that are in tlNewExcavation.vb. Copy them in frmExcavationEditor.vb. You will get an error in the m_application.hwnd, so replace it with _application.hwnd, which is the property we set.
- Right-click on frmExcavationEditor and select View Designer.
- Double-click on the Save button to generate the btnSave_Click method.
- The user will enter the new depth for the excavation in the txtExcavationDepthtextbox. We will use this value and store it in the feature. But before that, we need to retrieve that feature using the object ID, start editing, save the feature, and close the session. Write the following code to do so. Note that we have closed the form at the end of the code, so we can open it again to get the new value:
Private Sub btnSave_Click(sender As Object, e As EventArgs) Handles btnSave.Click Dim pWorkspaceEdit As IWorkspaceEdit = getYharnamWorkspace() Dim pFeatureClass As IFeatureClass = getExcavationFeatureClass(pWorkspaceEdit) Dim pFeature As IFeature = pFeatureClass.GetFeature(txtExcavationOID.Text) pWorkspaceEdit.StartEditing(True) pWorkspaceEdit.StartEditOperation() pFeature.Value(pFeature.Fields.FindField("DEPTH")) = txtExcavationDepth.Text pFeature.Store() pWorkspaceEdit.StopEditOperation() pWorkspaceEdit.StopEditing(True) Me.Close End Sub - Build and run yharnam.mxd.
- Click on the Excavation Editor tool and click on one of the excavations you drew before. Type a numeric depth value and click on Save; this will close the form. Use the Excavation Editor tool again to open back the excavation and check if your depth value has been stored successfully.
Summary
In this article, you started writing the excavation planning manager, code named Yharnam. In the first part of the article, you spent time learning to use the geodatabase editing and preparing the project. You then learned how to use the rubber band tool, which allows you to draw geometries on the map. Using this drawn geometry, you edited the workspace and created a new excavation feature with that geometry. You then learned how to view and edit the excavation feature with attributes.
Resources for Article:
Further resources on this subject:
- ArcGIS Spatial Analyst[article]
- Enterprise Geodatabase[article]
- Server Logs [article]


