Simple Notification Service is a managed web service that you, as an end user, can leverage to send messages to various subscribing endpoints. SNS works in a publisher–subscriber or producer and consumer model, where producers create and send messages to a particular topic, which is in turn consumed by one or more subscribers over a supported set of protocols. At the time of writing this book, SNS supports HTTP, HTTPS, email, push notifications in the form of SMS, as well as AWS Lambda and Amazon SQS, as the preferred modes of subscribers. In today's tutorial, we will learn about Amazon Simple Notification Service (SNS) and how to create your very own simple SNS topics:
SNS is a really simple and yet extremely useful service that you can use for a variety of purposes, the most common being pushing notifications or system alerts to cloud administrators whenever a particular event occurs. We have been using SNS throughout this book for this same purpose; however, there are many more features and use cases that SNS can be leveraged for. For example, you can use SNS to send out promotional emails or SMS to a large group of targeted audiences or even use it as a mobile push notification service where the messages are pushed directly to your Android or IOS applications.
With this in mind, let's quickly go ahead and create a simple SNS topic of our own:
- To do so, first log in to your AWS Management Console and, from the Filter option, filter out SNS service. Alternatively, you can also access the SNS dashboard by selecting https://console.aws.amazon.com/sns.
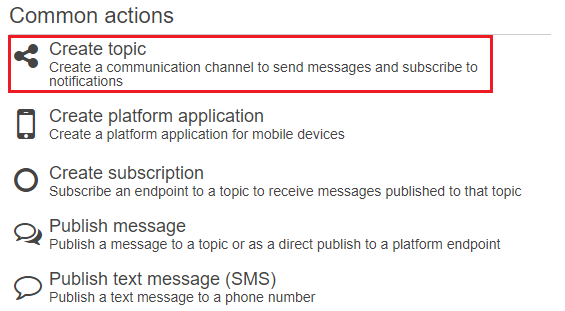
- If this is your first time with SNS, simply select the Get Started option to begin. Here, at the SNS dashboard, you can start off by selecting the Create topic option, as shown in the following screenshot:
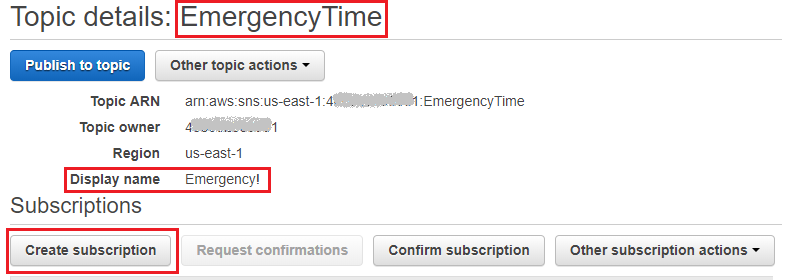
- Once selected, you will be prompted to provide a suitable Topic name and its corresponding Display name. Topics form the core functionality for SNS. You can use topics to send messages to a particular type of subscribing consumer. Remember, a single topic can be subscribed by more than one consumer. Once you have typed in the required fields, select the Create topic option to complete the process. That's it! Simple, isn't it?
- Having created your topic, you can now go ahead and associate it with one or more subscribers. To do so, first we need to create one or more subscriptions. Select the Create subscription option provided under the newly created topic, as shown in the following screenshot:
- Here, in the Create subscription dialog box, select a suitable Protocol that will subscribe to the newly created topic. In this case, I've selected Email as the Protocol. Next, provide a valid email address in the subsequent Endpoint field. The Endpoint field will vary based on the selected protocol. Once completed, click on the Create subscription button to complete the process.
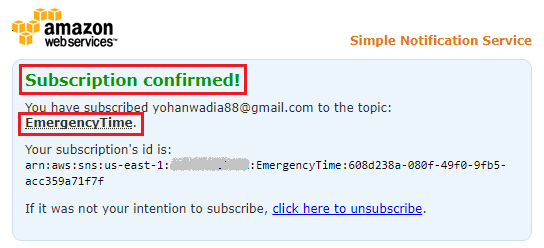
- With the subscription created, you will now have to validate the subscription. This can be performed by launching your email application and selecting the Confirm subscription link in the mail that you would have received.
- Once the subscription is confirmed, you will be redirected to a confirmation page where you can view the subscribed topic's name as well as the subscription ID, as shown in the following screenshot:
Unlock access to the largest independent learning library in Tech for FREE!
Get unlimited access to 7500+ expert-authored eBooks and video courses covering every tech area you can think of.
Renews at $19.99/month. Cancel anytime
- You can use the same process to create and assign multiple subscribers to the same topic. For example, select the Create subscription option, as performed earlier, and from the Protocol drop-down list, select SMS as the new protocol. Next, provide a valid phone number in the subsequent Endpoint field. The number can be prefixed by your country code, as shown in the following screenshot. Once completed, click on the Create subscription button to complete the process:
- With the subscriptions created successfully, you can now test the two by publishing a message to your topic. To do so, select the Publish to topic option from your topics page. Once a message is published here, SNS will attempt to deliver that message to each of its subscribing endpoints; in this case, to the email address as well as the phone number.
- Type in a suitable Subject name followed by the actual message that you wish to send. Note that if your character count exceeds 160 for an SMS, SNS will automatically send another SMS with the remainder of the character count. You can optionally switch the Message format between Raw and JSON to match your requirements. Once completed, select Publish Message.
- Check your email application once more for the published message. You should receive an mail, as shown in the following screenshot:
Similarly, you can create and associate one or more such subscriptions to each of the topics that you create.
We learned about creating simple Amazon SNS topics. You read an excerpt from the book AWS Administration - The Definitive Guide - Second Edition written by Yohan Wadia. This book will help you build a highly secure, fault-tolerant, and scalable Cloud environment.
Getting to know Amazon Web Services
AWS IoT Analytics: The easiest way to run analytics on IoT data
How to set up a Deep Learning System on Amazon Web Services

 United States
 Great Britain
 India
India
 Germany
 France
 Canada
 Russia
 Spain
Spain
 Brazil
 Australia
 Singapore
 Canary Islands
 Hungary
 Ukraine
 Luxembourg
 Estonia
 Lithuania
 South Korea
 Turkey
 Switzerland
 Colombia
 Taiwan
 Chile
Chile
 Norway
 Ecuador
 Indonesia
 New Zealand
 Cyprus
 Denmark
 Finland
 Poland
 Malta
Malta
 Czechia
 Austria
 Sweden
 Italy
Italy
 Egypt
Egypt
 Belgium
 Portugal
 Slovenia
 Ireland
 Romania
 Greece
 Argentina
 Netherlands
 Bulgaria
 Latvia
 South Africa
 Malaysia
 Japan
Japan
 Slovakia
 Philippines
 Mexico
 Thailand


