 |
79 recipes to harness the power of Alice 3 for teaching students to build attractive and interactive 3D scenes and videos
|
(For more resources related to this subject, see here.)
Introduction
You need to organize the statements that request the different actors to perform actions. Alice 3 provides blocks that allow us to configure the order in which many statements should be executed. This article provides many tasks that will allow us to start controlling the behavior of animations with many actors performing different actions.
We will execute many actions with a specific order. We will use counters to run one or more statements many times. We will execute actions for many actors of the same class. We will run code for different actors at the same time to render complex animations.
Performing many statements in order
In this recipe, we will execute many statements for an actor with a specific order. We will add eight statements to control a sequence of movements for a bee.
Getting ready
We have to be working on a project with at least one actor. Therefore, we will create a new project and set a simple scene with a few actors.
- Select File | New... in the main menu to start a new project. A dialog box will display the six predefined templates with their thumbnail previews in the Templates tab.
- Select GrassyProject.a3p as the desired template for the new project and click on OK. Alice will display a grassy ground with a light blue sky.
- Click on Edit Scene, at the lower right corner of the scene preview. Alice will show a bigger preview of the scene and will display the Model Gallery at the bottom.
- Add an instance of the Bee class to the scene, and enter bee for the name of this new instance. First, Alice will create the MyBee class to extend Bee. Then, Alice will create an instance of MyBee named bee. Follow the steps explained in the Creating a new instance from a class in a gallery recipe, in the article, Alice 3: Making Simple Animations with Actors.
- Add an instance of the PurpleFlower class, and enter purpleFlower for the name of this new instance.
- Add another instance of the PurpleFlower class, and enter purpleFlower2 for the name of this new instance. The additional flower may be placed on top of the previously added flower.
- Add an instance of the ForestSky class to the scene.
- Place the bee and the two flowers as shown in the next screenshot:

How to do it...
Follow these steps to execute many statements for the bee with a specific order:
- Open an existing project with one actor added to the scene.
- Click on Edit Code, at the lower-right corner of the big scene preview. Alice will show a smaller preview of the scene and will display the Code Editor on a panel located at the right-hand side of the main window.
- Click on the class: MyScene drop-down list and the list of classes that are part of the scene will appear.
- Select MyScene | Edit run.
- Select the desired actor in the instance drop-down list located at the left-hand side of the main window, below the small scene preview. For example, you can select bee. Make sure that part: none is selected in the drop-down list located at the right-hand side of the chosen instance.
- Activate the Procedures tab. Alice will display the procedures for the previously selected actor.
- Drag the pointAt procedure and drop it in the drop statement here area located below the do in order label, inside the run tab. Because the instance name is bee, the pointAt statement contains the this.bee and pointAt labels followed by the target parameter and its question marks ???. A list with all the possible instances to pass to the first parameter will appear.
- Click on this.purpleFlower. The following code will be displayed, as shown in the next screenshot:
this.bee.pointAt(this.purpleFlower)

- Drag the moveTo procedure and drop it below the previously dropped procedure call. A list with all the possible instances to pass to the first parameter will appear. Select this.purpleFlower getPart ??? and then IStemMiddle_IStemTop_IHPistil_IHPetal01, as shown in the following screenshot:

- Click on the more... drop-down menu button that appears at the right-hand side of the recently dropped statement. Click on duration and then on 1.0 in the cascade menu that appears.
- Click on the new more... drop-down menu that appears. Click on style and then on BEGIN_AND_END_ABRUPTLY. The following code will be displayed as the second statement:
this.bee.moveTo(this.purpleFlower.getPart(IStemMiddle_IStemTop_
IHPistil_IHPetal01), duration: 1.0, style: BEGIN_AND_END_ABRUPTLY)
- Drag the delay procedure and drop it below the previously dropped procedure call. A list with all the predefined direction values to pass to the first parameter will appear. Select 2.0 and the following code will be displayed as the third statement:
this.bee.delay(2.0)
- Drag the moveAwayFrom procedure and drop it below the previously dropped procedure call. Select 0.25 for the first parameter. Click on the more... drop-down menu button that appears and select this.purpleFlower getPart ??? and then IStemMiddle_IStemTop_IHPistil_IHPetal01. Click on the additional more... drop-down menu button, on duration and then on 1.0 in the cascade menu that appears. Click on the new more... drop-down menu that appears, on style and then on BEGIN_ABRUPTLY_AND_END_GENTLY. The following code will be displayed as the fourth statement:
this.bee.moveAwayFrom(0.25, this.purpleFlower.getPart(IStemMiddle_
IStemTop_IHPistil_IHPetal01), duration: 1.0, style: BEGIN_
ABRUPTLY_AND_END_GENTLY)
- Drag the turnToFace procedure and drop it below the previously dropped procedure call. Select this.purpleFlower2 getPart ??? and then IStemMiddle_IStemTop_IHPistil_IHPetal05. Click on the additional more... drop-down menu button, on duration and then on 1.0 in the cascade menu that appears. Click on the new more... drop-down menu that appears, on style and then on BEGIN_ABRUPTLY_AND_END_GENTLY. The following code will be displayed as the fifth statement:
this.bee.turnToFace(this.purpleFlower2.getPart(IStemMiddle_
IStemTop_IHPistil_IHPetal05), duration: 1.0, style: BEGIN_
ABRUPTLY_AND_END_GENTLY)
- Drag the moveTo procedure and drop it below the previously dropped procedure call. Select this.purpleFlower2 getPart ??? and then IStemMiddle_IStemTop_IHPistil_IHPetal05. Click on the additional more... drop-down menu button, on duration and then on 1.0 in the cascade menu that appears. Click on the new more... drop-down menu that appears, on style and then on BEGIN_AND_END_ABRUPTLY. The following code will be displayed as the sixth statement:
this.bee.moveTo(this.purpleFlower2.getPart(IStemMiddle_IStemTop_
IHPistil_IHPetal05), duration: 1.0, style: BEGIN_AND_END_GENTLY)
- Drag the delay procedure and drop it below the previously dropped procedure call. A list with all the predefined direction values to pass to the first parameter will appear. Select 2.0 and the following code will be displayed as the seventh statement:
this.bee.delay(2.0)
- Drag the move procedure and drop it below the previously dropped procedure call. Select FORWARD and then 10.0. Click on the more... drop-down menu button, on duration and then on 10.0 in the cascade menu that appears. Click on the additional more... drop-down menu that appears, on asSeenBy and then on this.bee. Click on the new more... drop-down menu that appears, on style and then on BEGIN_AND_END_ABRUPTLY. The following code will be displayed as the eighth and final statement. The following screenshot shows the eight statements that compose the run procedure:
this.bee.move(FORWARD, duration: 10.0, asSeenBy: this.bee, style:
BEGIN_ABRUPTLY_AND_END_GENTLY)
(Move the mouse over the image to enlarge it.)

- Select File | Save as... from Alice's main menu and give a new name to the project. Then you can make changes to the project according to your needs.
How it works...
When we run a project, Alice creates the scene instance, creates and initializes all the instances that compose the scene, and finally executes the run method defined in the MyScene class. By default, the statements we add to a procedure are included within the do in order block. We added eight statements to the do in order block, and therefore Alice will begin with the first statement:
Unlock access to the largest independent learning library in Tech for FREE!
Get unlimited access to 7500+ expert-authored eBooks and video courses covering every tech area you can think of.
Renews at $19.99/month. Cancel anytime
this.bee.pointAt(this.purpleFlower)
Once the bee finishes executing the pointAt procedure, the execution flow goes on with the next statement specified in the do in order block. Thus, Alice will execute the following second statement after the first one finishes:
this.bee.moveTo(this.purpleFlower.getPart(IStemMiddle_IStemTop_
IHPistil_IHPetal01), duration: 1.0, style: BEGIN_AND_END_ABRUPTLY)
The do in order statement encapsulates a group of statements with a synchronous execution. Thus, when we add many statements within a do in order block, these statements will run one after the other. Each statement requires its previous statement to finish before starting its execution, and therefore we can use the do in order block to group statements that must run with a specific order.
The moveTo procedure moves the 3D model that represents the actor until it reaches the position of the other actor. The value for the target parameter is the instance of the other actor. We want the bee to move to one of the petals of the first flower, purpleFlower, and therefore we passed this value to the target parameter:
this.purpleFlower.getPart(IStemMiddle_IStemTop_IHPistil_IHPetal01)
We called the getPart function for purpleFlower with IStemMiddle_IStemTop_IHPistil_IHPetal01 as the name of the part to return. This function allows us to retrieve one petal from the flower as an instance. We used the resulting instance as the target parameter for the moveTo procedure and we could make the bee move to the specific petal of the flower.
Once the bee finishes executing the moveTo procedure, the execution flow goes on with the next statement specified in the do in order block. Thus, Alice will execute the following third statement after the second one finishes:
this.bee.delay(2.0)
The delay procedure puts the actor to sleep in its current position for the specified number of seconds. The next statement specified in the do in order block will run after waiting for two seconds.
The statements added to the run procedure will perform the following visible actions in the specified order:
- Point the bee at purpleFlower.
- Begin and end abruptly a movement for the bee from its position to the petal named IStemMiddle_IStemTop_IHPistil_IHPetal01 of purpleFlower. The total duration for the animation must be 1 second.
- Make the bee stay in its position for 2 seconds.
- Move the bee away 0.25 units from the position of the petal named IStemMiddle_IStemTop_IHPistil_IHPetal01 of purpleFlower. Begin the movement abruptly but end it gently. The total duration for the animation must be 1 second.
- Turn the bee to the face of the petal named IStemMiddle_IStemTop_IHPistil_IHPetal05 of purpleFlower2. Begin the movement abruptly but end it gently. The total duration for the animation must be 1 second.
- Begin and end abruptly a movement for the bee from its position to the petal named IStemMiddle_IStemTop_IHPistil_IHPetal05 of purpleFlower2. The total duration for the animation must be 1 second.
- Make the bee stay in its position for 2 seconds.
- Move the bee forward 10 units. Begin the movement abruptly but end it gently. The total duration for the animation must be 10 seconds. The bee will disappear from the scene.
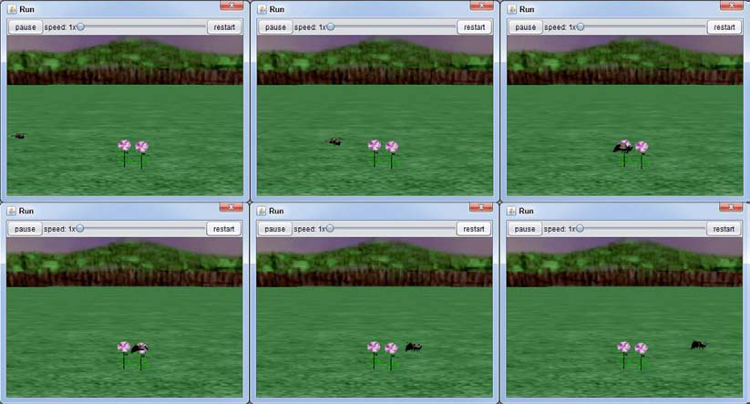
The following screenshot shows six screenshots of the rendered frames:
(Move the mouse over the image to enlarge it.)
There's more...
When you work with the Alice code editor, you can temporarily disable statements. Alice doesn't execute the disabled statements. However, you can enable them again later. It is useful to disable one or more statements when you want to test the results of running the project without these statements, but you might want to enable them back to compare the results.
To disable a statement, right-click on it and deactivate the IsEnabled option, as shown in the following screenshot:

The disabled statements will appear with diagonal lines, as shown in the next screenshot, and won't be considered at run-time:

To enable a disabled statement, right-click on it and activate the IsEnabled option.

 United States
 Great Britain
 India
India
 Germany
 France
 Canada
 Russia
 Spain
Spain
 Brazil
 Australia
 Singapore
 Canary Islands
 Hungary
 Ukraine
 Luxembourg
 Estonia
 Lithuania
 South Korea
 Turkey
 Switzerland
 Colombia
 Taiwan
 Chile
Chile
 Norway
 Ecuador
 Indonesia
 New Zealand
 Cyprus
 Denmark
 Finland
 Poland
 Malta
Malta
 Czechia
 Austria
 Sweden
 Italy
Italy
 Egypt
Egypt
 Belgium
 Portugal
 Slovenia
 Ireland
 Romania
 Greece
 Argentina
 Netherlands
 Bulgaria
 Latvia
 South Africa
 Malaysia
 Japan
Japan
 Slovakia
 Philippines
 Mexico
 Thailand


