


Artificial Intelligence (AI) is a rich and complex topic. At first glance, it can seem intimidating. The uses for it are diverse, ranging from robotics to statistics and to (more relevantly for us) entertainment, more specifically, video games. In this article, we will get to know the fundamentals of Artificial intelligence and why it is important for game developers.
We have also covered a quick background on AI in academics, traditional domain, and game-specific applications. We will also look at the following:
- Application and implementation of AI in games is different from other domains
- Special requirements for AI in games
- Basic AI patterns used in games
This article is an excerpt from a book written by Ray Barrera, Aung Sithu Kyaw, and Thet Naing Swe titled Unity 2017 Game AI Programming – Third Edition. This book would help you to create fun and unbelievable AI entities in your games with A*, Fuzzy logic and NavMesh with Unity 2017.
Leveling up your game with AI
AI in games dates back all the way to the earliest games, even as far back as Namco’s arcade hit Pac-Man. The AI was rudimentary at best, but even in Pac-Man, each of the enemies—Blinky, Pinky, Inky, and Clyde—had unique behaviors that challenged the player in different ways. Learning those behaviors and reacting to them adds a huge amount of depth to the game and keeps players coming back, even after over 30 years since its release.
It’s the job of a good game designer to make the game challenging enough to be engaging, but not so difficult that a player can never win. To this end, AI is a fantastic tool that can help abstract the patterns that entities in games follow to make them seem more organic, alive, and real. Much like an animator through each frame or an artist through his brush, a designer or programmer can breathe life into their creations via clever use of the AI techniques covered in this article.
The role of AI in games is to make games fun by providing challenging entities to compete with, and interesting non-player characters (NPCs) that behave realistically inside the game world. The objective here is not to replicate the whole thought process of humans or animals, but merely to sell the illusion of life and make NPCs seem intelligent by having them react to the changing situations inside the game world in a way that makes sense to the player.
Technology allows us to design and create intricate patterns and behaviors, but we’re not yet at the point where AI in games even begins to resemble true human behavior. While smaller, more powerful chips, buckets of memory, and even distributed computing have given programmers a much higher computational ceiling to dedicate to AI, at the end of the day, resources are still shared between other operations such as graphics rendering, physics simulation, audio processing, animation, and others, all in real time. All these systems have to play nice with each other to achieve a steady frame rate throughout the game. Like all the other disciplines in game development, optimizing AI calculations remains a huge challenge for AI developers.
Using AI in Unity
In this section, we’ll walk you through the AI techniques being used in different types of games. Unity is a flexible engine that provides a number of approaches to implement AI patterns. Some are ready to go out of the box, so to speak, while others we’ll have to build from scratch.
We’ll focus on implementing the most essential AI patterns within Unity so that you can get your game’s AI entities up and running quickly. Learning and implementing the techniques within this article will serve as a fundamental first step in the vast world of AI. Many of the concepts we will cover in this article, such as pathfinding and Navigation Meshes, are interconnected and build on top of one another. For this reason, it’s important to get the fundamentals right first before digging into the high-level APIs that Unity provides.
Defining the agent
Before jumping into our first technique, we should be clear on a key term—the agent. An agent, as it relates to AI, is our artificially intelligent entity. When we talk about our AI, we’re not specifically referring to a character, but an entity that displays complex behavior patterns, which we can refer to as non-random, or in other words, intelligent. This entity can be a character, creature, vehicle, or anything else. The agent is the autonomous entity, executing the patterns and behaviors we’ll be covering. With that out of the way, let’s jump in.
Finite State Machines
Finite State Machines (FSM) can be considered one of the simplest AI models, and they are commonly used in games. A state machine basically consists of a set number of states that are connected in a graph by the transitions between them. A game entity starts with an initial state and then looks out for the events and rules that will trigger a transition to another state. A game entity can only be in exactly one state at any given time.
For example, let’s take a look at an AI guard character in a typical shooting game. Its states could be as simple as patrolling, chasing, and shooting:
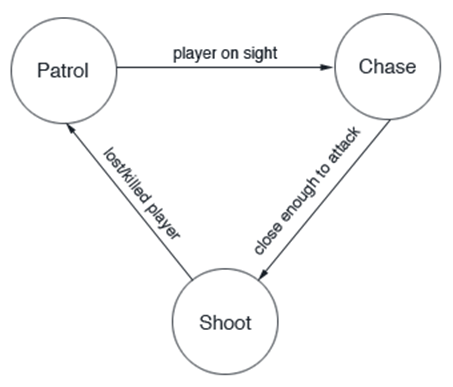
There are basically four components in a simple FSM:
- States: This component defines a set of distinct states that a game entity or an NPC can choose from (patrol, chase, and shoot)
- Transitions: This component defines relations between different states
- Rules: This component is used to trigger a state transition (player on sight, close enough to attack, and lost/killed player)
- Events: This is the component that will trigger to check the rules (guard’s visible area, distance to the player, and so on)
FSMs are commonly used go-to AI patterns in game development because they are relatively easy to implement, visualize, and understand. Using simple if/else statements or switch statements, we can easily implement an FSM. It can get messy as we start to have more states and more transitions.
Seeing the world through our agent’s eyes
In order to make our AI convincing, our agent needs to be able to respond to the events around him, the environment, the player, and even other agents. Much like real living organisms, our agent can rely on sight, sound, and other “physical” stimuli. However, we have the advantage of being able to access much more data within our game than a real organism can from their surroundings, such as the player’s location, regardless of whether or not they are in the vicinity, their inventory, the location of items around the world, and any variable you chose to expose to that agent in your code:

In the preceding diagram, our agent’s field of vision is represented by the cone in front of it, and its hearing range is represented by the grey circle surrounding it:
Vision, sound, and other senses can be thought of, at their most essential level, as data. Vision is just light particles, sound is just vibrations, and so on. While we don’t need to replicate the complexity of a constant stream of light particles bouncing around and entering our agent’s eyes, we can still model the data in a way that produces believable results.
As you might imagine, we can similarly model other sensory systems, and not just the ones used for biological beings such as sight, sound, or smell, but even digital and mechanical systems that can be used by enemy robots or towers, for example sonar and radar.
If you’ve ever played Metal Gear Solid, then you’ve definitely seen these concepts in action—an enemy’s field of vision is denoted on the player’s mini map as cone-shaped fields of view. Enter the cone and an exclamation mark appears over the enemy’s head, followed by an unmistakable chime, letting the player know that they’ve been spotted.
Path following and steering
Sometimes, we want our AI characters to roam around in the game world, following a roughly-guided or thoroughly-defined path. For example, in a racing game, the AI opponents need to navigate the road. In an RTS game, your units need to be able to get from wherever they are to the location you tell them navigating through the terrain and around each other.
To appear intelligent, our agents need to be able to determine where they are going, and if they can reach that point, they should be able to route the most efficient path and modify that path if an obstacle appears as they navigate. Even path following and steering can be represented via a finite state machine. You will then see how these systems begin to tie in.
In this article, we will cover the primary methods of pathfinding and navigation, starting with our own implementation of an A* Pathfinding System, followed by an overview of Unity’s built-in Navigation Mesh (NavMesh) feature.
Dijkstra’s algorithm
While perhaps not quite as popular as A* Pathfinding (which we will cover next), it’s crucial to understand Dijkstra’s algorithm, as it lays the foundation for other similar approaches to finding the shortest path between two nodes in a graph. The algorithm was published by Edsger W. Dijkstra in 1959. Dijkstra was a computer scientist, and though he may be best known for his namesake algorithm, he also had a hand in developing other important computing concepts, such as the semaphore. It might be fair to say Dijkstra probably didn’t have StarCraft in mind when developing his algorithm, but the concepts translate beautifully to game AI programming and remain relevant to this day.
So what does the algorithm actually do? In a nutshell, it computes the shortest path between two nodes along a graph by assigning a value to each connected node based on distance. The starting node is given a value of zero. As the algorithm traverses through a list of connected nodes that have not been visited, it calculates the distance to it and assigns the value to that node. If the node had already been assigned a value in a prior iteration of the loop, it keeps the smallest value. The algorithm then selects the connected node with the smallest distance value, and marks the previously selected node as visited, so it will no longer be considered. The process repeats until all nodes have been visited. With this information, you can then calculate the shortest path.
Need help wrapping your head around Dijkstra’s algorithm? The University of San Francisco has created a handy visualization tool: ;https://www.cs.usfca.edu/~galles/visualization/Dijkstra.html.
While Dijkstra’s algorithm is perfectly capable, variants of it have been developed that can solve the problem more efficiently. A* is one such algorithm, and it’s one of the most widely used pathfinding algorithms in games, due to its speed advantage over Dijkstra’s original version.
Using A* Pathfinding
There are many games in which you can find monsters or enemies that follow the player, or go to a particular point while avoiding obstacles. For example, let’s take a typical RTS game. You can select a group of units and click on a location you want them to move to, or click on the enemy units to attack them. Your units then need to find a way to reach the goal without colliding with the obstacles or avoid them as intelligently as possible. The enemy units also need to be able to do the same. Obstacles could be different for different units, terrain, or other in-game entities.
For example, an air force unit might be able to pass over a mountain, while the ground or artillery units need to find a way around it. A* (pronounced “A star”) is a pathfinding algorithm that is widely used in games because of its performance and accuracy. Let’s take a look at an example to see how it works. Let’s say we want our unit to move from point A to point B, but there’s a wall in the way and it can’t go straight towards the target. So, it needs to find a way to get to point B while avoiding the wall. The following figure illustrates this scenario:

In order to find the path from point A to point B, we need to know more about the map, such as the position of the obstacles. To do this, we can split our whole map into small tiles, representing the whole map in a grid format. The tiles can also be other shapes such as hexagons and triangles. Representing the whole map in a grid makes the search area more simplified, and this is an important step in pathfinding. We can now reference our map in a small 2D array:

Once our map is represented by a set of tiles, we can start searching for the best path to reach the target by calculating the movement score of each tile adjacent to the starting tile, which is a tile on the map not occupied by an obstacle, and then choosing the tile with the lowest cost.

A* is an important pattern to know when it comes to pathfinding, but Unity also gives us a couple of features right out of the box, such as automatic Navigation Mesh generation and the NavMesh agent. These features make implementing pathfinding in your games a walk in the park (no pun intended). Whether you choose to implement your own A* solution or simply go with Unity’s built-in NavMesh feature will depend on your project’s needs. Each option has its own pros and cons, but ultimately, knowing about both will allow you to make the best possible choice. With that said, let’s have a quick look at NavMesh.
IDA* Pathfinding
IDA* star stands for iterative deepening A*. It is a depth-first permutation of A* with a lower overall memory cost, but is generally considered costlier in terms of time. Whereas A* keeps multiple nodes in memory at a time, IDA* does not since it is a depth-first search. For this reason, IDA* may visit the same node multiple times, leading to a higher time cost. Either solution will give you the shortest path between two nodes.
In instances where the graph is too big for A* in terms of memory, IDA* is preferable, but it is generally accepted that A* is good enough for most use cases in games.
Using Navigation Mesh
Now that we’ve taken a brief look at A*, let’s look at some possible scenarios where we might find NavMesh a fitting approach to calculate the grid. One thing that you might notice is that using a simple grid in A* requires quite a number of computations to get a path that is the shortest to the target and, at the same time, avoids the obstacles. So, to make it cheaper and easier for AI characters to find a path, people came up with the idea of using waypoints as a guide to move AI characters from the start point to the target point. Let’s say we want to move our AI character from point A to point B and we’ve set up three waypoints, as shown in the following figure:

All we have to do now is to pick up the nearest waypoint and then follow its connected node leading to the target waypoint. Most games use waypoints for pathfinding because they are simple and quite effective in terms of using less computation resources. However, they do have some issues. What if we want to update the obstacles in our map? We’ll also have to place waypoints for the updated map again, as shown in the following figure:

Having to manually alter waypoints every time the layout of your level changes can be cumbersome and very time-consuming. In addition, following each node to the target can mean that the AI character moves in a series of straight lines from node to node. Look at the preceding figures; it’s quite likely that the AI character will collide with the wall where the path is close to the wall. If that happens, our AI will keep trying to go through the wall to reach the next target, but it won’t be able to and will get stuck there.
Even though we can smooth out the path by transforming it to a spline and doing some adjustments to avoid such obstacles, the problem is that the waypoints don’t give us any information about the environment, other than the spline being connected between the two nodes. What if our smoothed and adjusted path passes the edge of a cliff or bridge? The new path might not be a safe path anymore. So, for our AI entities to be able to effectively traverse the whole level, we’re going to need a tremendous number of waypoints, which will be really hard to implement and manage.
This is a situation where a NavMesh makes the most sense. NavMesh is another graph structure that can be used to represent our world, similar to the way we did with our square tile-based grid or waypoints graph, as shown in the following diagram:

A Navigation Mesh uses convex polygons to represent the areas in the map that an AI entity can travel to. The most important benefit of using a Navigation Mesh is that it gives a lot more information about the environment than a waypoint system. Now we can adjust our path safely because we know the safe region in which our AI entities can travel. Another advantage of using a Navigation Mesh is that we can use the same mesh for different types of AI entities.
Different AI entities can have different properties such as size, speed, and movement abilities. A set of waypoints is tailored for humans; AI may not work nicely for flying creatures or AI-controlled vehicles. These might need different sets of waypoints. Using a Navigation Mesh can save a lot of time in such cases.
Generating a Navigation Mesh programmatically based on a scene can be a somewhat complicated process. Fortunately, Unity 3.5 introduced a built-in Navigation Mesh generator as a pro-only feature, but is now included for free from the Unity 5 personal edition onwards. Unity’s implementation provides a lot of additional functionality out of the box. Not just the generation of the NavMesh itself, but agent collision and pathfinding on the generated graph (via A*, of course) as well.
Flocking and crowd dynamics
In nature, we can observe what we refer to as flocking behavior in several species. Flocking simply refers to a group moving in unison. Schools of fish, flocks of sheep, and cicada swarms are fantastic examples of this behavior. Modeling this behavior using manual means, such as animation, can be very time-consuming and is not very dynamic.
Similarly, crowds of humans, be it on foot or in vehicles, can be modeled by representing the entire crowd as an entity rather than trying to model each individual as its own agent. Each individual in the group only really needs to know where the group is heading and what their nearest neighbor is up to in order to function as part of the system.
Behavior trees
The behavior tree is another pattern used to represent and control the logic behind AI agents. Behavior trees have become popular for applications in AAA games such as Halo and Spore. Previously, we briefly covered FSMs. They provide a very simple yet efficient way to define the possible behaviors of an agent, based on the different states and transitions between them.
However, FSMs are considered difficult to scale as they can get unwieldy fairly quickly and require a fair amount of manual setup. We need to add many states and hardwire many transitions in order to support all the scenarios we want our agent to consider. So, we need a more scalable approach when dealing with large problems. This is where behavior trees come in.
Behavior trees are a collection of nodes organized in a hierarchical order, in which nodes are connected to parents rather than states connected to each other, resembling branches on a tree, hence the name.
The basic elements of behavior trees are task nodes, whereas states are the main elements for FSMs. There are a few different tasks such as Sequence, Selector, and Parallel Decorator. It can be a bit daunting to track what they all do. The best way to understand this is to look at an example. Let’s break the following transitions and states down into tasks, as shown in the following figure:

Let’s look at a Selector task for this behavior tree. Selector tasks are represented by a circle with a question mark inside. The selector will evaluate each child in order, from left to right. First, it’ll choose to attack the player; if the Attack task returns a success, the Selector task is done and will go back to the parent node, if there is one. If the Attack task fails, it’ll try the Chase task. If the Chase task fails, it’ll try the Patrol task. The following figure shows the basic structure of this tree concept:

Test is one of the tasks in the behavior tree. The following diagram shows the use of Sequence tasks, denoted by a rectangle with an arrow inside it. The root selector may choose the first Sequence action. This Sequence action’s first task is to check whether the player character is close enough to attack. If this task succeeds, it’ll proceed with the next task, which is to attack the player.
If the Attack task also returns successfully, the whole sequence will return as a success, and the selector will be done with this behavior and will not continue with other Sequence tasks. If the proximity check task fails, the Sequence action will not proceed to the Attack task, and will return a failed status to the parent selector task. Then the selector will choose the next task in the sequence, Lost or Killed Player? The following figure demonstrates this sequence:

The other two common components are parallel tasks and decorators. A parallel task will execute all of its child tasks at the same time, while the Sequence and Selector tasks only execute their child tasks one by one. Decorator is another type of task that has only one child. It can change the behavior of its own child’s tasks including whether to run its child’s task or not, how many times it should run, and so on.
Thinking with fuzzy logic
Finally, we arrive at fuzzy logic. Put simply, fuzzy logic refers to approximating outcomes as opposed to arriving at binary conclusions. We can use fuzzy logic and reasoning to add yet another layer of authenticity to our AI.
Let’s use a generic bad guy soldier in a first person shooter as our agent to illustrate this basic concept. Whether we are using a finite state machine or a behavior tree, our agent needs to make decisions. Should I move to state x, y, or z? Will this task return true or false? Without fuzzy logic, we’d look at a binary value (true or false, or 0 or 1) to determine the answers to those questions.
For example, can our soldier see the player? That’s a yes/no binary condition. However, if we abstract the decision-making process even further, we can make our soldier behave in much more interesting ways. Once we’ve determined that our soldier can see the player, the soldier can then “ask” itself whether it has enough ammo to kill the player, or enough health to survive being shot at, or whether there are other allies around it to assist in taking the player down. Suddenly, our AI becomes much more interesting, unpredictable, and more believable.
This added layer of decision making is achieved by using fuzzy logic, which in the simplest terms, boils down to seemingly arbitrary or vague terminology that our wonderfully complex brains can easily assign meaning to, such as “hot” versus “warm” or “cool” versus “cold,” converting this to a set of values that a computer can easily understand.
Game AI and academic AI have different objectives. Academic AI researchers try to solve real-world problems and prove a theory without much limitation in terms of resources. Game AI focuses on building NPCs within limited resources that seem to be intelligent to the player. The objective of AI in games is to provide a challenging opponent that makes the game more fun to play.
To summarize, we learned briefly about the different AI techniques that are widely used in games such as FSMs, sensor and input systems, flocking and crowd behaviors, path following and steering behaviors etc.
If you enjoyed this excerpt, check out this book Unity 2017 Game AI Programming – Third Edition, to explore brand-new features in Unity 2017 for easier Artificial Intelligence implementation in your games.
Read Next:
How to create non-player Characters (NPC) with Unity 2018


")