In this article by Fabrizio Soppelsa and Chanwit Kaewkasi, the author of Native Docker Clustering with Swarm we're now going to see how to administer a running Swarm cluster. The topics include scaling the cluster size (adding and removing nodes), updating the cluster and nodes information; handling the node status (promotion and demotion), troubleshooting, and graphical interfaces (UI).
(For more resources related to this topic, see here.)
Docker Swarm standalone
In standalone mode, cluster operations must be done directly inside the container 'swarm'.
We're not going to cover every option in detail. Swarm standalone is not deprecated yet, and is used around, the reason for which we're discussing it here, but it will be probably declared deprecated soon. It is obsoleted by the Swarm mode.
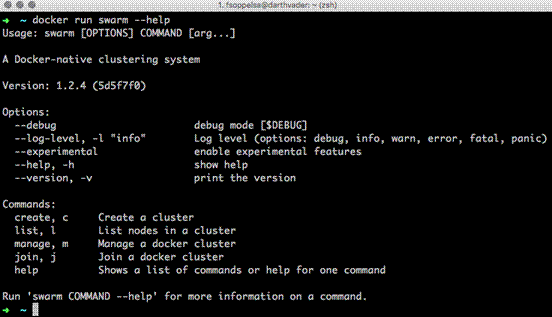
The commands to administer a Docker Swarm standalone cluster are:
Create (c): Typically, in production people use Consul or Etcd, so this command has no relevance for production
List (l): This shows the list of cluster nodes, basing on a iteration through Consul or Etcd, that is, the Consul or Etcd must be passed as an argument
Join (j): This joins a node on which the swarm container is running to the cluster. Here, still, a discovery mechanism must be passed at the command line
Manage (m): This is the core of the Standalone mode. By managing a cluster, here it's meant how to change some cluster properties, such as Filters, Schedulers, external CA URLs, and timeouts.
Docker Swarm mode: Scale a cluster size
Manually adding nodes
You can choose to create Docker hosts either way you prefer.
If you plan to use Docker Machine, you're probably going to hit Machine's limits very soon, and you will need to be very patient while even listing machines, having to wait several seconds for Machine to get and print all the information on the whole.
My favorite method is to use Machine with the generic driver, thus delegate to something else (that is, Ansible) the host provisioning (Operating System installation, network and security groups configurations, and so on), and later exploit Machine to install Docker the proper way:
Manually configure the cloud environment (security groups, networks, and so on)
Provision Ubuntu hosts with a third-party tool
Run Machine with the generic driver on these hosts with the only goal to properly install Docker
Then handle hosts with the tool in part 2, or even others.
If you use Machine's generic driver, it will select the latest stable Docker binaries. While we were writing this article, in order to use Docker 1.12, we had to overcome this by passing Machine a special option to get the latest, unstable, version of Docker:
For a production Swarm (mode), at the time you'll be reading this article, 1.12 will be already stable, so this trick will not be necessary anymore, unless you need to use some of the very latest Docker features.
Managers
The theory of HA suggests us that the number of managers must be odd, and equal or more than 3. This is to grant a quorum in high availability, that is the majority of nodes agree on what part of nodes are leading the operations.
If there were two managers, and one goes down and comes back, it's possible that both will think to be the leaders. That causes a logical crash in the cluster organization called split brain.
The more managers you have, the higher is the resistance ratio to failures. Refer to the following table:
Number of managers
Quorum (majority)
Maximum possible failures
3
2
1
5
3
2
7
4
3
9
5
4
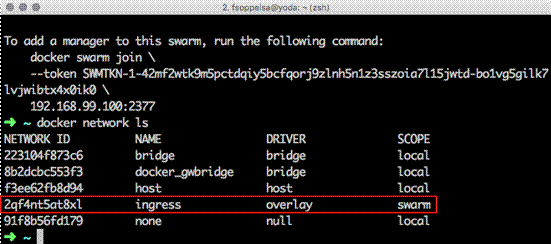
Also, in Swarm Mode, an overlay network is created automatically and associated as ingress traffic to the nodes. Its purpose is to be used with containers:
You will want that your containers be associated to an internal overlay (VxLAN meshed) network to communicate with each other, rather than using public or other networks. Thus, Swarm creates this already for you, ready to use.
We recommend, further, to geographically distribute managers. If an earthquake hits the datacenter where all managers are serving, the cluster would go down, wouldn't it? So, consider to place each manager or groups of managers into different physical locations. With the advent of cloud computing, that's really easy, you can spawn up each manager in a different AWS region, or even better have a manager running each on different providers on different regions, that is on AWS, on Digital Ocean, on Azure and also on private cloud, such as OpenStack.
IMAGE OF A WORLD WITH SCATTERED MANAGERS IN CONTINENTS?
Workers
You can add an arbitrary number of workers. This is the elastic part of the Swarm. It's totally fine to have 5, 15, 200, or 2,300 running workers. This is the easiest part to handle: You can add and remove workers with no burdens, at any time, at any size.
Scripted nodes addition
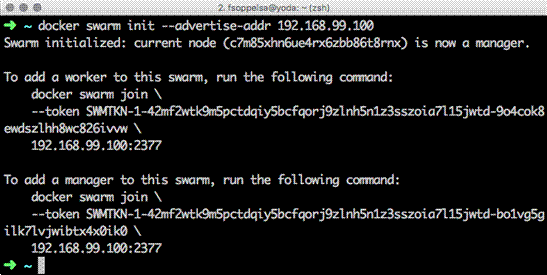
The very easiest way to add nodes, if you plan to not go over 100 nodes total, is to use basic scripting.
At the time of docker swarm init, just copy and paste the lines printed in the output.
Unlock access to the largest independent learning library in Tech for FREE!
Get unlimited access to 7500+ expert-authored eBooks and video courses covering every tech area you can think of.
Renews at $19.99/month. Cancel anytime
Then, create a certain bunch of workers:
#!/bin/bash
for i in `seq 0 9`; do
docker-machine create -d amazonec2 --engine-install-url https://test.docker.com --amazonec2-instance-type "t2.large" swarm-worker-$i
done
After that, it will be only necessary to go through the list of machines, ssh into them, and join the nodes:
#!/bin/bash
SWARMWORKER="swarm-worker-"
for machine in `docker-machine ls --format {{.Name}} | grep $SWARMWORKER`;
do
docker-machine ssh $machine sudo docker swarm join --token SWMTKN-1-5c3mlb7rqytm0nk795th0z0eocmcmt7i743ybsffad5e04yvxt-9m54q8xx8m1wa1g68im8srcme
172.31.10.250:2377
done
This script runs through the machines, and for each with a name starting with swarm-worker-, will ssh into, and join the node to the existing Swarm, to the leader manager, here 172.31.10.250.
Belt is another tool for massively provisioning Docker Engines. It is basically a SSH wrapper on steroids and it requires you to prepare provider-specific images as well as provisioning templates before go massively. In this section, we'll learn to do so:
You can compile Belt yourself by getting its source from Github.
# Set $GOPATH here
go get https://github.com/chanwit/belt
Currently, Belt supports the DigitalOcean driver. We can prepare our template for provisioning such as the following inside config.yml:
Then we can create a hundred nodes basically with a couple of commands.
First we create three boxes of 16 GB, namely, mg0, mg1, and mg2.
$ belt create 16gb mg[0:2]
NAME IPv4 MEMORY REGION IMAGE STATUS
mg2 104.236.231.136 16384 nyc3 Ubuntu docker-1.12-rc4 active
mg1 45.55.136.207 16384 nyc3 Ubuntu docker-1.12-rc4 active
mg0 45.55.145.205 16384 nyc3 Ubuntu docker-1.12-rc4 active
Then we can use the status command to wait for all nodes to become active:
$ belt status --wait active=3
STATUS #NODES NAMES
active 3 mg2, mg1, mg0
We'll do this again for 10 worker nodes.
$ belt create 512mb node[1:10]
$ belt status --wait active=13
STATUS #NODES NAMES
active 3 node10, node9, node8, node7
Use Ansible
You can alternatively use Ansible (as you like, and it's becoming very popular) to make things more repeatable. I (Fabrizio) created some Ansible modules to work directly with Machine and Swarm (Mode), compatible with Docker 1.12 (https://github.com/fsoppelsa/ansible-swarm). They require Ansible 2.2+, the very first version of Ansible compatible with binary modules.
You will need to compile the modules (written in Go), and then pass them to the ansible-playbook -M parameter.
git clone https://github.com/fsoppelsa/ansible-swarm
cd ansible-swarm/library
go build docker_machine_
go build docker_swarm_
cd ..
There are some examples of plays in playbooks/. Ansible's plays syntax is that easy to understand, that's even superfluous to explain in detail.
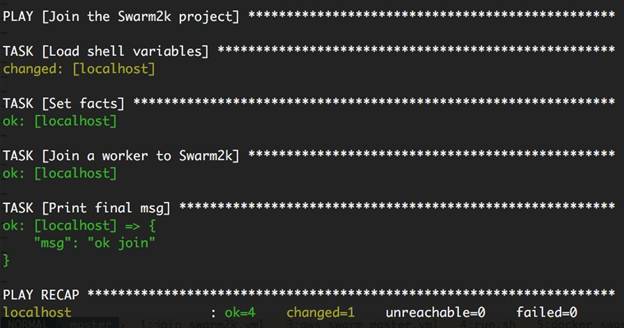
I used this play to join 10 workers to the Swarm2k experiment:
Basically, after loading some host facts from Machine, it invokes the docker_swarm module:
The operation is join.
The role of the new node is worker.
The new node joins "tcp://104.236.78.154:2377", that was the leader manager at the time of joining. This argument takes an array of managers, such as might be ["tcp://104.236.78.154:2377", "104.236.18.183:2377", "tcp://104.236.87.10:2377"].
It passes the password (secret).
It specifies some basic Engine connection facts. The module will connect to the dockerurl using the certificates at tlspath.
After having docker_swarm.go compiled in library/, adding workers to the swarm is as easy as:
#!/bin/bash
SWARMWORKER="swarm-worker-"
for machine in `docker-machine ls --format {{.Name}} | grep $SWARMWORKER`;
do
ansible-playbook -M library --extra-vars "{machine_name: $machine}" playbook.yaml
don
Cluster management
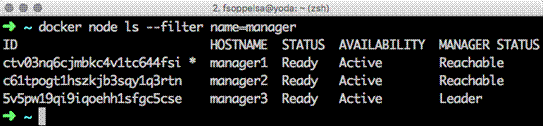
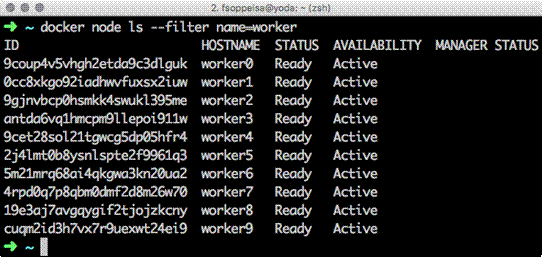
We now operate a little bit with this example, made of 3 managers and 10 workers.
You can reference the nodes by calling them either by their hostname (manager1) or by their ID (ctv03nq6cjmbkc4v1tc644fsi). The other columns in this list statement describe the properties of the cluster nodes.
STATUS: This is about the physical reachability of the node. If the node is up, it's Ready, otherwise Down
AVAILABILITY: This is the node availability. A node can be either Active (so participating to the cluster operations), Pause (in standby, suspended, not accepting tasks), or Drain (waiting to evacuate its tasks).
MANAGER STATUS: This is about the current status of manager. If a node is not a manager, this field will be empty. If a node is a manager, this field can be either Reachable (one of the managers presents to guarantee high availability) or Leader (the host leading all operations).
Nodes operations
The docker node command comes with some possible options.
Demotion and promotion
Promotion is possible for worker nodes (transforming them into managers), while demotion is possible for manager nodes (transforming them into workers).
Always keep in mind the table to guarantee high availability when managing the number of managers and workers (odd number, more than or equal to 3).
Use the following syntax to promote worker0 and worker1 to managers:
There is nothing magic behind the curtain. It is just that Swarm attempts to change the node role, with an on-the-fly instruction.
Demote is the same (docker node demote worker1). But be careful to not demote the node you're working from, otherwise you'll get locked out.
What happens if you try to demote a Leader manager? In this case, the RAFT algorithm will start an election and a new leader will be selected among the Active managers.
Tagging nodes
You must have noticed, in the preceding screenshot, that worker9 is in Drain availability. This means that the node is in the process of evacuating its tasks (if any), which will be rescheduled somewhere else on the cluster.
You can change the availability of a node by updating its status using the docker node update command:
The --availability option can take either active, pause, or drain. Here we just restored worker9 to the active state.
Active: This means that the node is running and ready to accept tasks
pause: This means that the node is running, but not accepting tasks
drain: This means that the node is running and not accepting tasks, it is currently draining its tasks, that are getting rescheduled somewhere else
Another powerful update argument is about labels. There are --label-add and --label-rm that respectively allow us to add labels to Swarm nodes.
Docker Swarm labels do not affect the Engine labels. It's possible to specify labels when starting the Docker Engine (dockerd [...] --label "staging" --label "dev" [...]). But Swarm has no power to edit/change them. The labels we see here only affect the Swarm behavior.
Labels are useful to categorize nodes. When you start services, you can then filter and decide where to physically spawn containers, using labels. For instance, if you want to dedicate a bunch of nodes with SSD to host MySQL, you can actually do this:
Later, when you will start a service with some replica factor, say 3, you'll be sure that it will start MySQL containers exactly on worker1, worker2, and worker3, if you filter by node.type:
In this article, we went through the typical Swarm administration procedures and options. After showing how to add managers and workers to the cluster, we explained in detail how to update cluster and node properties, how to check the Swarm health, and we encountered Shipyard as a UI. After this focus on infrastructure, now it's time to use our Swarms.

 United States
 Great Britain
 India
India
 Germany
 France
 Canada
 Russia
 Spain
Spain
 Brazil
 Australia
 Singapore
 Canary Islands
 Hungary
 Ukraine
 Luxembourg
 Estonia
 Lithuania
 South Korea
 Turkey
 Switzerland
 Colombia
 Taiwan
 Chile
Chile
 Norway
 Ecuador
 Indonesia
 New Zealand
 Cyprus
 Denmark
 Finland
 Poland
 Malta
Malta
 Czechia
 Austria
 Sweden
 Italy
Italy
 Egypt
Egypt
 Belgium
 Portugal
 Slovenia
 Ireland
 Romania
 Greece
 Argentina
 Netherlands
 Bulgaria
 Latvia
 South Africa
 Malaysia
 Japan
Japan
 Slovakia
 Philippines
 Mexico
 Thailand