OpenStack Ceilometer is a useful tool for monitoring your instances. It includes built-in monitoring for basic instance measures like CPU utilization and interface utilization. It includes alarm evaluation and notification infrastructure that works with the Heat orchestration engine’s AutoScalingGroups to enable automatic scaling of services.
This all works nicely right out-of-the-box when your measures are already built into Ceilometer. But what if you want to scale on some other criteria? For example, at Infoblox we provide a virtual instance that is serving DNS, and we make the DNS queries/second rate available via SNMP. You may want to provide similar, application-level metrics for other applications – for example, you may want to poll a web application for internal metrics via HTTP.
In this blog post, I will show you how to add your own meter in Ceilometer. Let’s start with getting an understanding of the components involved in a meter, and how they interact.
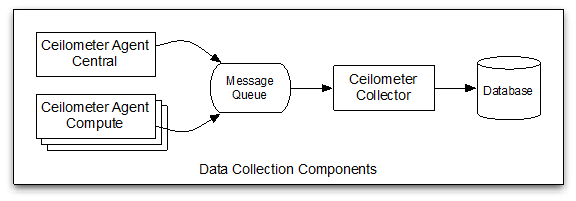
The most basic version of the data collection service in Ceilometer consists of agents, a collector service, a message queue, and a database. Typically there is a central agent that runs on the controller, and a compute agent that runs on each compute node. The agents gather the data, and publish it to the message queue. The collector receives this data and stores it into the database.
Periodically, the agent attempts to collect each meter. The frequency is controlled by the /etc/ceilometer/pipeline.yaml file, and can be configured on a per meter basis. If a specific meter is not configured, it will use the global interval configured in pipeline.yaml, which by default is 10 minutes.
To add a new meter, we will add a package that plugs into one of the agents. Let’s pick the compute agent, which runs locally on each compute node. We will build a Python package that can be installed on each compute node using pip. After installing this package, you simply restart the Ceilometer compute agent, and you will start to see the new meter appear in the database.
For reference, you can take a look at https://github.com/infobloxopen/ceilometer-infoblox. This is a package that installs a number of custom, SNMP-based meters for Infoblox virtual appliances (which run the NIOS operating system, which you will see references to in class names below).
The package will deliver three basic classes: a discovery class, an inspector, and a pollster. In Ceilometer terminology, “discovery” refers to the process by which the agent identifies the resources to poll, and then each “pollster” will utilize the “inspector” to generate “samples” for those resources.
When the agent initiates a polling cycle, it looks through all pollster classes defined for that agent. When you define a new meter that uses a new class for polling, you specify that meter class in your [entry_points] section of the setup.cfg:
Then, it will directly use an inspector class that was delivered with the package.
You can base your discovery, inspector, and pollster classes on those already defined as part of the core Ceilometer project. In the case of the ceilometer-infoblox code, the discovery class is based on the core instance discovery code in Ceilometer, as we see in discovery.py:
Unlock access to the largest independent learning library in Tech for FREE!
Get unlimited access to 7500+ expert-authored eBooks and video courses covering every tech area you can think of.
Renews at $19.99/month. Cancel anytime
class NIOSDiscovery(discovery.InstanceDiscovery):
def __init__(self):
super(NIOSDiscovery, self).__init__()
The InstanceDiscovery class will use the Nova API to query for all instances defined on this compute node. This makes things very simple, because we are interested in polling the subset of those instances that are Infoblox virtual appliances. In this case, we identify those via a metadata tag. During the discovery process we loop through all the instances, rejecting those without the tag:
def discover(self, manager, param=None):
instances = super(NIOSDiscovery, self).discover(manager, param)
username = cfg.CONF['infoblox'].snmp_community_or_username
password = cfg.CONF['infoblox'].snmp_password
port = cfg.CONF['infoblox'].snmp_port
metadata_name = cfg.CONF['infoblox'].metadata_name
resources = []
for instance in instances:
try:
metadata_value = instance.metadata.get(metadata_name, None)
if metadata_value is None:
LOG.debug("Skipping instance %s; not tagged with '%s' "
"metadata tag." % (instance.id, metadata_name))
continue
This code first calls the superclass to get all the Nova instances on this host, and then pulls in some necessary configuration data. The meat of the method starts with the loop through the instances; it rejects those that are not appropriately tagged. In the end, the discover method is expected to return an array of dictionary objects, containing the resources to poll, all information needed to poll them, and any metadata that should be included in the sample.
If you follow along in the code, you will see another issue that needs to be dealt with in this case. Since we are polling SNMP from the instances, we need to be able to access the IP address of the instance via UDP. But the compute agent is running in the network namespace for the host, not for the instances. This means we need a floating IP to poll the instance; the code in the _instance_ip method figures out which IP to use in the polling.
This will likely be important for any application-based meter, which will face a similar problem, even if you are not using SNMP. For example, if you use an HTTP method to gather data about the internal performance of a web application, you will still need to directly access the IP of the instance. If a floating IP is out-of-the-question, the polling agent would have to utilize the appropriate namespace; this is possible but much more complex.
Ok, let’s review the process and see where we are. First, the agent looks at the installed pollster list. It finds our pollster, and calls the discovery process. This produces a list of resources. The next step is to use those resources to generate samples, using the get_samples method of the pollster.
This method will loop through the resource list provided by the discover method, calling the inspector for each of those resources, resulting in one or more samples. In the SNMP case, we inherit most of the functionality from the parent class, ceilometer.hardware.plugin.HardwarePollster. The get_samples method in that class handles calling the inspector and then calls a generate_samples method to convert the data returned by the inspector into a Sample object, which in turn calls generate_one_sample. This is pretty typical through the Ceilometer code, and makes it easy to override and customize the behavior - we simply needed to override the generate_one_sample method.
The inspector class in our case was also largely provided by the existing Ceilometer code. We simply subclass that, and define the specific SNMP OIDs to poll, and make sure that the _get_inspector call of the pollster returns our custom inspector. If you are using another method like HTTP, you may have to define a truly new inspector.
So, that is all there is to it: define a discovery class, an inspector class, and a pollster class. Register those in a setup.cfg for your package, and it can be installed and start polling new data from your instances.
That data will show up via the normal Ceilometer API and CLI calls – for example, here is a call returning the queries/sec meter:
John Belamaric is a software and systems architect with nearly 20 years of software design and development experience, his current focus is on cloud network automation. He is a key architect of the Infoblox Cloud products, concentrating on OpenStack integration and development. He brings to this his experience as the lead architect for the Infoblox Network Automation product line, along with a wealth of networking, network management, software, and product design knowledge. He is a contributor to both the OpenStack Neutron and Designate projects. He lives in Bethesda, Maryland with his wife Robin and two children, Owen and Audrey.

 United States
 Great Britain
 India
India
 Germany
 France
 Canada
 Russia
 Spain
Spain
 Brazil
 Australia
 Singapore
 Canary Islands
 Hungary
 Ukraine
 Luxembourg
 Estonia
 Lithuania
 South Korea
 Turkey
 Switzerland
 Colombia
 Taiwan
 Chile
Chile
 Norway
 Ecuador
 Indonesia
 New Zealand
 Cyprus
 Denmark
 Finland
 Poland
 Malta
Malta
 Czechia
 Austria
 Sweden
 Italy
Italy
 Egypt
Egypt
 Belgium
 Portugal
 Slovenia
 Ireland
 Romania
 Greece
 Argentina
 Netherlands
 Bulgaria
 Latvia
 South Africa
 Malaysia
 Japan
Japan
 Slovakia
 Philippines
 Mexico
 Thailand